Replication Operations
Explore this Page
- About Replication Operations
- Replicating Virtual Disks
- Offline Initialization
- Changing Initialization Type
- Enabling and Disabling Test Mode
- Activating and Deactivating Replications
- Reversing Replication Direction for Failover/Failback
- Checkpoint Markers
- Pausing and Resuming Data Transfers
- Splitting Replications
- Setting Replication Buffer Locations
About Replication Operations
Virtual disk replication is the process of copying data from a "source" virtual disk on one DataCore Server to a "destination" virtual disk on another DataCore Server. Virtual disks are most often replicated from a local server to a remote server, but can also be replicated from a local server to another local server.
- Snapshots or rollbacks cannot be the source or destination of a replication.
- Virtual disks that are the source or destination of a replication cannot be resized.
- The virtual disk source and destination must have the same sector size.
| Recording and Database Information | |
|---|---|
|
Creates a relationship between two virtual disks on different DataCore Servers and causes the data on the source virtual disk to be asynchronously copied to the destination virtual disk. Ongoing changes to the data on the source virtual disk will continue to be sent to the destination virtual disk. See Replicating Virtual Disks in this topic for more information. |
|
|
Activate |
The data stream on the "activated" virtual disk is actively monitored and every write operation is stored in a dedicated buffer and subsequently transferred to the virtual disk in "standby" mode. See Activating and Deactivating Replications for more information. |
|
Deactivate |
Causes the replication direction to be reversed. The "active" virtual disk becomes the "standby" virtual disk and the "standby" virtual disk becomes "active" virtual disk. See Activating and Deactivating Replications for more information. |
|
Inserts a checkpoint marker into the data stream of the "active" virtual disk that is transferred to the "standby" virtual disk. When the checkpoint is received by the "standby" virtual disk, the checkpoint triggers actions to be performed on the "standby" server. See Checkpoint Markers in this topic for more information. |
|
|
Pause/resume |
Pause temporarily stops data transfers from the "active" virtual disk. Resume restarts the data transfers. See Pausing and resuming data transfers for more information. |
|
Terminates the replication configuration between two virtual disks. The source and destination virtual disks are not deleted. The data on the virtual disks are preserved as it existed at the time of split. See Splitting Replications in this topic for more information. |
|
Replication operations can be performed from:
- The Virtual Disk Details page>Replications tab and in the Ribbon>Virtual Disk Actions tab when the details page is open.
- The context menu in the DataCore Servers panel, Hosts panel, or Virtual Disks list.
(This topic provides instructions using one method.)
Replicating Virtual Disks
Before replicating disks, perform these steps:
- See Replication for an overview of the feature, initialization methods and best practices in creating and sizing the replication buffer. Prepare the volume for the replication buffer accordingly. The location of the buffer will be entered the first time a replication is created on the "source" DataCore Server.
- For remote replications, the local server group must be "partnered with the remote replication server group. Ensure both server groups have unique server group names. See Configuring Server Groups for Replication.
- Ensure there are available virtual disks of the same size at the destination location for bidirectional replications. For unidirectional replications, the virtual disk at the remote location may be larger, but not smaller than the local virtual disk.
- If selecting offline initialization, review Offline Initialization. An offline buffer folder must be created for each virtual disk prior to starting the initialization process.
- The size of either the source or destination virtual disks in a replication cannot be changed without having to split the replication. After changing the size, the replication will have to be re-established resulting in a re-initialization (data that already exists on the destination will not have to be transferred again).
- When creating a replication, the server for the destination virtual disk cannot be the inactive storage source in a 3-Way Virtual Disks since host access is disabled. See Dynamic Data Resiliency.
- When replicating within the same server group, the port to be used for transmission of replication data between DataCore Servers cannot be specified. As such, data will be sent via the IP address which resolves from the replication server host name (the default DNS name resolution) and this IP may be used for communications other than replication traffic.
- The initialization type chosen at replication creation time will be used for all subsequent initializations unless manually changed. For instance, after using offline initialization for the initial data transfer, the administrator may want to change the type to online. See Changing Initialization Type.
When a replication is created, front-end paths between the host and the destination virtual disk will be disabled until the replication direction is reversed or the replication is split
Do not stop the source server during initialization (online or offline) or the process will have to be restarted. In the case of offline initialization, if the source server is restarted or stopped before the destination has completed the initialization process, a new full initialization will be required.
To replicate a virtual disk:
- Open the Virtual Disk Details page for the source virtual disk to replicate.
- In the Ribbon>Virtual Disk Actions tab, click Create Replication to open the Create Replication dialog.
This operation can also be initiated from the panels and lists using the context menu
- In the Local Virtual Disk area:
- In the DataCore Server box, select the server to use to transmit data changes occurring on the source virtual disk. Data written to the source virtual disk will be asynchronously mirrored to the destination.
- If the replication buffer is not assigned on the DataCore Server indicated above, a text box will appear to enter the location of the buffer. In the Replication Buffer box enter the full path to the location of the buffer and click Apply. If a folder name is included in the path and it does not exist, it will be created.
Valid path format includes drive letter and full path to buffer. For instance, if the buffer is the root of G:, then enter G:\, or if the buffer is located in a folder named Replication Buffer on G:\, then enter G:\Replication Buffer.
- In the Partner Virtual Disk area, select the following destination parameters:
- In Replication group, select the server group where the data will be replicated.
- In DataCore Server, choose the server which will receive the data.
- In Virtual disk, choose the virtual disk in which the data will be replicated. Only virtual disks of compatible subtypes will be included in the list. For example, a standard virtual disk cannot be replicated to a VVOL virtual disk.
- Only select the duplicate disk identifier check box if both local and partner virtual disks will be served to hosts requiring the same SCSI inquiry ID (virtual product information). For instance, this is required for ESXi clusters.
You cannot use the duplicate disk identifier feature if the source and destination vdisks for the replication are in the same group. It will fail with the error "Cannot duplicate SCSI device ID for virtual disks "vdisk1" and "vdisk2" because they belong to one and the same region."
- Select the Offline initialization check box if necessary; otherwise the initialization process will be online.
Offline initialization requires an existing folder location. The source virtual disk data will be copied to the folder.
- Click Create. A confirmation message will appear, read the warning. Select the check box and click Yes to continue with the operation.
- After the replication is created, the Create Replication page closes.
If initialization is online, data on the source and destination will be checked for consistency and then source data that does not already exist on the destination will be transferred during initialization. The replication status should be Active and the transfer status Healthy. Progress for the consistency check and initialization can be monitored on the Virtual Disk Details page>Replication tab.

- For offline initialization continue to the next section Offline Initialization.
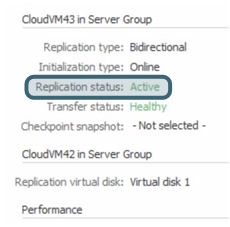
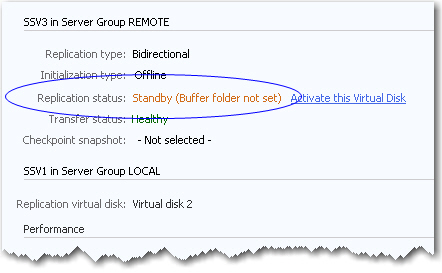
Detailed replication information can be viewed in the Virtual Disk Details page>Replication Tab. See Replication Status for replication and transfer status descriptions.
Offline Initialization
Offline initialization is a manual process, but can save a significant amount of time. Offline initialization could be a good option if a large amount of data needs to be initialized or if data transfer capacity is limited. (See Replication for information on online initialization.)
An overview of the process: The source virtual disk data is automatically copied to a pre-existing folder location (removable drive or local folder). When all data has been copied to the offline replication buffer, prepare the data to be transported and deliver the data to the destination using a shipping or courier service. When the data has arrived at the destination, copy the data to the offline replication buffer on the destination server. The data will be automatically copied from the offline buffer folder to the destination virtual disk.
- Before you begin, create an offline buffer folder for each source virtual disk. Use a different offline buffer folder for each virtual disk. The folder must be empty. Name the folder so that it identifies the virtual disk.
- Use a new, unused virtual disk for the destination.
At the source site:
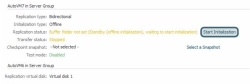
- On the Virtual Disk Details page>Replication tab for the source virtual disk, click Start initialization to begin the process.
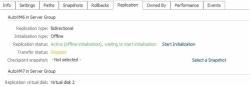
- On the Start offline Initialization page, enter the complete and valid path to the offline buffer folder where the virtual disk data should be copied.
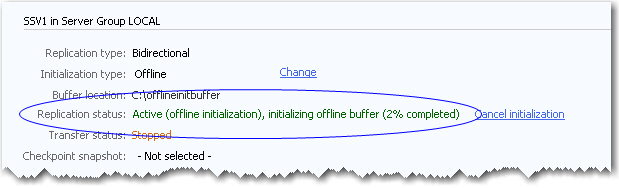
- Click Start offline initialization. The replication will show that the replication is active and the offline buffer is initializing. The percentage complete will be displayed.

During this process, significant I/O traffic from the host may delay completion.
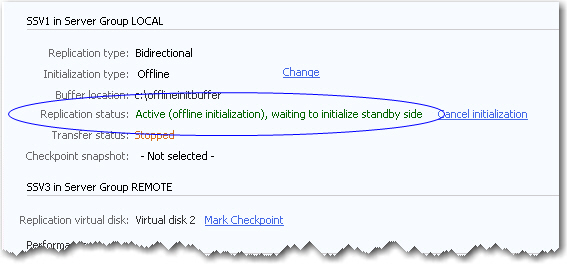
- When all data has been copied the offline buffer initialization is complete. The transfer status will be stopped. The replication will be active, but waiting to initialize the standby (destination) side.
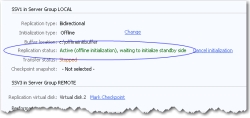
Do not disconnect the media containing the offline buffer folder until the status has changed to Active (offline initialization), waiting to initialize standby side.
- Prepare the data for transport and send the media containing the virtual disk data to the destination site.

At the destination site:
- When the data is received at the destination, add the removable drive or copy all data in the existing folders to (or accessible to) the destination server.
- In the DataCore Management Console, open the Virtual Disk Details page>Replication tab for the destination virtual disk and click Start initialization to begin the process.
- On the Start offline Initialization page, enter the complete and valid path to the location of the virtual disk data.
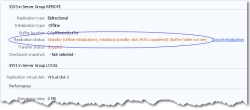
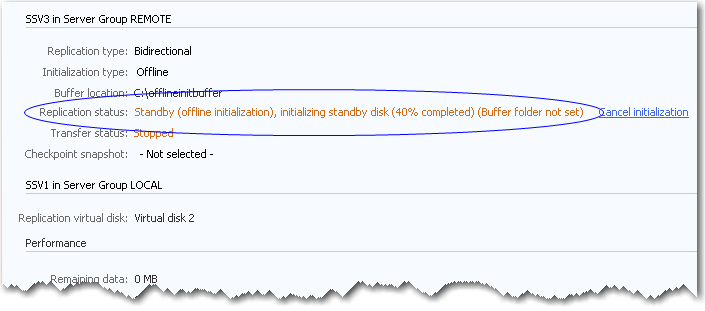
- Click Start offline initialization. The replication will show that the replication is in standby mode and the standby disk is initializing.
- When the offline initialization is complete, the replication will remain in standby mode. The transfer status will go healthy and regular asynchronous data transfers from the source will begin.

All information (including buffer size, time lag, and transfer rate) for the replication is displayed on the Replication tab, see Virtual Disk Details and List for more information. Also see Replication Status.

Canceling Offline Initialization
The offline initialization can be canceled.
- On the Virtual Disk Details page>Replication tab for the virtual disk being initialized, click Cancel initialization. (Next to the Replication status.)
Changing Initialization Type
The initialization type for a virtual disk can be changed.
- Open the Virtual Disk Details page for the virtual disk.
- In the Ribbon>Virtual Disk Actions tab, click Initialization type and select the initialization type.
- On the confirmation message, click Yes to continue.
Enabling and Disabling Test Mode
Test mode is enabled per standby virtual disk. Test mode temporarily activates the standby virtual disk which enables all host paths on the standby side. In test mode, users can ensure that paths are correctly configured and hosts have read/write access to the virtual disk. Data changes made to the standby virtual disk while in test mode are temporary and will be discarded after test mode is exited.
- The test mode process and exiting test mode can be a lengthy process and may affect performance. While exiting test mode, replication transfers will be temporarily disabled.
- Test mode requires storage allocation overhead, ensure there is ample storage space in the pool from which the standby virtual disk was created.
- Certain replication commands are not available in test mode such as changing the initialization type and sending checkpoint markers.
- Do not enable test mode during a disaster. Data changes made during test mode are temporary.
- If a disaster should occur while in test mode, exit test mode and activate the standby virtual disk.
- If an unexpected machine shutdown or pool failure occurs during test mode, a full re-initialization of the replication is required to synchronize the data.
- Test mode is not supported if the standby virtual disk is a dual virtual disk.
To enable test mode:
- Open the Virtual Disk Details page for the standby virtual disk.
- In the Ribbon>Virtual Disk Actions tab, click Enter Test Mode.
- In the confirmation message, click Yes to continue.
The replication status will temporarily reflect Standby (off-line) while test mode is being activated. Test mode in the Replication tab will change from Disabled to Active. The icon for the virtual disk in the panels will change from grey (paths disabled) to the standard icon reflecting a healthy virtual disk. The standby virtual disk should be read/write accessible on the host.
Data on the standby and active sides of the virtual disk may differ due to the remaining replication data (see Remaining Data under Performance in the Replication tab).
To disable test mode:
- Open the Virtual Disk Details page for the standby virtual disk.
- In the Ribbon>Virtual Disk Actions tab, click Exit Test Mode.
- In the confirmation message, click Yes to continue.
The replication status will temporarily reflect Standby (off-line) while test mode is being exited. Test mode in the Replication tab will change from Active to Disabled. The icon virtual disk icon in the panels will change from healthy to grey (paths disabled).
Activating and Deactivating Replications
Either activating or deactivating a replication causes the current replication direction to be reversed. A virtual disk in Active status can be deactivated and a virtual disk in Standby status can be activated. When either operation is performed, the "active" virtual disk becomes the "standby" virtual disk and the "standby" virtual disk becomes the "active" virtual disk. Front-end paths to the host are enabled on the new "active" virtual disk in order to receive write operations and the front-end paths to the host are disabled on the new "standby" virtual disk to prevent write operations. Also see Reversing Replication Direction for Failover/ for the correct process to follow for the situation.
Activating or deactivating a replication can be performed from either the active or standby side of a replication.
Before performing either operation, I/O must be stopped on the active virtual disk. This can be accomplished by performing a clean shut down on the host. The active virtual disk will be deactivated after files in the buffer have transferred. This process can take a considerable amount of time, depending on the amount of files to transfer. Also, ensure that the virtual disk that is being activated, has a replication buffer assigned.
To activate or deactivate a replication:
- Open the Virtual Disk Details page for either the source or destination virtual disk, perform one of the steps below. (Do not perform both.)
- On the source virtual disk with Active status: In the Ribbon>Virtual Disk Actions tab, click Deactivate This Side.
- On the destination virtual disk with Standby status: In the Ribbon>Virtual Disk Actions tab, click Activate This Side.
- A confirmation message will appear. Click Yes to continue.
Canceling Deactivation
If a virtual disk is deactivated in error, while the virtual disk is in the process of Deactivating (which is a transitional state, the deactivation operation can be canceled.
To cancel the deactivate command:
- Open the Virtual Disk Details page and in the Ribbon>Virtual Disk Actions tab, click Cancel Deactivation.
Reversing Replication Direction for Failover/Failback
Replication can be reversed if licensed for bidirectional replication.
When a controlled or emergency failover is necessary, the roles of the source (active) and destination (standby) virtual disks must be swapped in order to reverse the direction of the replication. This can be accomplished by either activating the standby side or deactivating the active side of a replication. When replication direction is reversed, the paths from the host to the virtual disk being deactivated will be disabled and the paths from the host to the virtual disk being activated will be enabled. When the process is complete, paths to the replication virtual disks at the failover site will be active and the virtual disks are in read/write mode. Data changes made by the host at the failover site are added to the replication buffer on the DataCore Server at the failover site.
When the production site is functional again, the virtual disks at the production site can be activated again (failback). Data changes will be transferred from the replication buffer on the DataCore Server at the failover site to the DataCore Server at the production site.
The procedures for a controlled failover and an emergency failover differ slightly; follow the correct instructions depending on the situation.
Failover/Failback for a Controlled Event
Before reversing replication direction, I/O must be stopped on the active virtual disk. This can be accomplished by performing a clean shut down on the host. The active virtual disk will be deactivated after files in the buffer have transferred. This process can take a considerable amount of time, depending on the amount of files to transfer. Also, ensure that the virtual disk that is being activated, has a replication buffer assigned.
This operation can be performed from either the source or destination.
- Open the Virtual Disk Details page for either the source or destination virtual disk, perform one of the steps below. (Do not perform both.)
- On the source virtual disk with Active status, in the Ribbon>Virtual Disk Actions tab, click Deactivate This Side.
- On the destination virtual disk with Standby status, in the Ribbon>Virtual Disk Actions tab, click Activate This Side.
Either of these actions will cause the source virtual disk to go into the Deactivating state and the destination virtual disk will go into Activating state while the buffer files on the source are being transferred to the destination. This process can take a considerable amount of time, depending on the amount of files to transfer. The deactivation operation can be cancelled while a virtual disk is in Deactivating state by clicking Cancel Deactivation on the Ribbon>Virtual Disk Actions tab.
- Click Yes on the confirmation message to continue.
- Once the buffer is empty on the source server, the source virtual disk will go into the Standby state and become the new destination of the replication and paths to the virtual disk will be disabled. At the same time, the destination virtual disk will go into the Active state and become the new source of the replication and paths to the virtual disk will be enabled. Read and write operations to the host at the failover site will be processed on the virtual disk at the failover site and replicated to the production site.
- To failback to the production site, activate the virtual disks at the production site.
Failover/Failback for an Emergency Event
This procedure consists of two parts: (1) failing over to the failover site and (2) failing back to the production site when the site is functional again.
Failing Over
Since the DataCore Server at the production site is unavailable, operations will be performed from the destination server at the failover site. The destination virtual disk is currently in Standby state.
- Open the Virtual Disk Details page for the destination virtual disk in Standby state, and in the Ribbon>Virtual Disk Actions tab, click Split Replication to remove the replication relationship between the source and destination virtual disks.
- Click Yes on the confirmation message to confirm the split.
- When the split is complete, the virtual disk is now a standard virtual disk and not involved in a replication. The virtual disk can be served to a host and used from the failover site.
Failing Back
In order to failback, a replication buffer must be assigned on the DataCore Server at the failover site.
- When the production site is functional, on the DataCore Server at the production site, split the original replication. Confirm the operation to continue.
- Establish the replication going from the failover site to the production site.
- Allow the replication to initialize (synchronize).
- After the virtual disks are initialized, activate the virtual disks at the production site.
Checkpoint Markers
Checkpoint markers can be used to update existing snapshots on the destination. Checkpoints can also be used as triggers and actions for configured tasks. When the checkpoint is received at the destination, the selected snapshot will be updated, or the appropriate triggers/actions will be acted upon. The snapshot to be updated must exist and should be selected for the destination virtual disk on the destination server.
Since the checkpoint is a marker in a data transmission and latency does occur, the action will be delayed in time.
- Checkpoints should always be marked (sent) when virtual disks are healthy and the replication transfer status is Healthy. Data on the source virtual disk should be in a known good state. The virtual disk must be in the Active replication state.
- If a checkpoint is sent when a mirrored virtual disk status is in Redundancy Failed state and the destination side is up-to-date and the replication is Healthy, then the marker should work as expected; but if the destination side is not up-to-date, the snapshot image will not match the source image when the marker was sent.
- Do not send checkpoint markers while the virtual disk is in recovery; the snapshots may not be valid.
- Checkpoints cannot be sent if the buffer is full or missing.
- Checkpoints cannot be sent to a virtual disk group.
To select a snapshot to update on the destination server:
- The snapshot must be selected on the destination (standby) server. Open the Virtual Disk Details page>Replication tab for the virtual disk in standby status in the replication.
- In the Checkpoint snapshot field, click Select a Snapshot and select the snapshot in the drop-down list.
- Click Apply.
To mark a checkpoint:
- The checkpoint must be marked from the source server. Open the Virtual Disk Details page for the virtual disk used as the source of a replication.
- In the Ribbon>Virtual Disk Actions tab, click Mark Checkpoint. The operation will be logged in the Operations Panel and an event message is logged. The checkpoint will be inserted into the data stream and transferred to the standby virtual disk on the destination server.
Pausing and Resuming Data Transfers
Replications can use considerable network resources. If an occasion arises when it is necessary to free-up those resources in order to expedite a different process or activity, or if the network is experiencing problems, data transfers can be temporarily paused and resumed later. In the event of heavier than usual traffic on the network, data transfers can also be paused until traffic subsides then resumed. When a replication is paused, other replication operations cannot be performed on that replication.
To pause or resume data transfers:
- Open the Virtual Disk Details page for the source virtual disk in Active status.
- In the Ribbon>Virtual Disk Actions tab, click Pause Transfer or Resume Transfer.
- Click Yes on the confirmation message to continue.
Splitting Replications
The replication configuration between source and destination virtual disks can be split (removed). Data transfers must be active in order to split a replication. This operation can be performed from the source or destination.
When the split operation is invoked, an end-of-stream marker is inserted at the end of all files that currently exist in the buffer and the replication goes into Splitting state; therefore, all data files that existed in the buffer at the time that the split operation is invoked will be processed. When the marker is received at the destination, the split will be completed. This will leave both source and destination virtual disks in the same state as when the operation is invoked.
After the split replication operation is invoked, new data changes will continue to be added to the buffer, but when the marker is received at the destination, any files that were added after the command was initiated will be deleted from the buffer and will not be transferred to the destination virtual disk.
The splitting process can take a considerable amount of time. To stop replication immediately, the replication split can be forced.
Use caution when a virtual disk is using duplicate disk IDs and is involved in replication. If the replication is split, both virtual disks will have the same SCSI device ID. Under these circumstances, the SCSI device ID for one virtual disk may need to be changed in order to make it unique. See SCSI Standard Inquiry Data.
To split a replication configuration:
- Open the Virtual Disk Details page, and in the Ribbon>Virtual Disk Actions tab, click Split Replication.
- Click Yes on the confirmation message. The replication state will change to "splitting" until the operation is complete.
Forcing the Split Replication
The split replication can be forced under two different circumstances:
- The normal splitting process can take a considerable amount of time. The replication split can be forced to stop replicating immediately and perform the split. When a split replication is forced, replication stops immediately (new data files are not created) and all data that exists in the buffer is deleted immediately instead of transferring it to the destination. Forcing the split replication operation is useful when there are many files to be transferred and it is not important to leave the source and destination virtual disks in the same state as when the split replication operation is invoked.
- Forcing the split replication operation is necessary when the replication is in a state where the replication cannot be split gracefully; for example, when the replication is in initialization or the replication partner is unavailable. In these cases, the only option is to force the split. Forcing the split replication operation will leave the standby virtual disk in an unusable condition unless the split can be performed from both replication partners.
To force the split replication operation:
- Open the Virtual Disk Details page, and in the Ribbon>Virtual Disk Actions tab, click Split Replication.
- Follow either step according to the confirmation message received:
- If the replication is in initialization or the replication partner is unavailable and the split operation must be forced, you will receive this message:
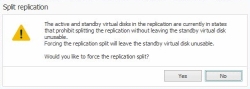
- Click Yes on the message to continue with the forced split replication operation.
- When the split operation is complete, repeat steps 1 and 2 on the replication partner. This will leave the standby virtual disk in a usable condition.
- If you receive a standard confirmation message:
- Click Yes to continue. The replication state will change to "splitting".
- In the Ribbon>Virtual Disk Actions tab, click Split Replication again.
- This time, you will receive a message that the split replication operation will be forced. Click Yes to continue with the operation.
- If the replication is in initialization or the replication partner is unavailable and the split operation must be forced, you will receive this message:

Canceling the Split Operation
The split operation can be canceled while the replication status is in the process of splitting.
To cancel the split operation:
- Open the Virtual Disk Details page for the virtual disk being split, in the Ribbon>Virtual Disk Actions tab, click Cancel Split.
Setting Replication Buffer Locations
A replication buffer is required for a DataCore Server to act as the source of a replication. The location of the replication buffer can be assigned or changed using the instructions below.
The path to the replication buffer can be changed on-the-fly, even if active replications exist. Any replication files existing in the original folder will be transferred and then the replication files will be deleted. The original folder will not be deleted.
The buffer location can also be changed during initialization after the consistency check completes. During the consistency check, the buffer location cannot be changed.
After changing the buffer location once, the location cannot be changed again if files are still being transferred from the original buffer location. Wait until all files have been transferred from the original buffer and then change the location.
Ensure that best practices are used when creating or changing buffers. Refer to the Best Practices Guide (FAQ 1348) on the DataCore Technical Support Portal for the recommended guidelines.
To assign or change replication buffer location:
- In the DataCore Server Details page>Settings tab, expand General Settings.
- In Replication buffer location, enter the path to the buffer. If the new folder does not exist, it will be created.
Valid path format includes drive letter and full path to buffer. For instance, if the buffer is the root of G:, then enter G:\ or if the buffer is located in a folder named Replication Buffer on G:\, then enter G:\Replication Buffer. If the replication buffer is on a network share, use the full Windows Universal Naming Convention path to the share location (for example \\10.10.10.10\myshare), not the mapped drive letter.
- Click Apply.
Learn More