Creating Virtual Disks
Explore this Page
- About Virtual Disk Creation
- Creating a Virtual Disk Using the Wizard
- Creating Virtual Disks From a Template
- Creating Virtual Disks Using Another as a Model
- Quickly Creating and Serving a Virtual Disk to a Host in the Same Operation
About Virtual Disk Creation
Virtual disks are a virtualization of physical disks managed by one or more DataCore Servers in a server group. Storage sources used to create virtual disks can originate from physical disks existing in pools or from pass-through physical disks. For more information, see Virtual Disks.
Virtual disks can be created in the following ways:
- Using a wizard where all properties, storage sources and settings are selected from a series of dialog pages. Single, dual, mirrored virtual disks, and 3-way mirrored virtual disks can be created using the wizard.
- Using a virtual disk template that creates virtual disks based on the predefined properties and settings selected in the template. Single, dual, mirrored, and 3-way mirrored virtual disks can be created using the wizard. See Creating Virtual Disk Templates.
- Using an existing virtual disk as a model to create a new virtual disk. The Create Another operation will duplicate properties and settings of the "source" virtual disk, such as type, storage sources, size, reserved space, storage profile, mirror paths, CDP settings (including history log size, and pool), preferred snapshot pool setting, and virtual disk group if assigned. Mirror paths can be auto-selected or duplicated from the source virtual disk. Data, snapshots, rollbacks, and front-end paths will not be duplicated. One or more new virtual disks can be created from the "source" at the same time. All types of virtual disks can be created using this operation.
- Using a dialog box to quickly create and serve a virtual disk directly to the host to which the operation is performed. This method allows for minimal selections and advanced redundancy levels to create all types of virtual disks. See Quickly Creating and Serving to Host.
- If you intend on creating virtual disks with the CDP enabled, see Continuous Data Protection (CDP) before creating the virtual disks.
- By default, Fibre Channel ports will always be used for mirroring. To use iSCSI ports for mirroring, when FC ports exist, the port must be intentionally selected. To use redundant iSCSI mirroring, select a single iSCSI mirror path and after the virtual disk is created, manually add additional iSCSI paths. See Modifying Paths.
- Use caution when creating virtual disks from pass-through disks as storage sources:
- In a mirrored virtual disk, data on the preferred side is mirrored to the alternate side. To ensure that a pass-through disk is not overwritten by the mirroring process, the pass-through disk should be the first storage source selected when the virtual disk is created. Another way to easily ensure that data is not overwritten is to create a single virtual disk using the pass-through disk then add a mirror later.
- When creating a virtual disk using a pass-through disk and the host has access to the disk, follow this process:
- Unmount the disk, flushing the cache.
- Create the virtual disk using the pass-through disk as the storage source.
- Serve the pass-through virtual disk to the host.
- A pass-through disk cannot have a virtual disk created from it in order to be included in the list of potential storage sources in the wizard.
- Ensure there is sufficient free space in pools to create virtual disks.
- Virtual disks can be created with sector sizes of 4 KB or 512 B. Virtual disks with a sector size of 4 KB can be created from pools with either a 4 KB or 512 B sector size, or pass-through disk with a sector size of 4 KB. Virtual disks with a 512 B sector size can be created from a pool with a sector size of 512 B or a pass-through disk of 512 B. Only storage sources with compatible sector sizes will be available for selection in the wizard. See 4 KB Sector Support for more information.
Creating a Virtual Disk Using the Wizard
To create a virtual disk using the wizard:
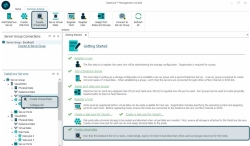
- In the Ribbon>Common Actions tab, click Create Virtual Disks to open the Create Virtual Disk wizard.
Alternatively, the wizard can be opened from:
- The Getting Started page by clicking the Create virtual disks link.
- In DataCore Servers panel, by right-clicking on Virtual Disks and selecting Create Virtual Disks from the context menu.
- The Virtual Disks List by clicking the Create Virtual Disks link. Open the list by clicking Virtual Disks from the Ribbon>Home tab.
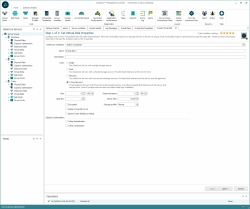
- In Step 1 of 3: Set Virtual Disk Properties:
The wizard will also allow you to select an Reference Template. Selecting a reference template will pre-populate the wizard with recommended values for the virtual disk. You will still have the option to modify these pre-selected values based on your requirements. For creating a Virtual Disk Template, see Virtual Disk Templates.
- Replace the default name with a meaningful name and provide a description, if desired.
If creating multiple virtual disks; default names will be assigned beginning with the name entered, each additional name will be incremented by 1. For instance, if the name entered is Vdisk, names will be Vdisk, Vdisk 1, Vdisk 2, and so on. (Virtual disks can be renamed at any time after they are created.)
- Specify the virtual disk type to create by clicking on the selection:
- A single virtual disk is created from one storage source from one DataCore Server.
- A dual virtual disk is created from a disk pool or pass-through disk that is shared by two DataCore Servers. When this option is selected, only shared storage sources are available for selection. See Shared Multi-port Array Support for more information.
- A mirrored virtual disk is created from two storage sources which are mirrored.
- The 3-way mirrored virtual disk is created from three storage sources which are mirrored. You can select 3-way disk option when you have 3 or more servers in your configuration.
If the system detects 3 or more servers, the 3-way virtual disk creation option will be the default choice, improving ease of use for users with larger server configurations.
- In Size, enter the virtual disk size. (The last size entered will be remembered in the wizard until the DataCore Management Console is closed.)
- The optional Reserved space field can be used to reserve space in the pool to be used exclusively for the virtual disk. The reserved space can be any amount up to the entire size of the virtual disk. (The last size entered will be remembered in the wizard until the DataCore Management Console is closed.)
The amount of reserved space must be free (not in reclamation) in the pool or the virtual disk will not be created. See Disk Pools.
- In Quantity, enter the number of virtual disks to create. More than one virtual disk can be created as long as they have the same configuration.
- In Sector size, select the sector size for the virtual disk.
- Select the Encrypted check box to encrypt the virtual disk. See Encryption.
- The default setting for the storage profile is Normal, select a different setting if required. (See Storage Profiles for more information.)
- Select the Assign ownership to me check box to assign exclusive ownership to the user account currently logged in and creating the virtual disks. This restricts all virtual disk operations on these virtual disks being created to only the account logged in and the Administrator account.
- Select Ignore Cyber Resiliency Rating checkbox to hide and ignore the Cyber Resiliency Rating that is displayed on the top right of the screen.
Disabling the Cyber Resiliency Mode at server group level hides the star rating and the Ignore Cyber Resiliency Rating checkbox for all virtual disks. See Cyber Resiliency Rating for more details.
- Under Capacity Optimization, select the Inline Deduplication and/or Inline Compression check boxes. See Inline Deduplication and Compression.
- Click Next.
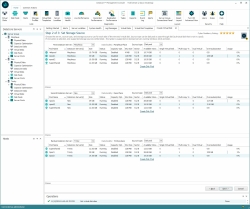
- In Step 2 of 3: Set Storage Source, select the server and storage sources to use.
- Mirrored virtual disks require storage sources from two DataCore Servers.
- Dual virtual disks require one storage source shared by two DataCore Servers.
- 3-way virtual disks require three different storage sources, each from a separate DataCore Server.
- In DataCore Server, select the server to use as a storage source. For example, select two servers that share a storage source for dual virtual disks.
When a mirrored virtual disk is served to a host that has the preferred server set to Auto Select, the DataCore Server that owns the first storage source selected in the wizard will act as the preferred server.
- In Source type, select one of the types:
- Disk pool
Select the pool from the list or click the link to create a disk pool on-the-fly and then select it in the list.
When creating a disk pool on-the-fly, before the virtual disk can be created, the available storage amount has to be equal to or exceed the SAU size.
- Pass-through disk
Select the pass-through disk from the list. If the virtual disk size selected is incorrect, it will be adjusted.
To protect existing data on the pass-through disk, select the pass-through disk as the first (top) storage source when creating virtual disks.
- Disk pool
- Click Next to continue.
- In DataCore Server, select the server to use as a storage source. For example, select two servers that share a storage source for dual virtual disks.
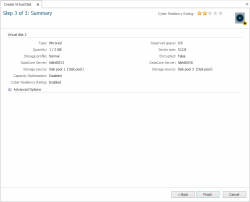
- In Step 3 of 3: Set Advanced Options, review the summary of the virtual disks for accuracy.
- Advanced Options for the virtual disk include settings for storage profile, sequential storage, CDP, and mirror paths. Expand Advanced Options and make changes if necessary.
Available options may differ depending on virtual disk type and configuration.
- Storage Profile:
- The default setting for the storage profile is Normal, select a different level if required. (See Storage Profiles for more information.)
- Sequential Storage:
- To enable this feature select the Sequential Storage / Random Write Accelerator Enabled check box. (See Sequential Storage for more information.)
- Continuous Data Protection area: (See Continuous Data Protection (CDP) for more information.)
- To enable this feature select the Continuous Data Protection Enabled check box.
- In DataCore Server, select the server on which the history log should reside.
- In Disk Pool, select the pool to use to create the history log.
- In Desired maximum history log size, set a desired value.
The history log will begin destaging the oldest data changes when the maximum history log size is encroached.
- Mirror Paths area:
Selections for mirror paths are not available when server group configurations use system managed mirroring.
- Select the mirror path mode:
- Redundant path provides two mirror paths going in each direction between DataCore Servers. Port paths are automatically selected and cannot be customized in the wizard. This setting requires each server to have two available FC or iSCSI ports with the mirror role enabled. Redundant paths will be selected by default and created if possible.
If this setting is selected and the port requirements are not met, redundant paths will not be created.
- Single path provides one initiator to target path going in each direction between DataCore Servers and the paths can be customized with this selection.
- When a specific initiator or target port is selected, only valid ports will be offered for the corresponding port in the path. By default, only ports that are connected are displayed; clear the Show only connected ports check box to include disconnected ports.
- Auto Select allows DataCore SANsymphony software to select the port at the time the virtual disk is created. (See Port Connections and Paths for automatic port selection guidelines.)
- Redundant path provides two mirror paths going in each direction between DataCore Servers. Port paths are automatically selected and cannot be customized in the wizard. This setting requires each server to have two available FC or iSCSI ports with the mirror role enabled. Redundant paths will be selected by default and created if possible.
- Select the mirror path mode:
- Storage Profile:
- Click Finish.
Virtual disks undergo intermediate virtual disk state and data status changes before the virtual disks go healthy and on-line. These changes are instantaneous and most often will not be noticed unless multiple virtual disks are created at the same time.
After the virtual disks are created:
- In DataCore Servers panel, the virtual disks created are listed under Virtual Disks. Mirrored virtual disks and dual virtual disks are displayed under both servers.
For 3-way mirrored, the virtual disk will appear on each of the three servers that are part of the configuration.
- A Virtual Disk Details page is created for each virtual disk.
- Virtual disks can be presented to hosts. See Serving Virtual Disks.
- Additional virtual disk features can be enabled:
Creating Virtual Disks From a Template
Templates can be used to create single, mirrored, dual and 3-way mirrored virtual disks. Virtual disks created from a template will adopt all properties and settings in the template. See Virtual Disk Templates for instructions in creating templates.
To create a virtual disk from a template:
- In the Home tab of the ribbon, click Virtual Disk Templates.
- In the list, right-click the template to use for the virtual disk and select Create Virtual Disk from the context menu.
- In the submenu:
- Enter the name of the virtual disk, if different than the prefix in the template.
- Enter the quantity of virtual disks to create. Up to 99 virtual disks may be created at a time.
- Click Create Virtual Disk.
-
Virtual disk templates that use three disk pools cannot refer to the same shared pool on different servers. This is because a shared pool cannot be used across multiple servers in the context of 3-way virtual disks.
-
If a Backup disk pool is specified, a second disk pool must also be defined. This ensures the proper distribution of data across multiple pools, maintaining the redundancy and resiliency expected from 3-way virtual disks.
Creating Virtual Disks Using Another as a Model
The Create Another feature creates new virtual disks based on the properties and settings of an existing virtual disk that has been created from disk pool storage sources. Virtual disks that have been created from pass-through disks
To create virtual disks:
- In the DataCore Servers panel or Virtual Disks list, right-click on the virtual disk to duplicate and select Create Another.
- In the form, keep or replace the default name and provide a description, if desired. If creating multiple virtual disks; default names will be assigned beginning with the name entered.
- Enter the quantity of virtual disks to create.
- A summary of the properties and settings of the virtual disks is displayed for review.
- In the Mirror Paths area, select the path mode: This setting is not available when system managed mirroring is enabled.
- The default path mode is auto select. Auto select allows DataCore SANsymphony software to select the ports. Redundant paths will be created if possible.
- Duplicate paths will create the same mirror paths used for the source virtual disk.
- Click Create.
Quickly Creating and Serving a Virtual Disk to a Host in the Same Operation
This operation includes creating a virtual disk on-the-fly and serving the virtual disk to a host in the same operation.
The virtual disk name, size, redundancy level, and storage profile can be selected. All other virtual disk settings must be applied manually after this operation completes.
- The redundancy level is the number of virtual disk copies to create from pools on different servers.
- Level 1 creates a single virtual disk (one-copy).
- Level 2 creates a mirrored virtual disk (default setting). Two servers in a server group are required to create two copies of a virtual disk.
- Level 3 creates a 3-Way Virtual Disks. Three servers in a server group are required to create three copies of a virtual disk. See Dynamic Data Resiliency for more information.
- Pools are automatically selected from each server needed to create the virtual disk. Pools with 512 B sector size are preferred over 4 K sector size. If multiple pools exist with matching sector sizes, the pool with the most available space is preferred.
- For virtual disks with redundancy levels 2 and 3, the mirror and front-end paths will be automatically selected and redundant paths are created, if possible.
- Host settings such as multipathing and preferred server will be respected. If the host is an ESXi server, the VMware path selection policy will be Round robin.
To create and serve a virtual disk:
-
In Hosts panel or Hosts list, right-click on the host or host group and select Create Virtual Disk.
(Alternatively, this operation can also be performed from the Ribbon>Host Actions tab when the Host Details page is active.)
- In the Name field, enter the virtual disk name.
- Enter the size of the virtual disk. The virtual disk must be a minimum size of 1 GB. Sizes can include a decimal, such as 100.5 GB.
- Enter the redundancy level for the virtual disk. (The default setting is two. The last entry will be remembered in the wizard when it is re-opened.)
- The default setting for the storage profile is Normal, select a different setting if required. (See Storage Profiles for more information.)
- Select the Encrypted check box to encrypt the virtual disk. See Encryption.
- Under Capacity Optimization, select the Inline Deduplication and/or Inline Compression check boxes. See Inline Deduplication and Compression.
- Click Create.
Learn More
