Virtual Disk Templates
Explore this Page
- About Templates
- Creating Templates
- Editing Templates
- Deleting Templates
- Viewing Template Details and List
About Templates
A virtual disk template is used to duplicate properties and settings in order to create virtual disks in a standardized fashion. The template contains all basic properties of a virtual disk, including storage sources to use, as well as settings for features and System Health thresholds. Templates can be used to create virtual disks that uniformly fulfill the requirements of applications they are intended to support.
Virtual disk templates are also used by the DataCore VASA Provider and DataCore Storage Management Provider in provisioning DataCore SANsymphony storage resources for virtual machines.
- Virtual disks created from a template are independent of that template.
- Editing a template will not effect existing virtual disks.
- The properties and settings of virtual disks created from a template can be changed after creation.
- Objects in DataCore SANsymphony (such as DataCore Servers, pools and storage profiles) may not be deleted if used in a virtual disk template; templates must be deleted or changed first. Pool names cannot be changed if used in a template.
- Templates in use by the DataCore VASA Provider are automatically set to read-only, prohibiting any changes to the template. Read-only templates can be viewed in the Templates List and the read-only designation will be indicated under the icon in the Virtual Disk Template details page.
- Templates do not currently support the creation of 3-Way Virtual Diskss, see Dynamic Data Resiliency for more information.
Creating Templates
Virtual disks created from a template will adopt all properties and settings in that template.
Templates are created with default values for virtual disk System Health thresholds. After templates are created, the thresholds, as well as other properties and settings, may be changed in the Virtual Disk Template Details page.
To create a virtual disk template:
- In the Home tab of the ribbon, click Virtual Disk Templates.
- In the Virtual Disk Template list, click Create Virtual Disk Template.
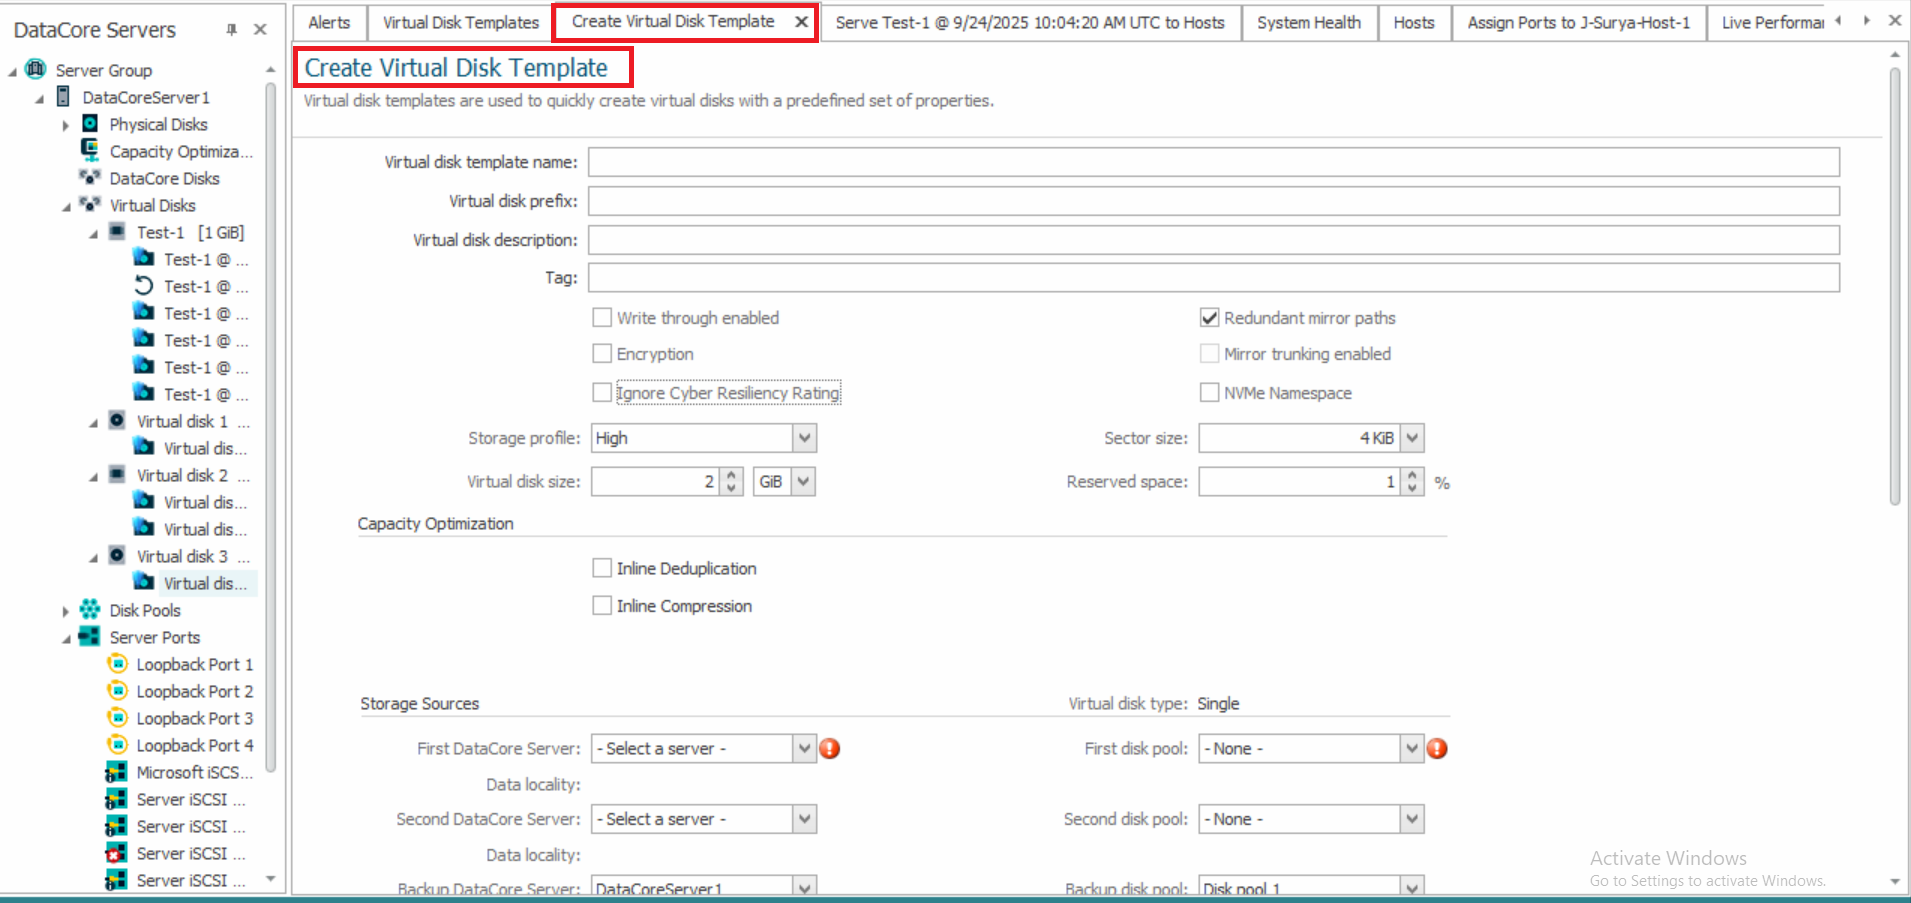
- In the Create Virtual Disk Template dialog box, enter or select the following:
- Name of the template.
- Virtual disk prefix - enter the base name of the virtual disks.
When creating multiple virtual disks; default names will be assigned beginning with the prefix entered and subsequent virtual disks will have a number appended to make the name unique in the server group. Numbers will be incremented by 1, skipping any names that already exist in the configuration. For instance, if the prefix entered is MirrorVdisk, names will be Mirror.
- Description of the virtual disks. This field is optional.
- A custom tag for the virtual disk template. This field is optional.
- Write through enabled - select the check box to put virtual disks in write-through mode. (Write operations are written directly to the back-end storage and then acknowledged.)
- Redundant mirror paths - select the check box to create redundant mirror paths for mirrored virtual disks. Two mirror paths going in each direction between DataCore Servers will be created. Port paths are automatically selected.
This setting requires each server to have two available FC or iSCSI ports with the mirror role enabled. (This setting is not available when system managed mirroring is enabled.)
- NVMe Namespace – Select this checkbox to enable NVMe support for the virtual disk. The next available Namespace Id (a unique number within the Server Group) will be automatically assigned to the virtual disk.
The NVMe Namespace option will be visible only when the NVMeoF Enabled checkbox is enabled in the Server Group. Refer to NVMeoF Specific for more information.
- Select the Encryption check box to encrypt the virtual disk. See Encryption.
Select Ignore Cyber Resiliency Rating checkbox to hide and ignore the Cyber Resiliency Rating.
- Storage profile - the default setting is Normal, select a different storage profile, if required. (See Storage Profiles for more information.)
- Sector size - select either 512 B or 4 KB for Advanced Format. (See 4 KB Sector Support for more information.)
- Virtual disk size - enter the size of the virtual disks.
- Reserved space - the optional Reserved space field can be used to reserve space in the pool to be used exclusively for the virtual disks. The value entered is a percentage of the total disk size.
For example if the virtual disk size is 100 GB and the reserved space is 50%, then 50 GB will be reserved in the pool for each virtual disk created from the template. Sufficient amounts of reserved space must be free (not in reclamation) in the pool in order to create the virtual disks. (See Disk Pools for more information on reserved space.)
- Under Capacity Optimization, select the Inline Deduplication and/or Inline Compression check boxes. See Inline Deduplication and Compression.
- Storage sources
- For single virtual disks, select the first DataCore Server and first disk pool.
- For mirrored virtual disks, select the first and second DataCore Servers and the first and second disk pools. Mirrored virtual disks require two different storage sources from two DataCore Servers.
- For dual virtual disks, select the first and second DataCore Servers. These servers must share the same pool. Select the same shared pool for the first and second disk pool. Dual virtual disks require one storage source shared by two DataCore Servers.
- For 3-way virtual disks, select the first, second, and third DataCore Servers, and their corresponding disk pools. 3-way virtual disks require three different storage sources, each from a separate DataCore Server. Each server must have its own disk pool, with the three disk pools being distinct. If using templates, the reference template should define the three pools and servers, or they can be manually specified during disk creation.
- Expand Advanced Options to include settings for additional virtual disk features, if required.
- Preferred Snapshot Pool - select the DataCore Server and disk pool to use as the preferred pool when creating snapshots. (See Snapshot Operations for more information.)
- Sequential Storage (Random Write Accelerator) - select the check box to enable this feature. (See Sequential Storage for more information.)
- Continuous Data Protection - select the check box to enable this feature. (See Continuous Data Protection
(CDP) for more information.)
- In DataCore Server, select the server on which the history log should reside.
- In Disk Pool, select the pool to use to create the history log.
- In Desired maximum history log size, set a desired value.
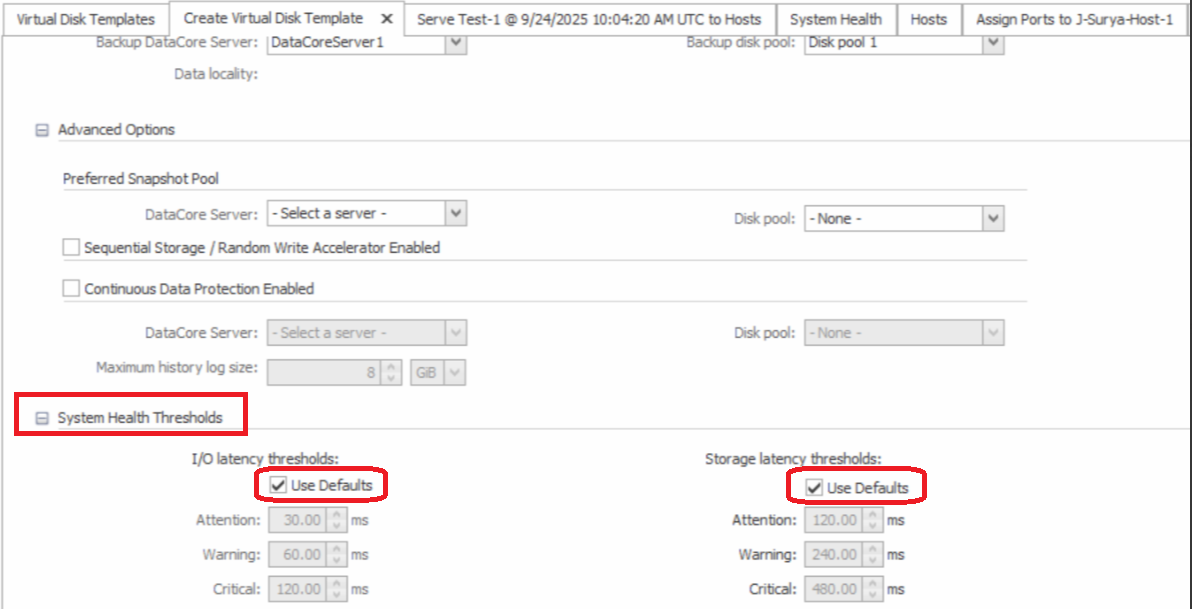
- System Health Thresholds- Expand the System Health Thresholds section to configure latency thresholds for the virtual disk.
- I/O Latency Thresholds – Set Attention, Warning, and Critical values (in milliseconds) for the front-end paths to the virtual disk. When latency on any front-end path exceeds a threshold, the corresponding alert is triggered.
- Storage Latency Thresholds – Set Attention, Warning, and Critical values (in milliseconds) for the back-end storage paths. Thresholds are calculated based on the maximum latency per operation sampled over a two-minute interval. An alert is triggered when values exceed the threshold more than once during the sample time.
- If you select the Use Defaults check box, the latency thresholds will inherit the default values defined in System Health > Default Thresholds. Refer to Global Default Thresholds section in System Health for more information.
- Click Create to complete the operation.
Editing Templates
Editing a template does not change the properties of existing virtual disks created from the template.
To edit a template:
- In the Home tab of the ribbon, click Virtual Disk Templates.
- In the list, double-click the template to edit.
Alternatively, right-click on the template and select View Details.
- In the Virtual Disk Template Details, click Edit in the upper-right corner.
- Make changes to the template.
- Click Apply.
Deleting Templates
Deleting a template removes the template from the configuration, but does not delete the virtual disks created from the template.
Templates in use by the DataCore VASA Provider are automatically set to read-only, prohibiting any changes to the template. Contact DataCore Technical Support for assistance in deleting a template associated with a VVOL.
To delete a template:
- In the Home tab of the ribbon, click Virtual Disk Templates.
- In the list, right-click the template to delete and select Delete from the context menu.
Viewing Template Details and List
To view a list of all templates in the configuration:
- In the Home tab of the ribbon, click Virtual Disk Templates to open the Virtual Disk Template list.
To view details of a virtual disk template:
- Double-click a template in the Virtual Disk Template list to open the Virtual Disk Template Details page.
Learn More