Backup and Restore Using DataCore Puls8 with Veeam Kasten
Explore this Page
- Overview
- Requirements
- Install Veeam Kasten K10
- Deploy an Application Using DataCore Puls8
- Perform Backup
- Simulate Application Loss
- Restore the Application from Backup
- Validate Application Functionality
- Benefits of Using DataCore Puls8 with Veeam Kasten
Overview
DataCore Puls8 integrates Veeam Kasten K10 to provide snapshot-based backup and restore capabilities for Kubernetes workloads that require application-aware data protection, scheduling, and off-cluster retention. The integration leverages Kubernetes CSI snapshots to protect Puls8-backed persistent volumes, with optional export of backup data to supported object storage locations. Veeam Kasten K10 operates alongside Puls8 to deliver policy-driven backup, restore, and recovery workflows through a centralized management interface.
This document describes how to configure and use Veeam Kasten with DataCore Puls8 to perform backup and restore operations. It covers installation, storage configuration, backup policy creation, restore workflows, and validation of restored applications.
- Backup and restore operations using Veeam Kasten are supported with DataCore Puls8 storages:
- Replicated PV Mayastor
- Local PV LVM (only thin-provisioned LVM volumes are supported)
- Local PV ZFS
- Local PV ZFS supports both filesystem and block mode exports. Refer to the Protecting Applications section in the Veeam Kasten documentation for block-mode export configuration.
Requirements
Before you begin, ensure the following requirements are met:
- A functional Kubernetes cluster with cluster-admin privileges
- Helm CLI installed and configured
- Prerequisites for DataCore Puls8 completed
- Prerequisites for Veeam Kasten K10 completed, including access to the Veeam Kasten keyring file
- Worker nodes with available storage devices for Replicated PV Mayastor
- Network access to required container registries
- DataCore Puls8 Helm chart installed on the cluster
- A VolumeSnapshotClass configured and annotated for Veeam Kasten, enabling snapshot-based backup and restore operations for Puls8-backed PersistentVolumes:
cat <<EOF | kubectl create -f -
kind: VolumeSnapshotClass
apiVersion: snapshot.storage.k8s.io/v1
metadata:
  name: csi-mayastor-snapshotclass
  annotations:
    k10.kasten.io/is-snapshot-class: "true"
driver: io.openebs.csi-mayastor
deletionPolicy: Delete
EOF
This example applies to Replicated PV Mayastor. Use the appropriate CSI driver when configuring snapshots for Local PV LVM or Local PV ZFS.
Refer to the CSI Snapshot Configuration in the Veeam Kasten documentation for more information.
Install Veeam Kasten K10
-
Add the Veeam Kasten Helm chart repository and update the local Helm index.
CopyAdd and Update the Veeam Kasten Helm Chart Repositoryhelm repo add kasten https://charts.kasten.io/
helm repo update -
Deploy Veeam Kasten K10 using Helm.
CopyInstall Veeam Kasten K10 using Helmhelm install k10 kasten/k10 --namespace=kasten-io --create-namespace --verify --keyring=/path/to/keyringfile --version <version>CopyExamplehelm install k10 kasten/k10 --namespace=kasten-io --create-namespace --verify --keyring=/kastentesting/RPM-KASTEN --version 8.0.11Download the key ring file as specified in the prerequisites and specify the path to the file using the
--keyringoption. Refer to the Installing on Kubernetes documentation for more information. -
Verify Veeam Kasten pod status.
CopySample OutputNAME READY STATUS RESTARTS AGE
aggregatedapis-svc-f4f9f7966-k9dtq 1/1 Running 0 4h1m
auth-svc-569685bf5f-dt9cd 1/1 Running 0 4h1m
catalog-svc-784fb8898c-6nvqh 2/2 Running 0 4h1m
controllermanager-svc-784c456997-2zrmh 1/1 Running 0 4h1m
crypto-svc-5bdd4b765f-tqvr6 4/4 Running 0 4h1m
dashboardbff-svc-688798bfc7-lcm29 2/2 Running 0 4h1m
executor-svc-5dc78f474f-6jq4t 1/1 Running 0 4h1m
executor-svc-5dc78f474f-fsk8c 1/1 Running 0 4h1m
executor-svc-5dc78f474f-n86z2 1/1 Running 0 4h1m
frontend-svc-97874b4f9-w8dh7 1/1 Running 0 4h1m
gateway-bbc9b4ff4-b55tt 1/1 Running 0 4h1m
jobs-svc-cf4f8d7fc-zvzq2 1/1 Running 0 4h1m
kanister-svc-65c75d5d8b-xdzb5 1/1 Running 0 4h1m
logging-svc-d97bfdbb-6bpc5 1/1 Running 0 4h1m
metering-svc-5dfc6c9f85-ph2c9 1/1 Running 0 4h1m
prometheus-server-5f8bf7cb5d-cgjqw 2/2 Running 0 4h1m
state-svc-7c687d9f4f-q52l6 2/2 Running 0 4h1m
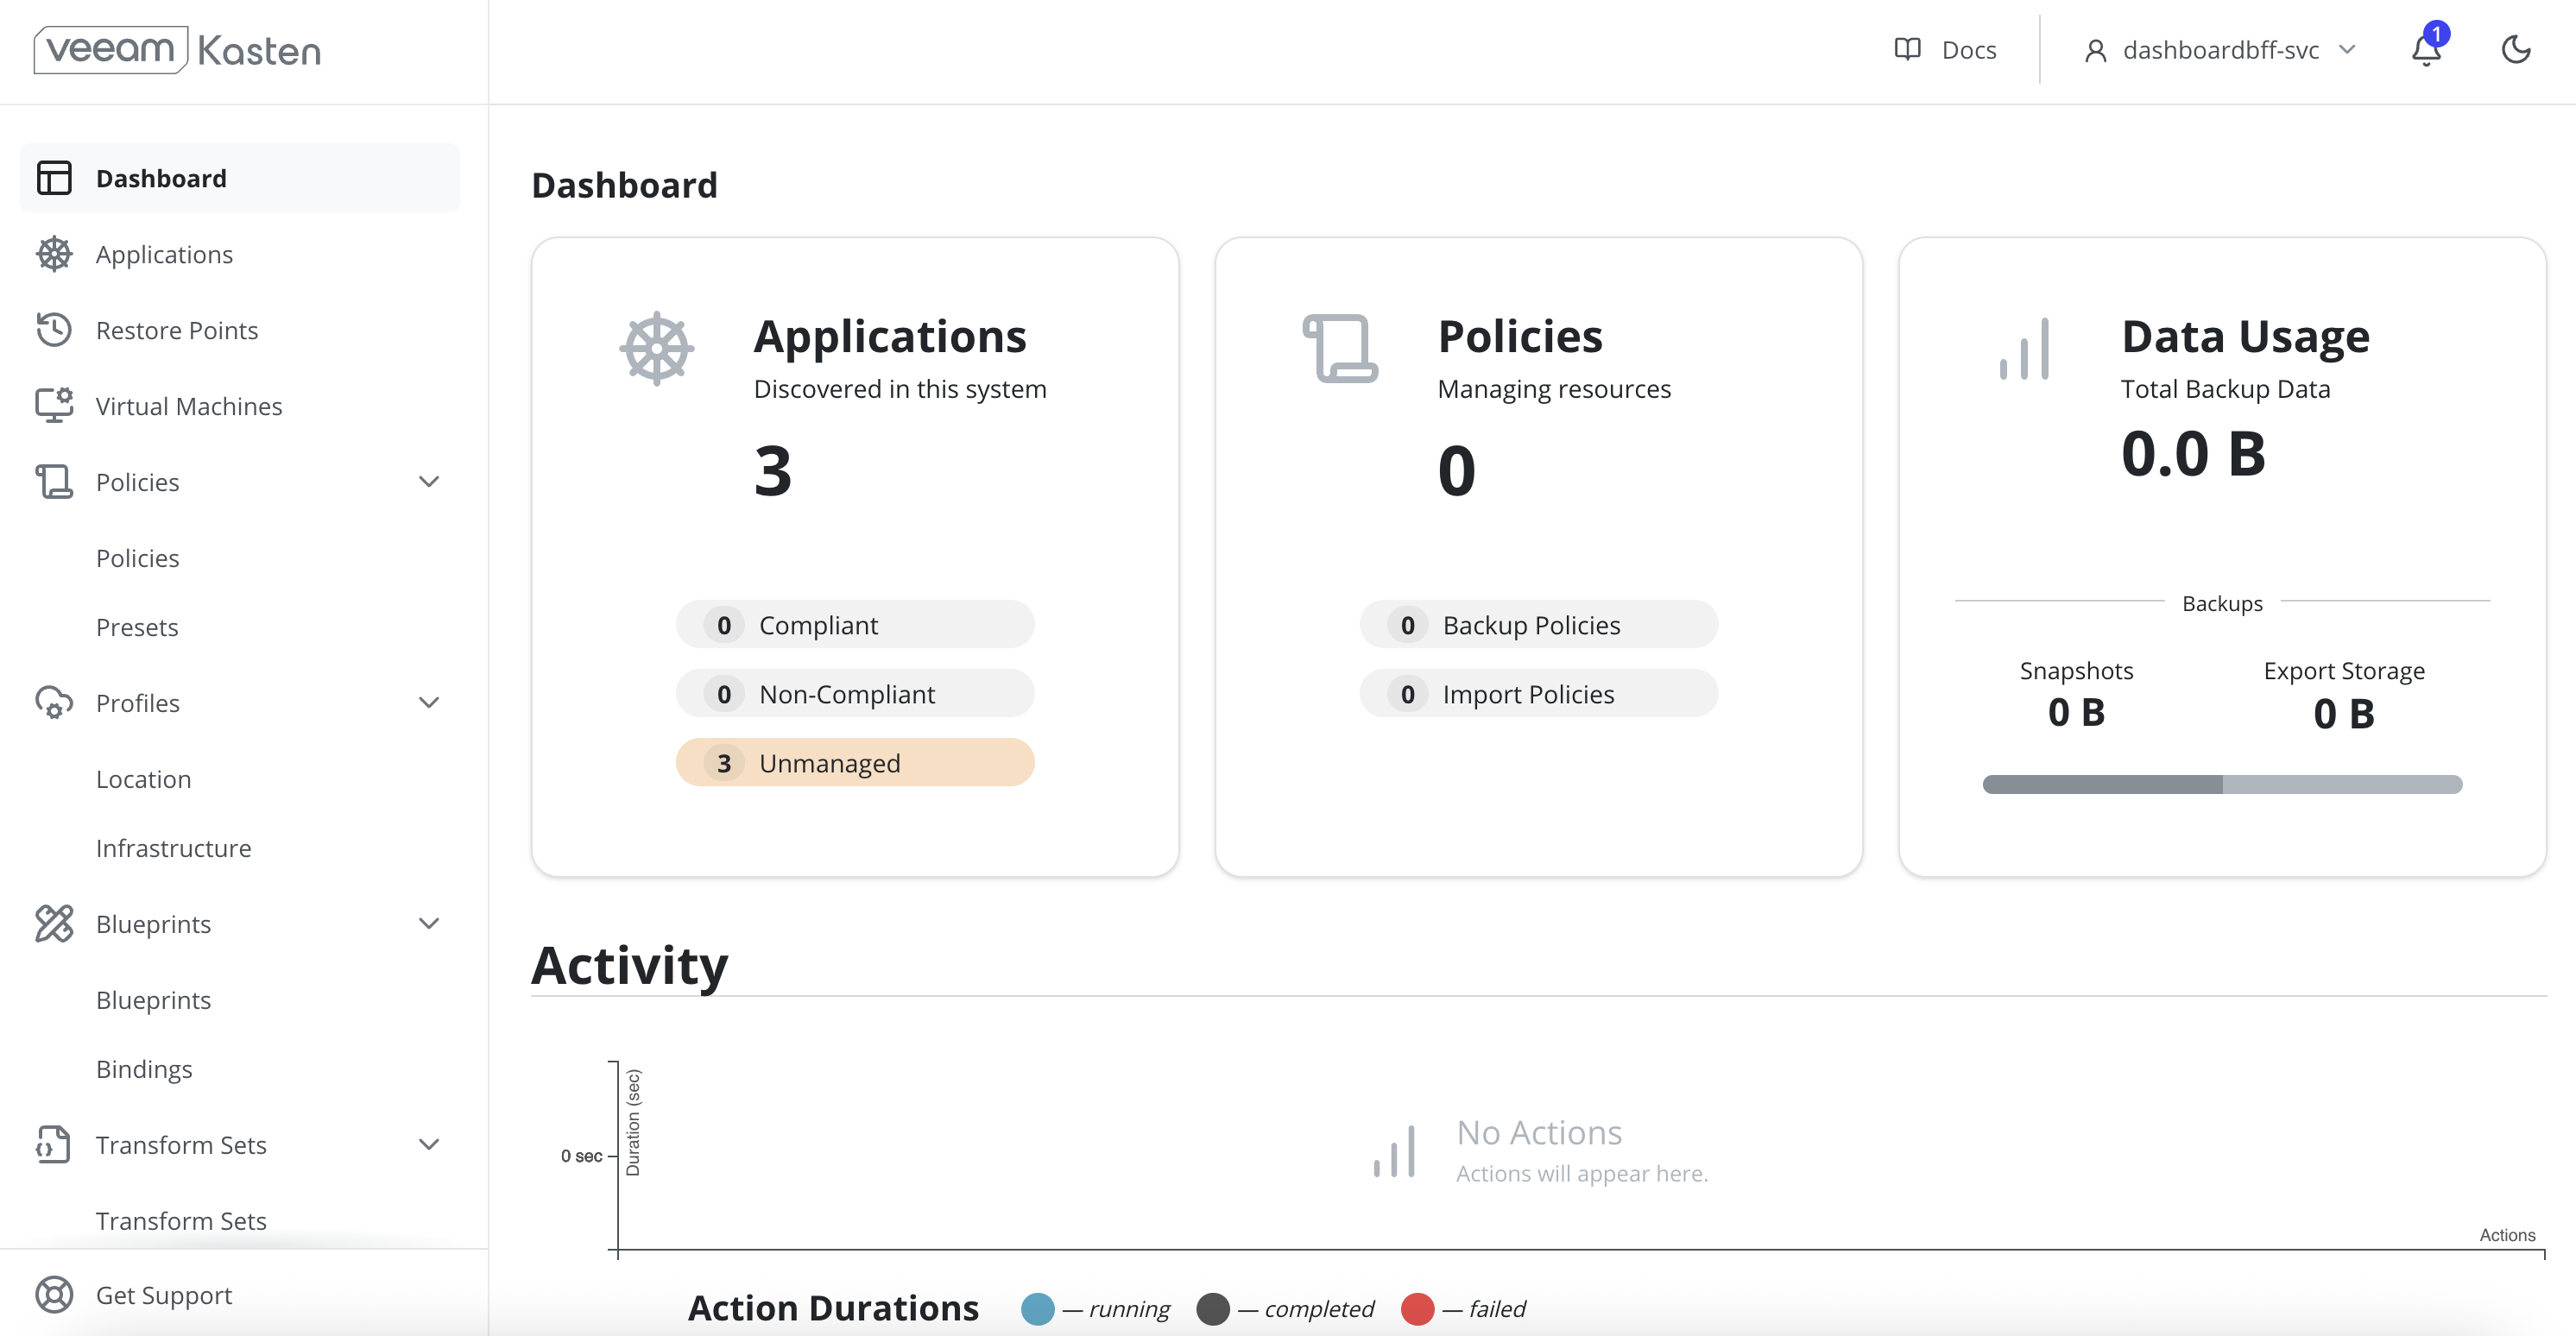
Access the Veeam Kasten Dashboard
-
Port-forward the Veeam Kasten gateway service to access the dashboard.
CopyPort-Forward the Kasten Gateway Servicekubectl --namespace kasten-io port-forward service/gateway 8080:80Port forwarding is not recommended for production environments.
-
In the left navigation panel, expand Profiles and click Location. The Location Profiles page is displayed.
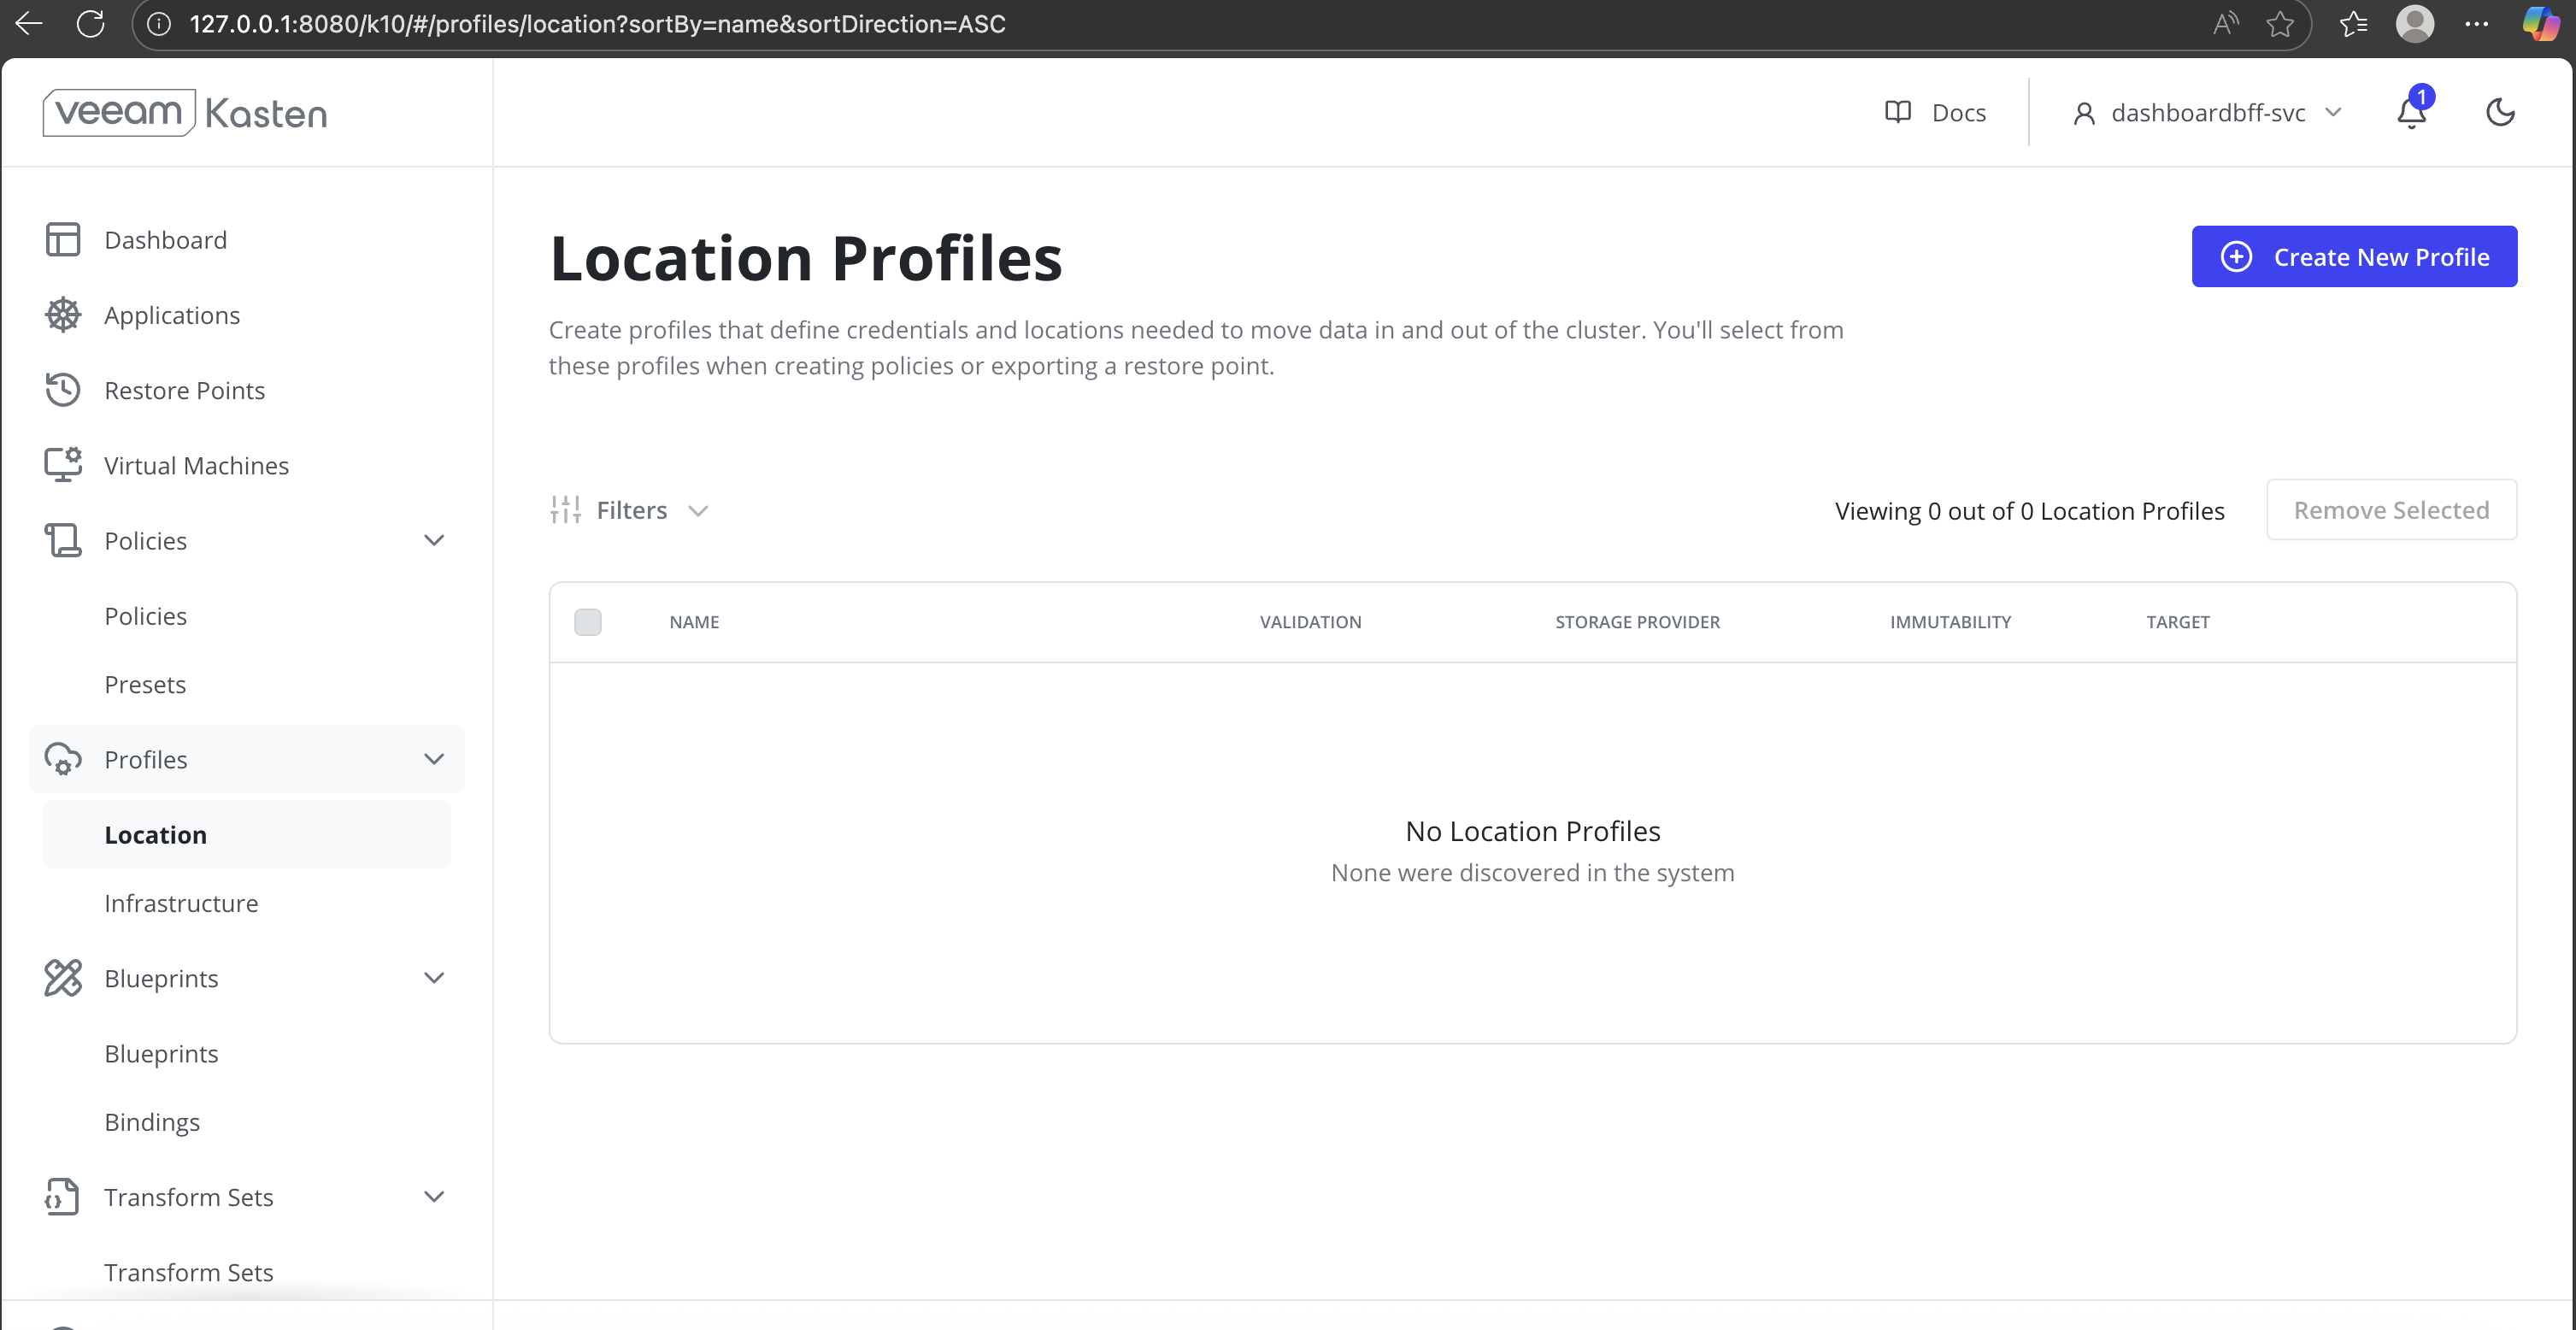
-
On the Location Profiles page, click Create New Profile to create a Backup location profile.
-
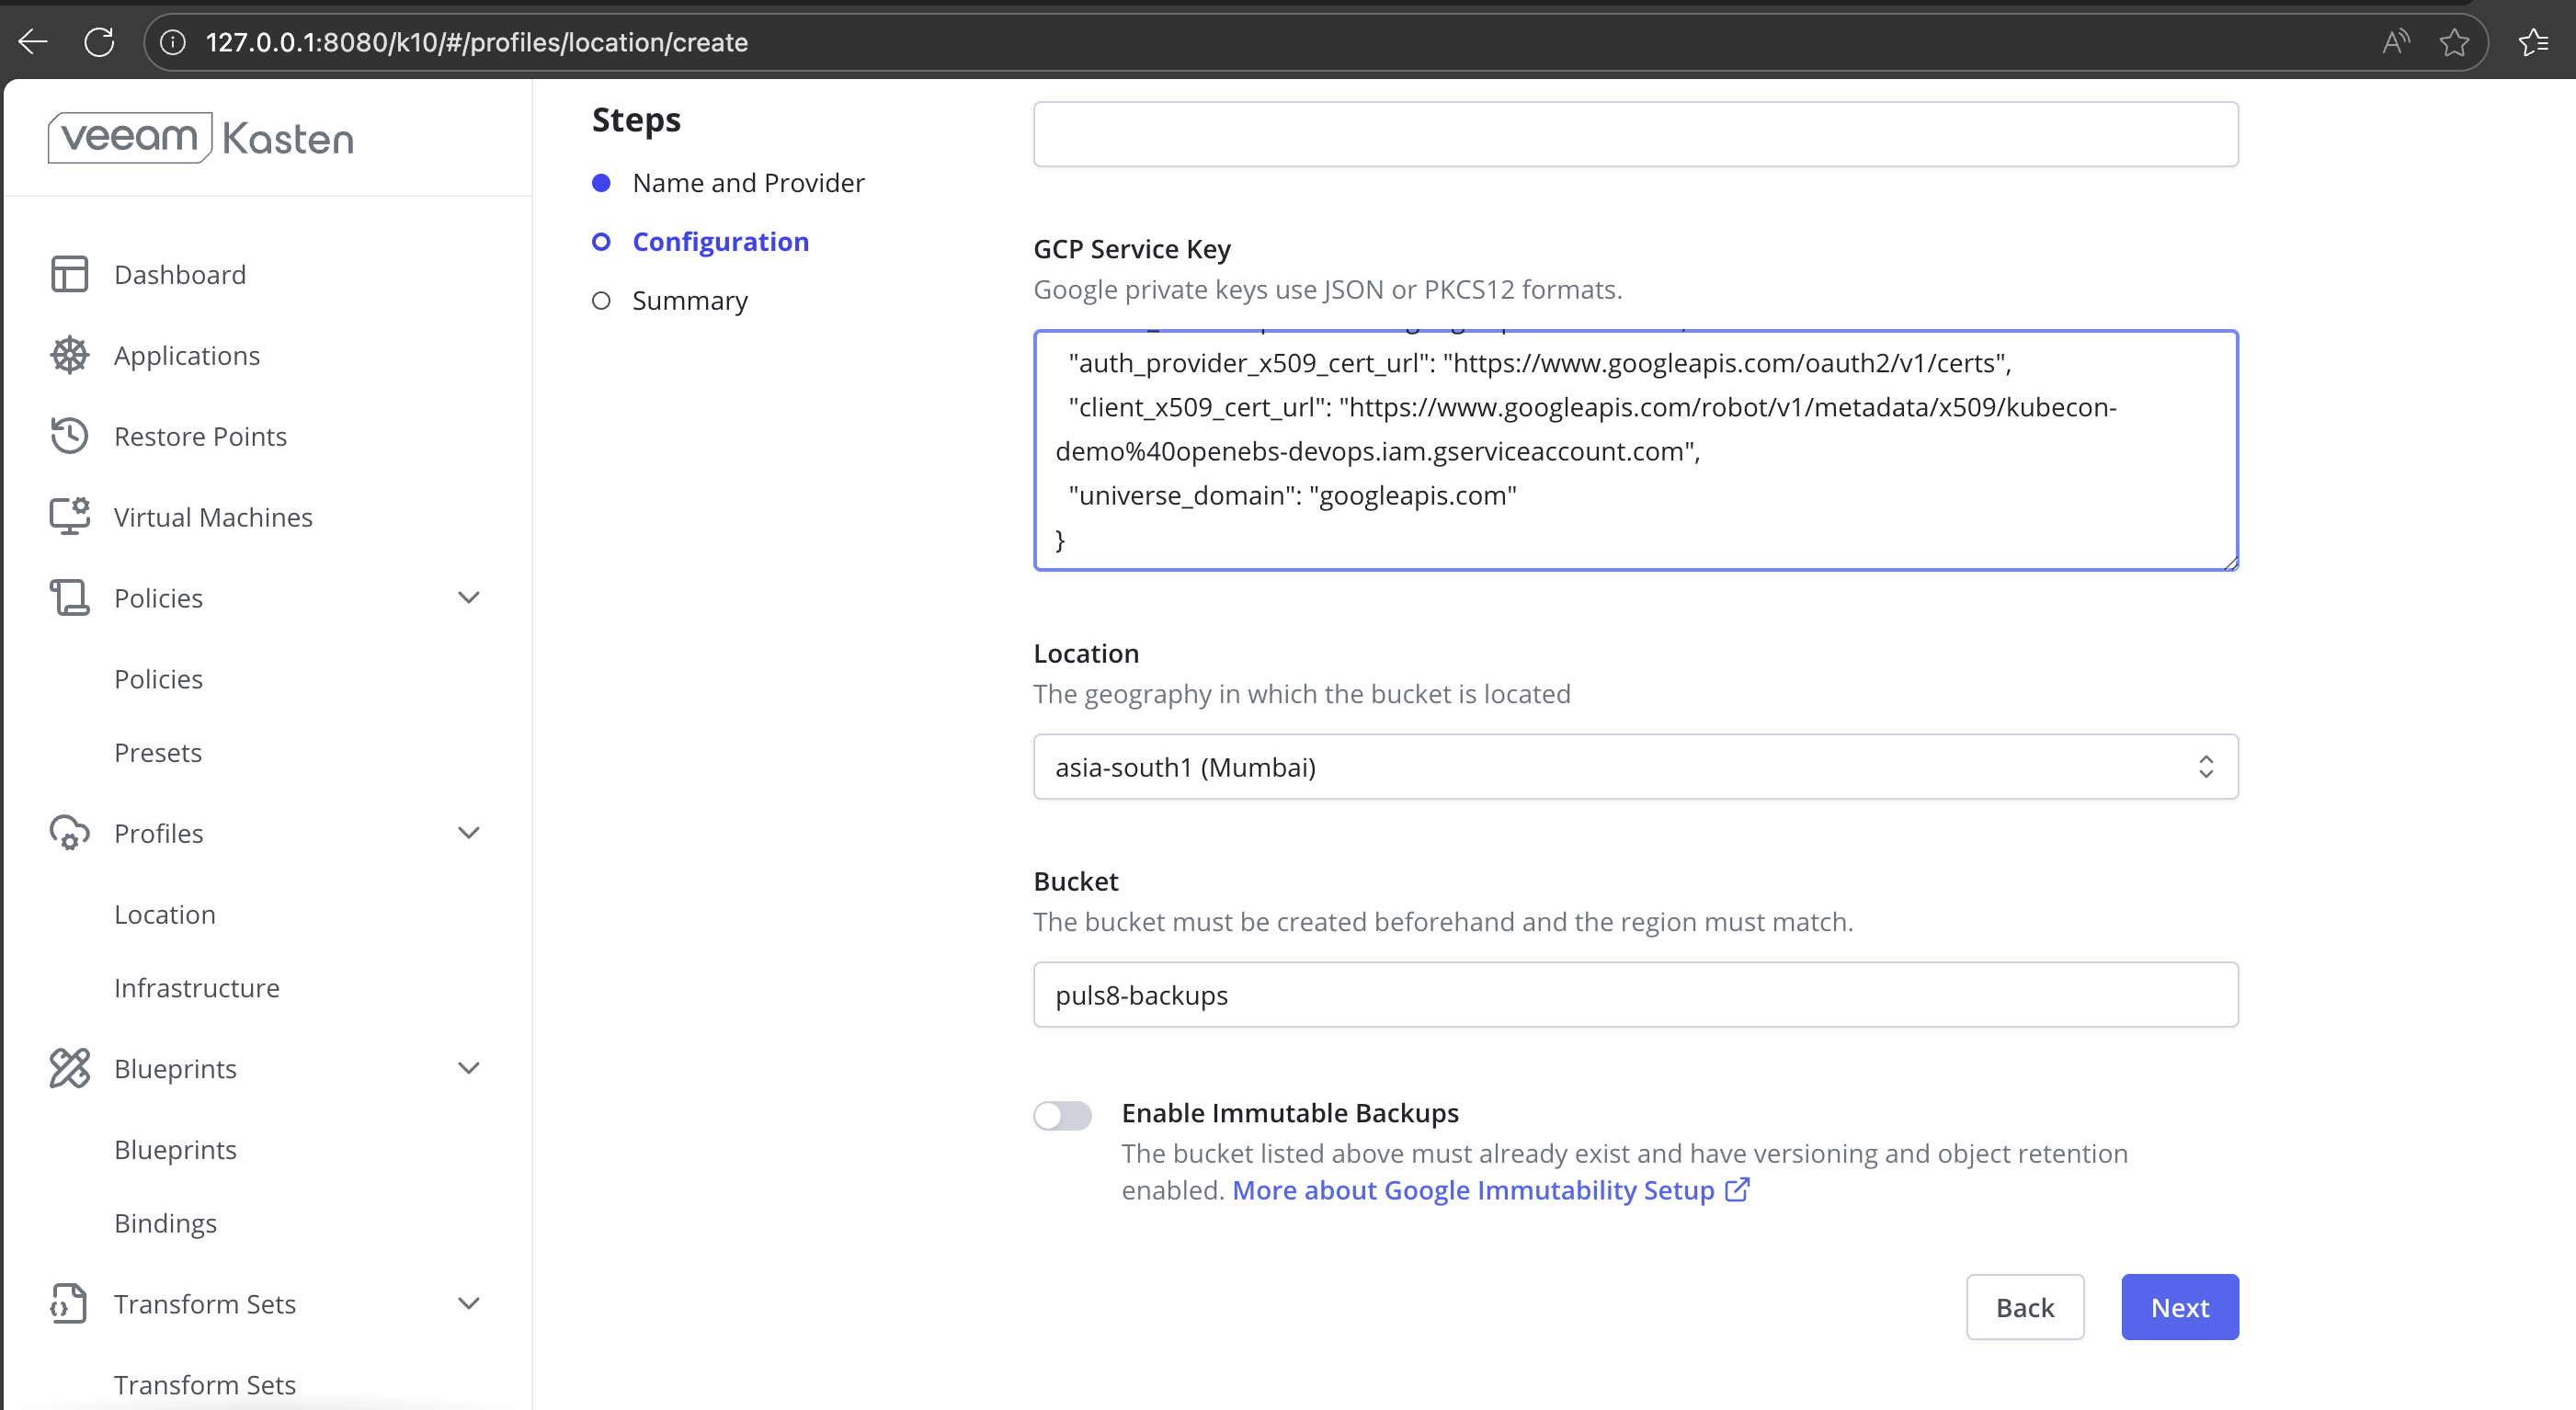
In the Create Location Profile wizard:
-
Enter a Name for the location profile.
-
Select the Storage Provider.

-
-
Provide the below Configuration Details:
-
In the GCP Service Key field, paste the Google Cloud service account key in JSON or PKCS12 format.
-
From the Location drop-down list, select the region where the Google Cloud Storage bucket is located.
-
In the Bucket field, enter the name of the existing Google Cloud Storage bucket that will be used to store backups.
-
(Optional) Enable Immutable Backups if the bucket has object versioning and object retention already configured.
-
Click Next to continue to the Summary step.
-
-
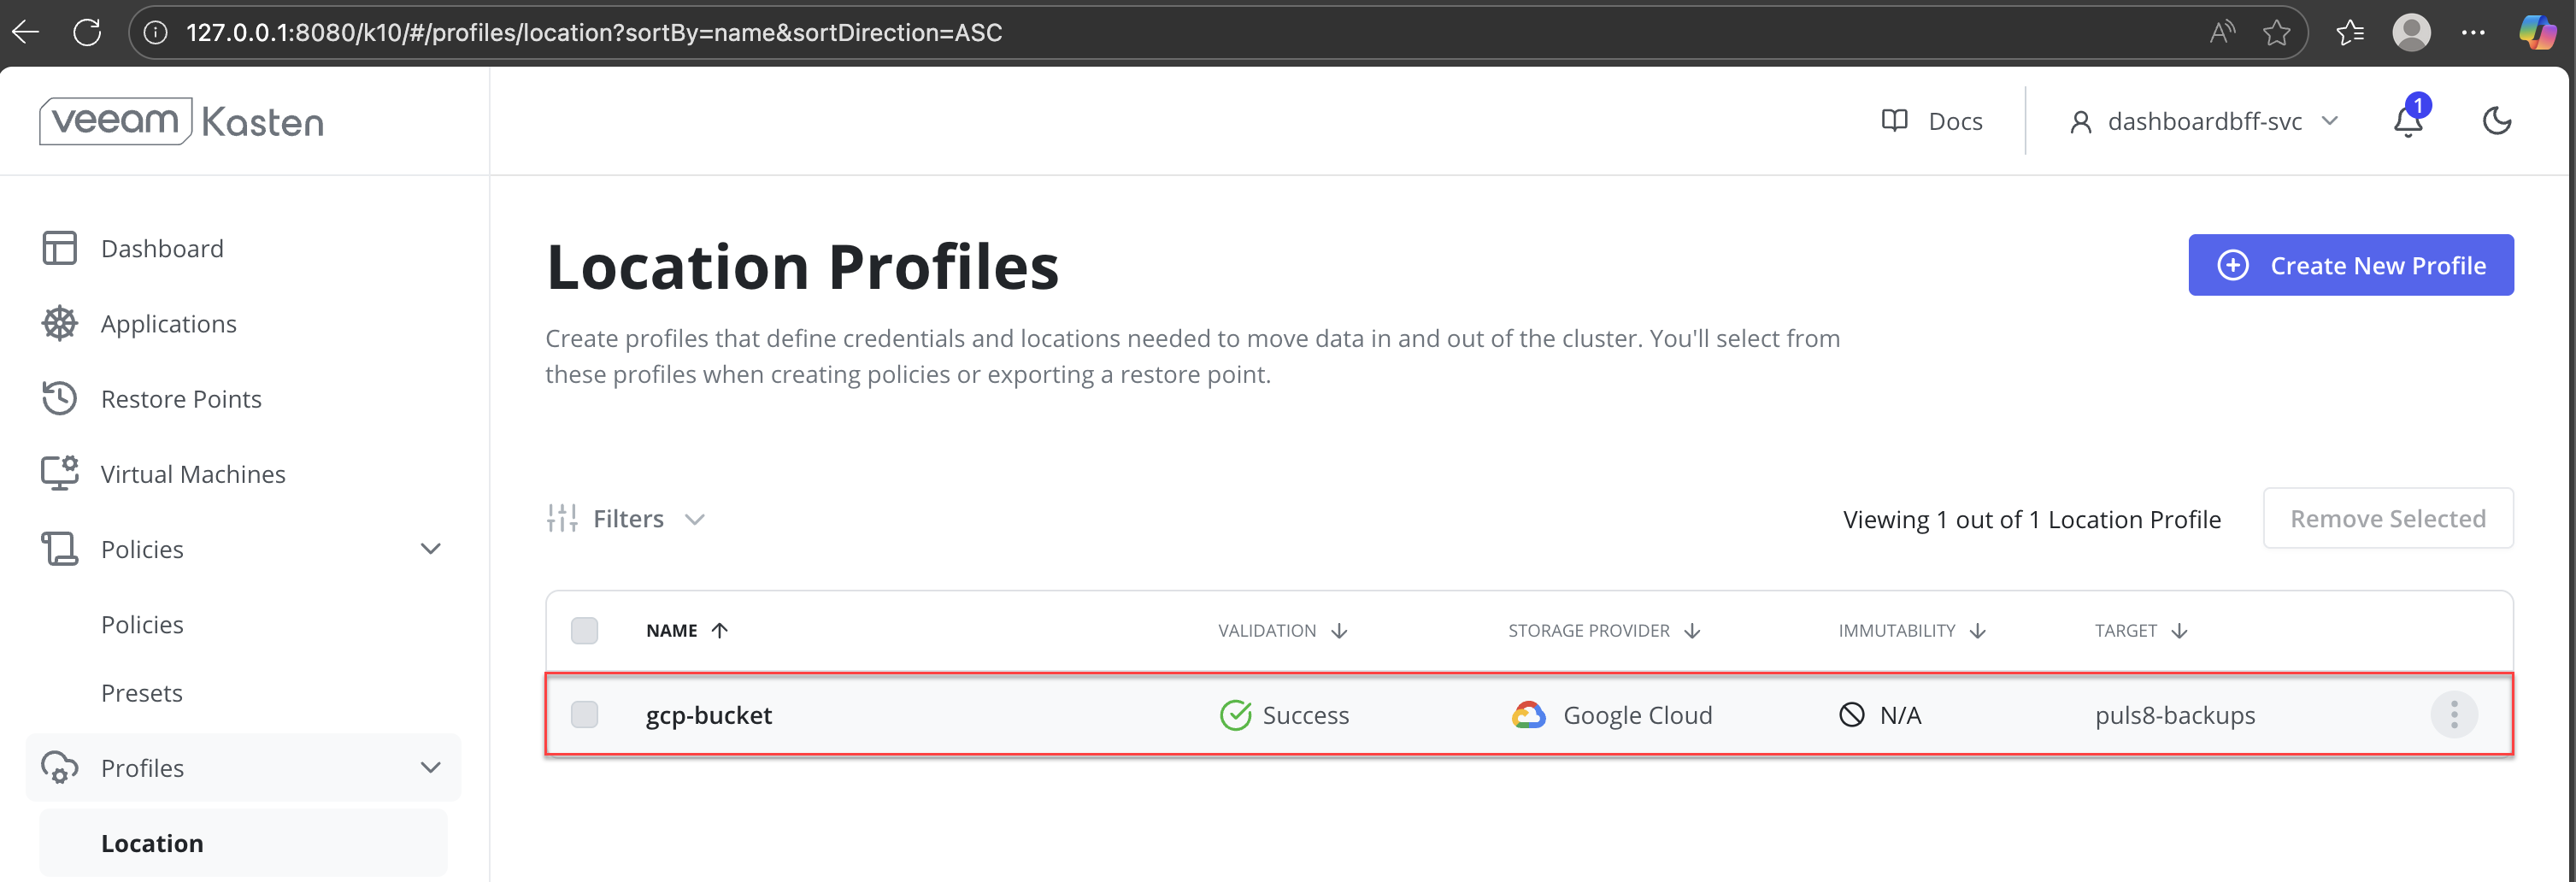
Verify Location Profile status.
-
After submitting the location profile, return to Profiles > Location in the left navigation panel.
-
On the Location Profiles page, locate the newly created profile in the list.
-
Verify the Validation status: Success indicates that the credentials and bucket configuration are valid and accessible.
-
Once the validation status shows Success, the location profile is ready to be used for backup and restore policies.
-
Deploy an Application Using DataCore Puls8
-
Create a PVC using the Puls8 StorageClass.
CopyCreate a PVCapiVersion: v1
kind: PersistentVolumeClaim
metadata:
name: ms-volume-claim
spec:
accessModes:
- ReadWriteOnce
resources:
requests:
storage: 1Gi
storageClassName: mayastor-1-thin -
Deploy a NGINX Application.
CopyDeploy an Application using a Puls8-Backed PVCapiVersion: apps/v1
kind: Deployment
metadata:
name: nginx
spec:
replicas: 1
strategy:
type: Recreate
selector:
matchLabels:
app: nginx
template:
metadata:
labels:
app: nginx
spec:
nodeSelector:
openebs.io/engine: mayastor
volumes:
- name: web-content
persistentVolumeClaim:
claimName: ms-volume-claim
containers:
- name: nginx
image: nginx:latest
ports:
- containerPort: 80
volumeMounts:
- name: web-content
mountPath: /usr/share/nginx/html -
After deploying the application, verify that the PVC is successfully bound and that the application pod is running as expected.
CopySample OutputNAME STATUS VOLUME CAPACITY ACCESS MODES STORAGECLASS VOLUMEATTRIBUTESCLASS AGE
ms-volume-claim Bound pvc-482a2be1-5c90-4237-bd63-4b85a7a13f35 1Gi RWO mayastor-1-thin <unset> 4h2mConfirm that the PVC status is Bound and associated with the expected StorageClass.
-
Verify that the application pod is running.
Ensure that the pod is in the Running state and all containers are ready.
Access the Application
To validate that the application is correctly serving data from the Puls8-backed PVC, you can access the application using port forwarding.
Port forwarding is not recommended for production environments.
-
Port-Forward the application pod.
-
Access the application using the following URL:
-
Open the URL in a web browser and confirm that the application web page is displayed successfully. The page indicates that the application is serving content from the PVC backed by Replicated PV Mayastor.
Perform Backup
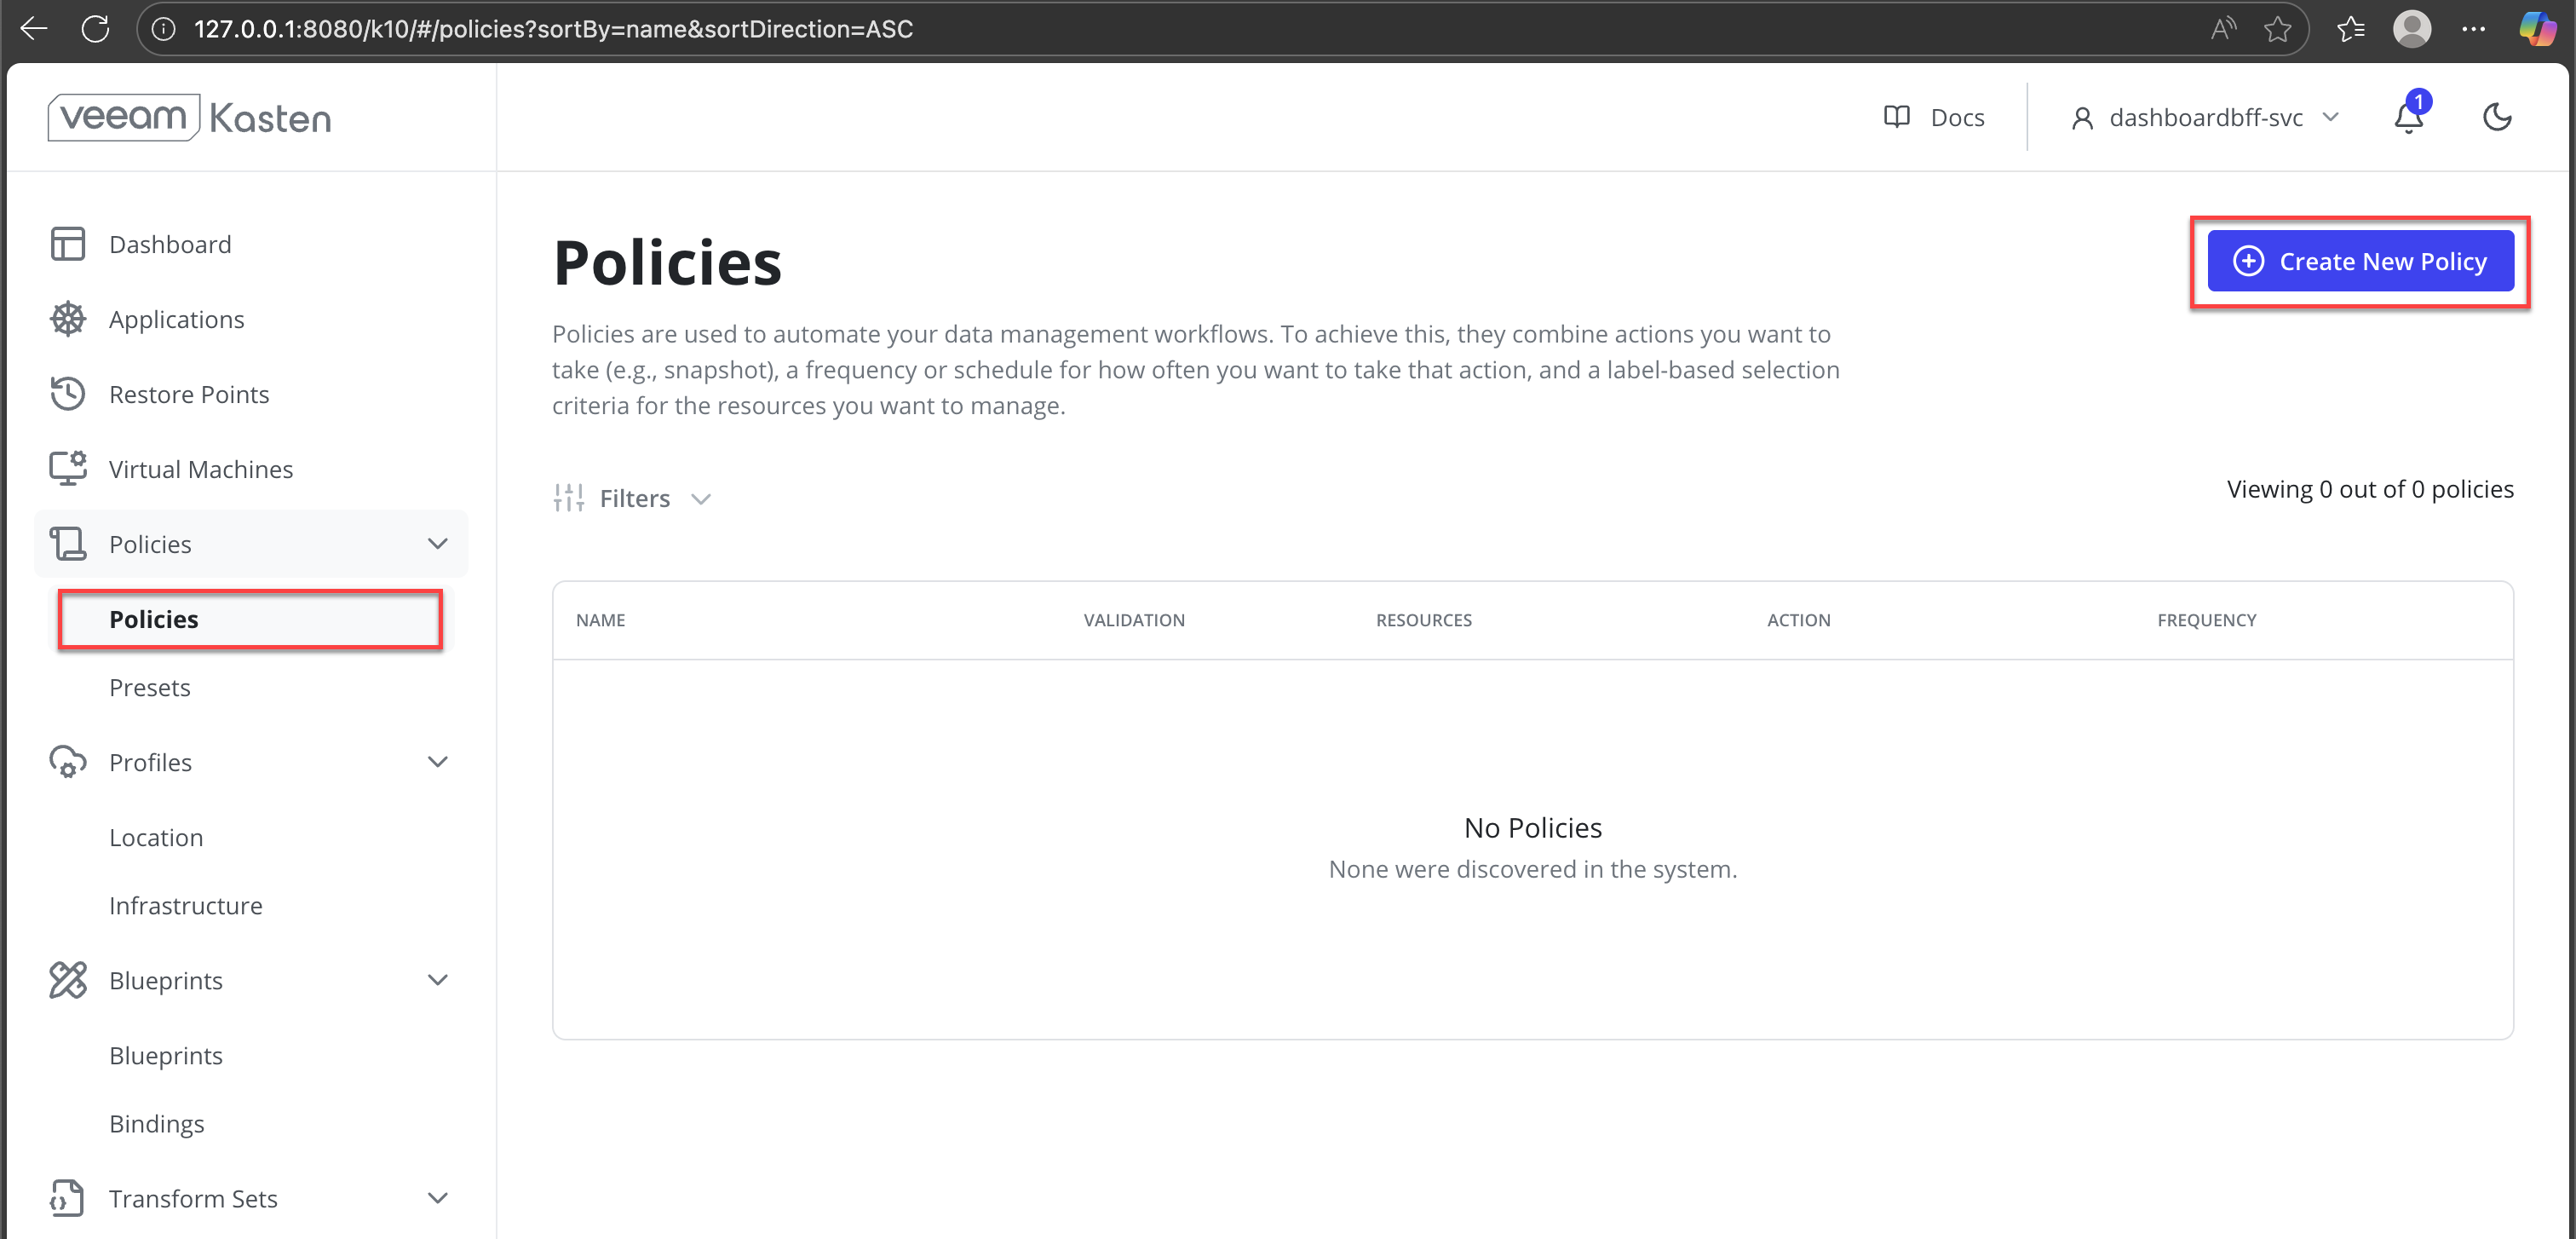
-
In the Veeam Kasten dashboard, navigate to Policies from the left navigation pane.
-
Click Create New Policy.
-
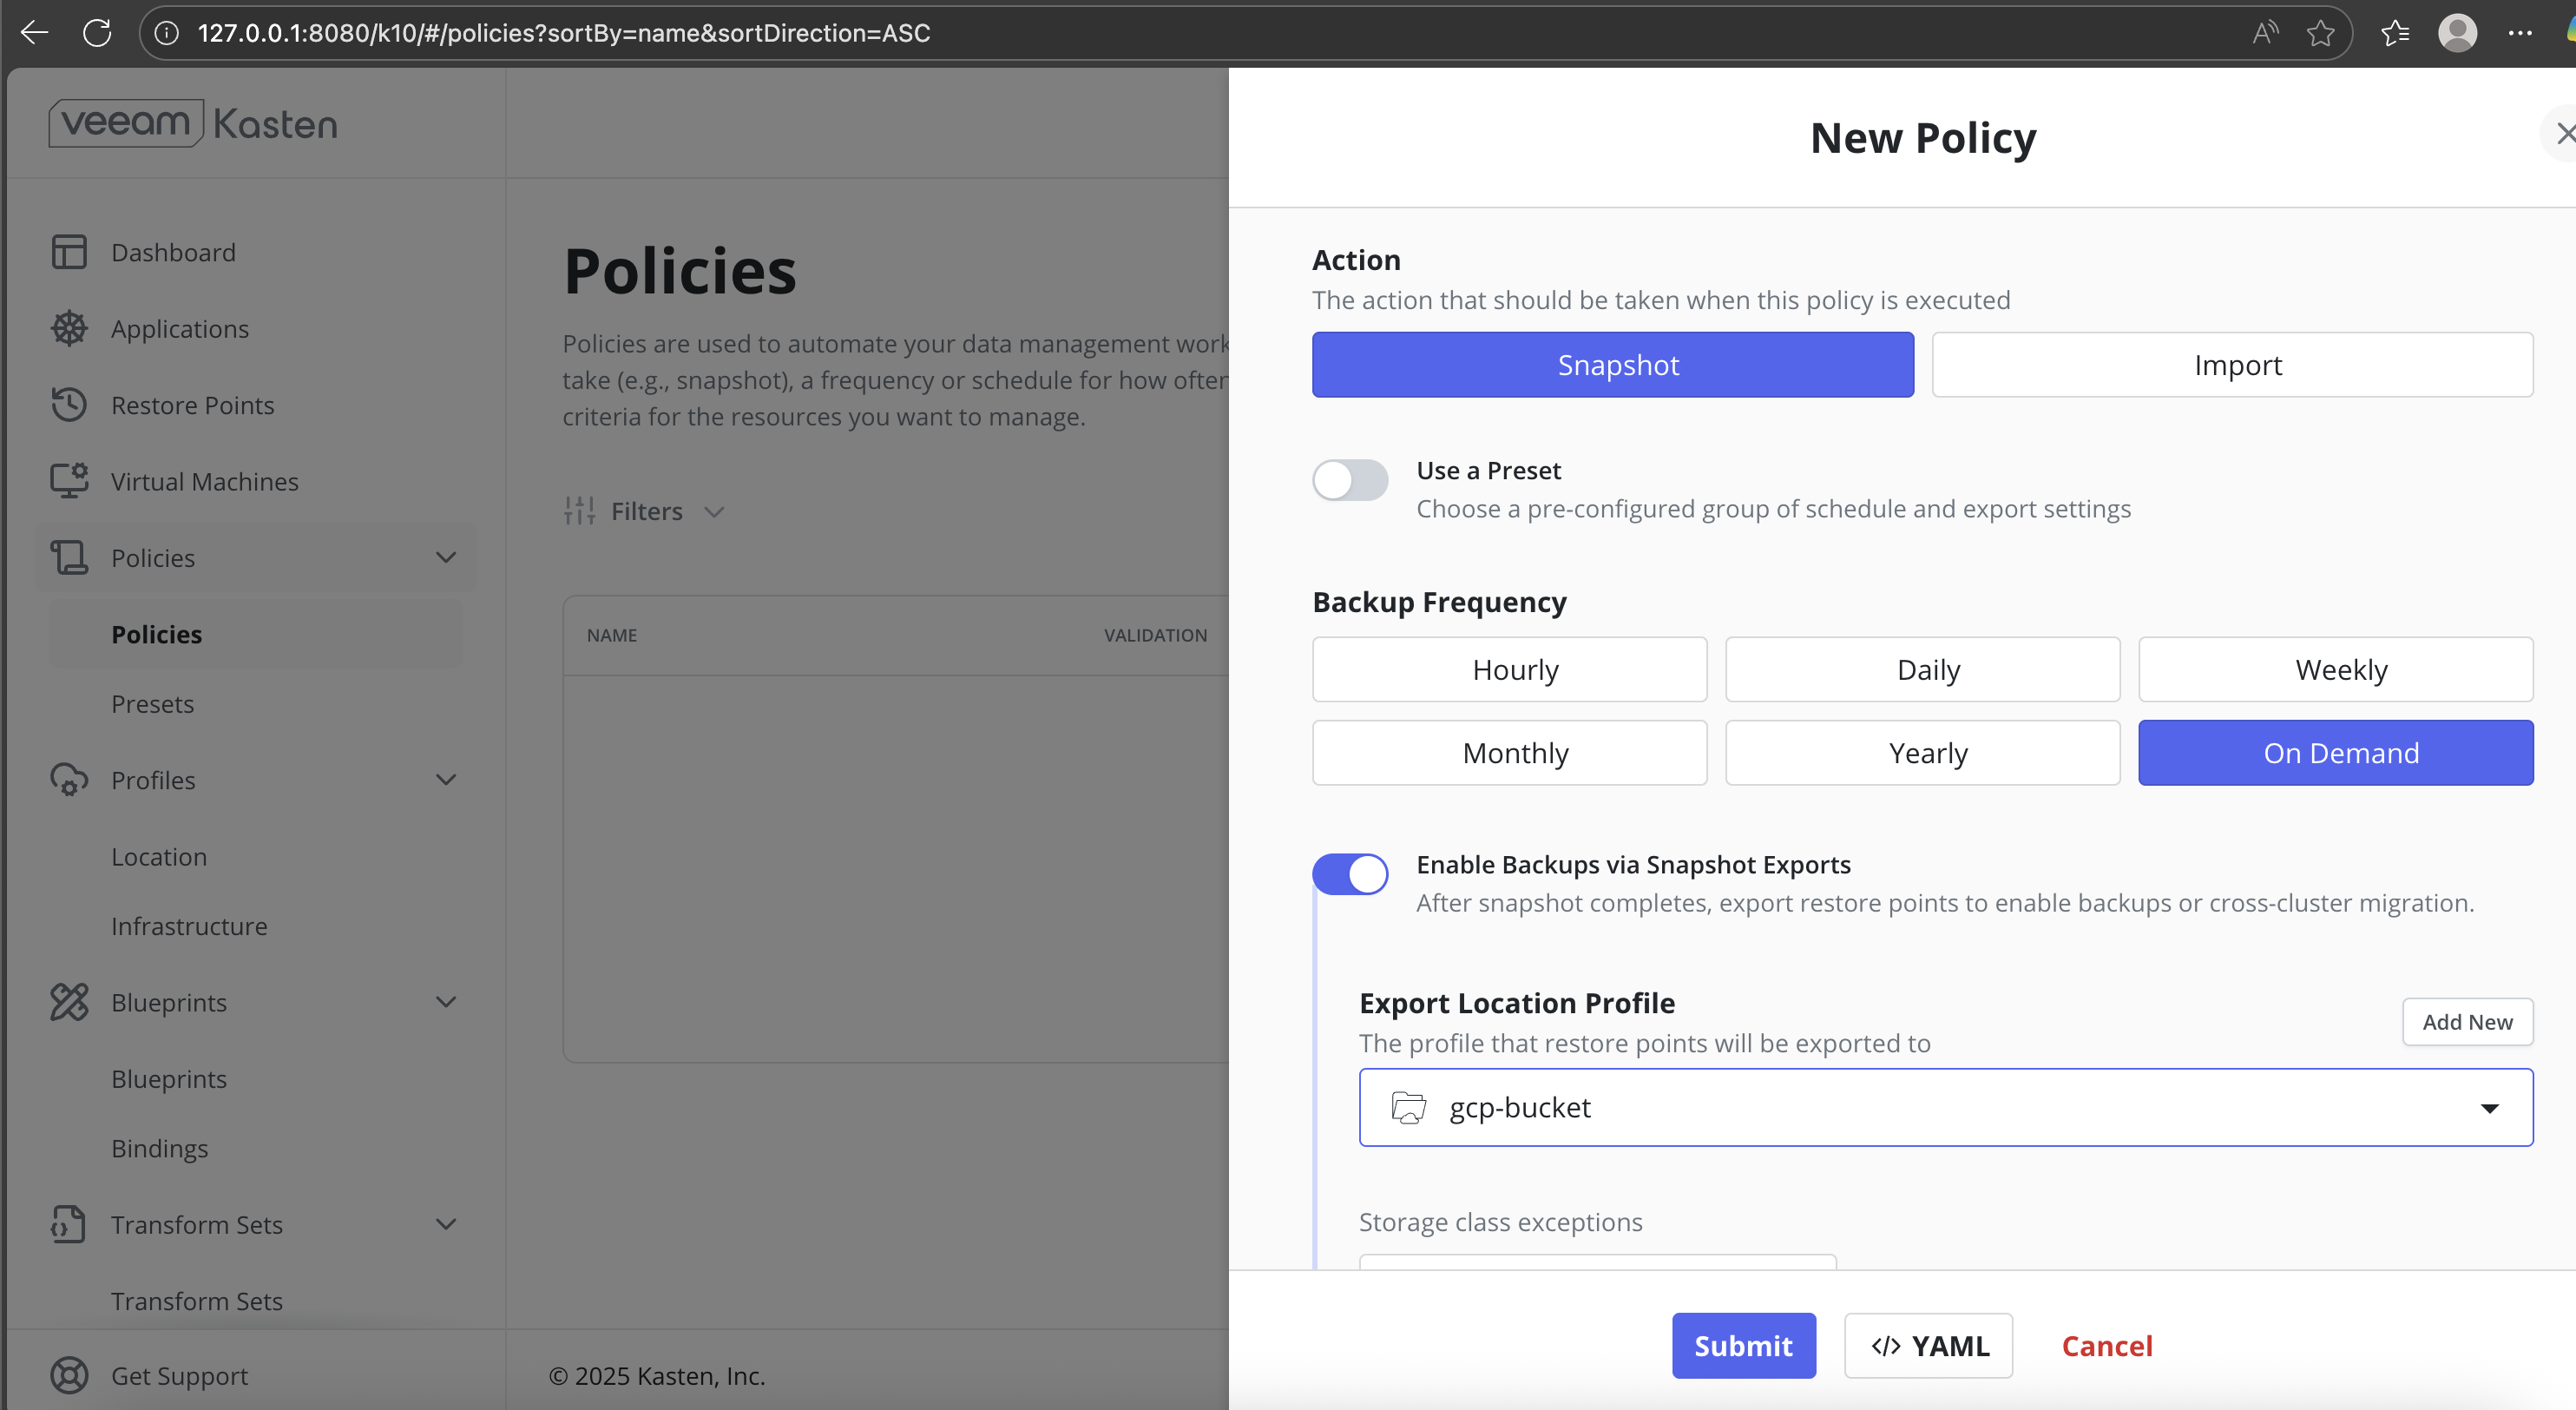
Configure the policy with the following settings:
- Action: Snapshot
- Backup Frequency: On Demand
- Enable Backups via Snapshot Exports: Enabled
- Export Location Profile: Select the configured backup location
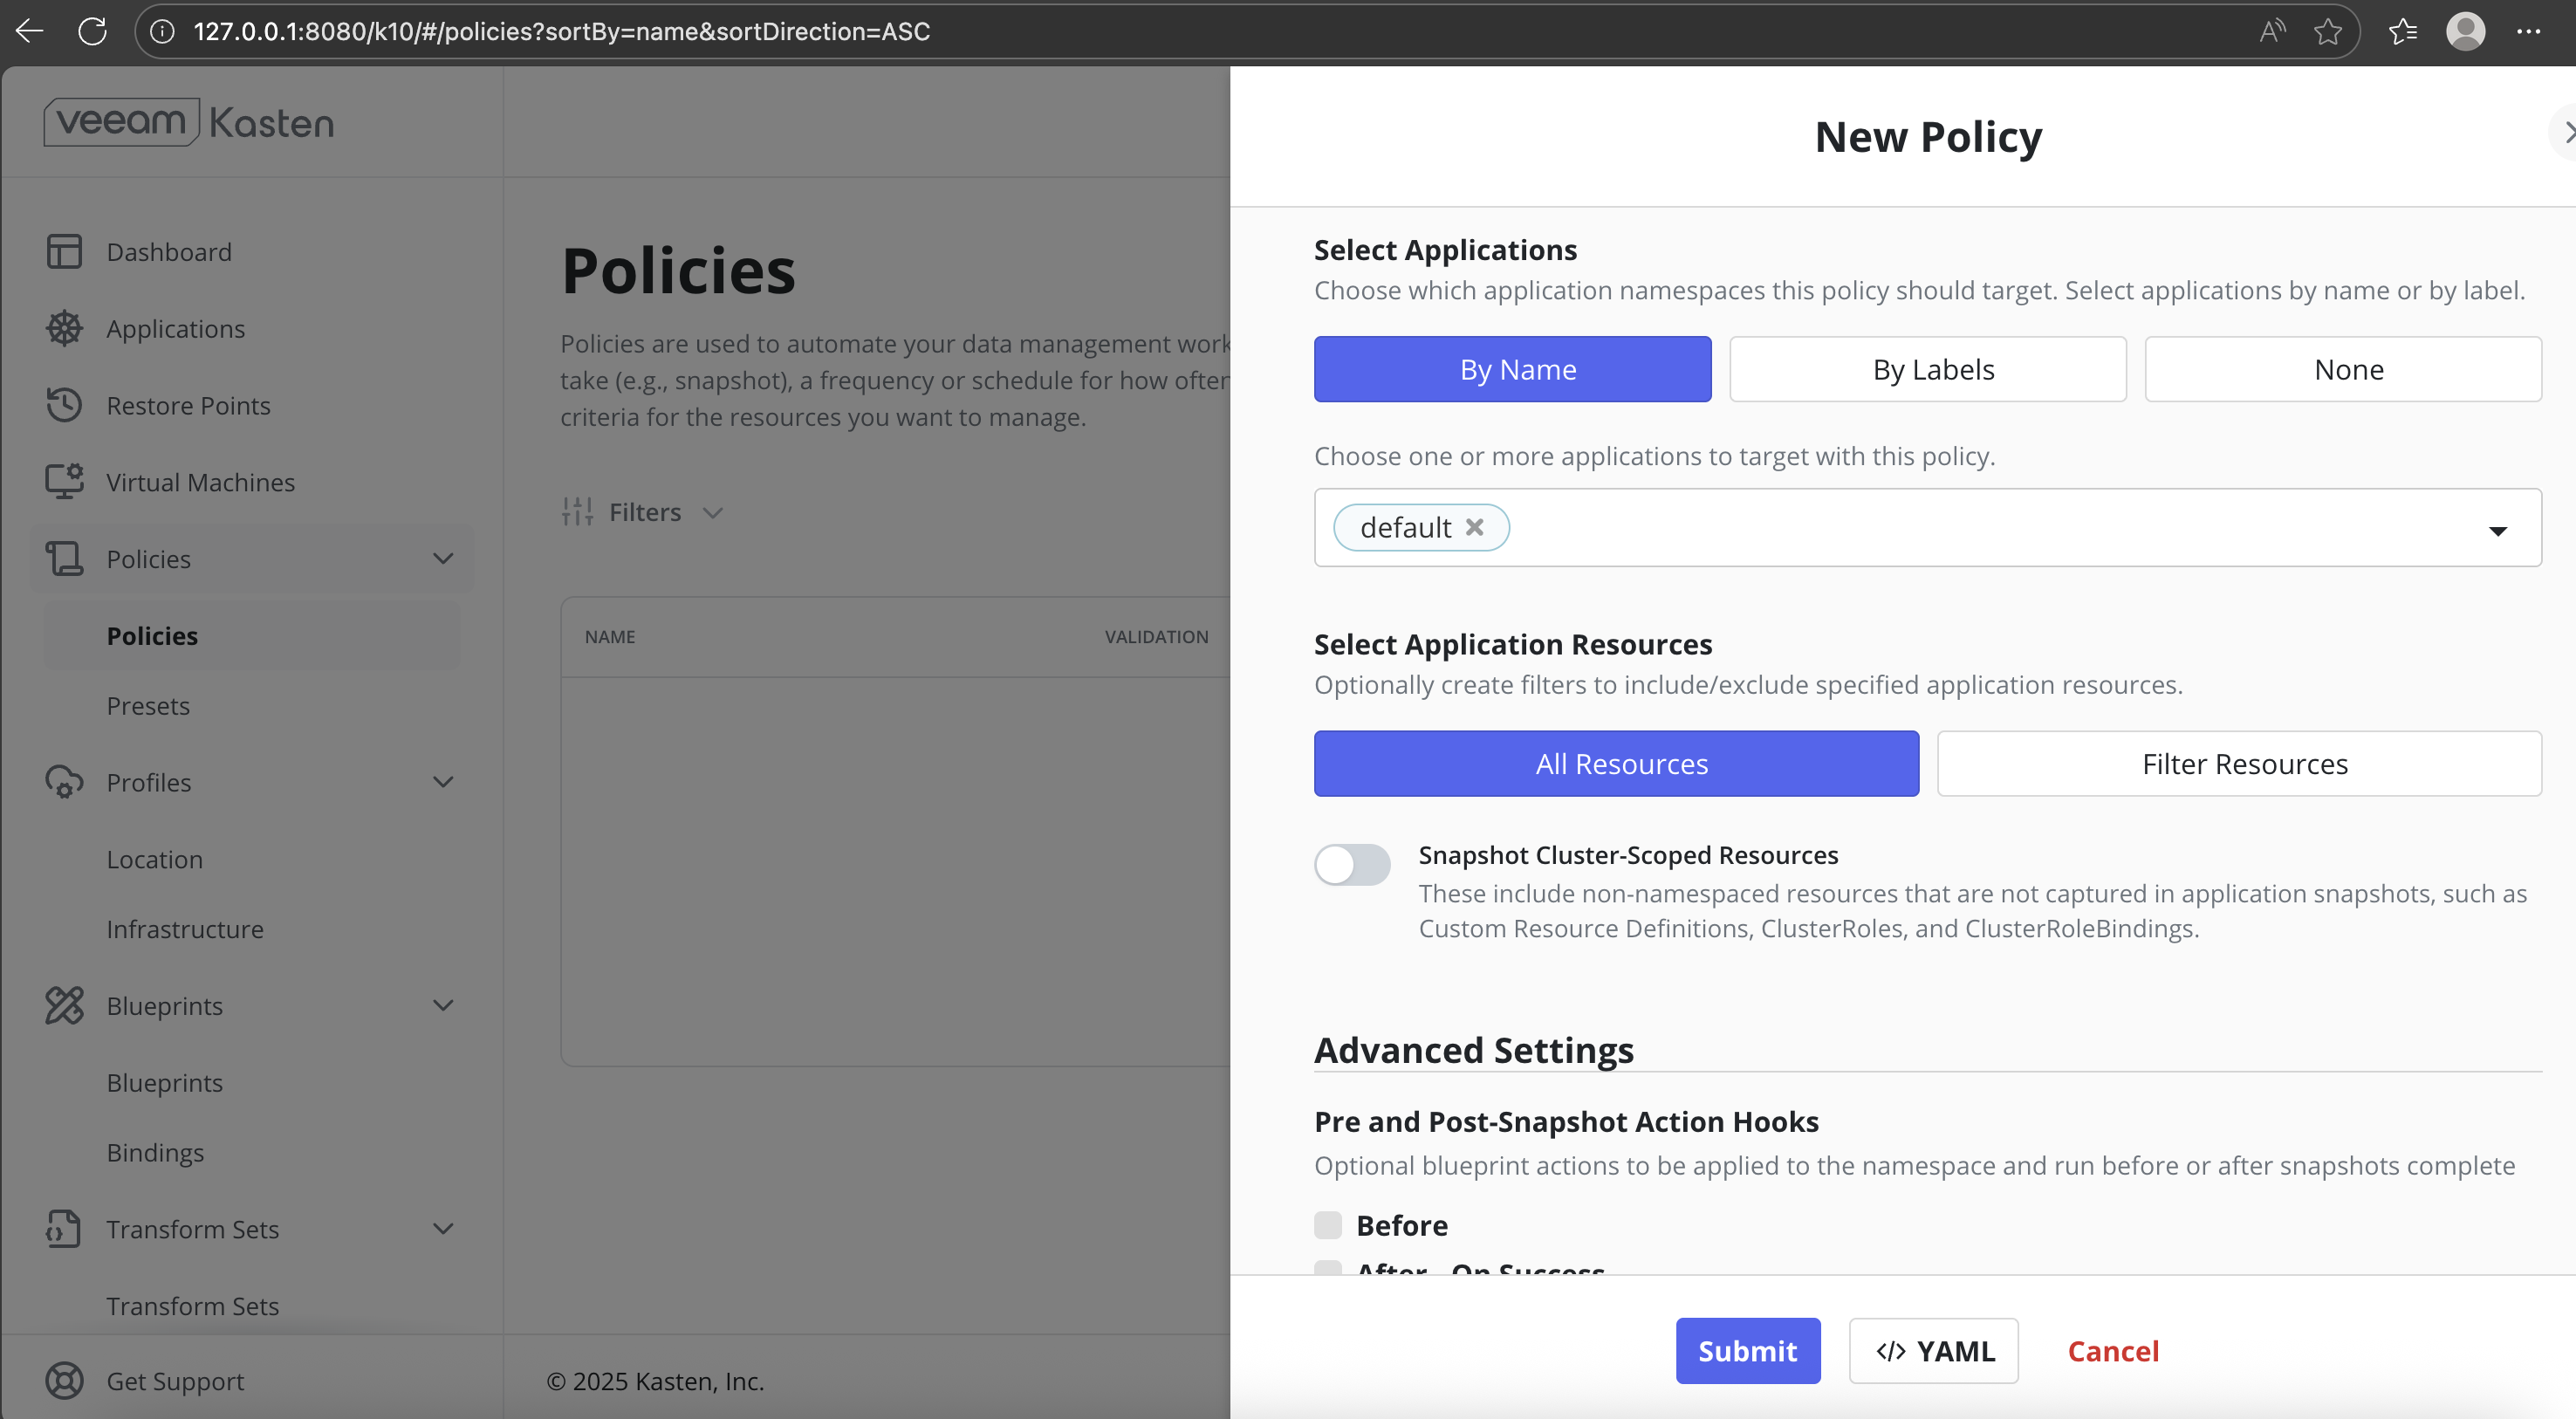
- Select Applications: By Name
- Target Application: Select the application namespace (for example,
default) - Select Application Resources: All Resources
-
Submit the policy.
-
On the Policies page, verify that:
- The policy status is Valid
- The action is Snapshot + Export
- The frequency is On Demand
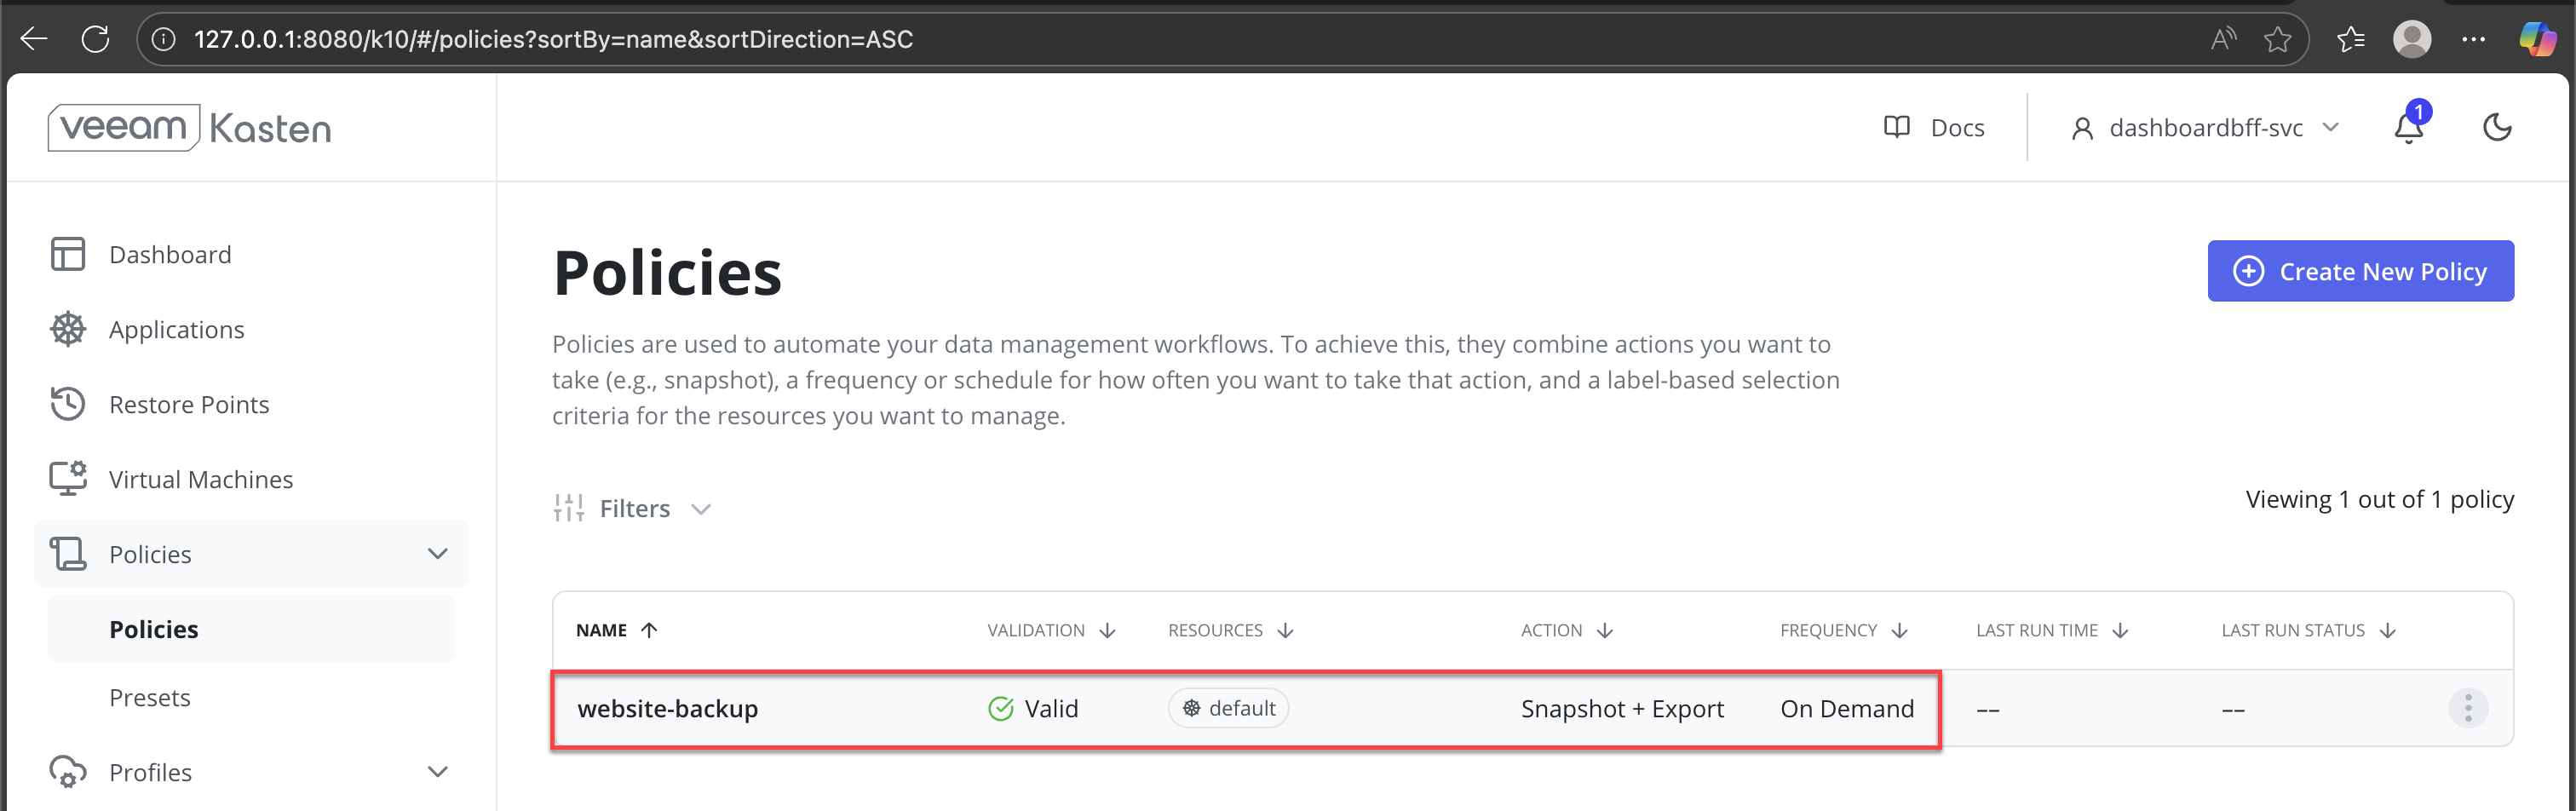
This confirms that the policy is ready for execution.
-
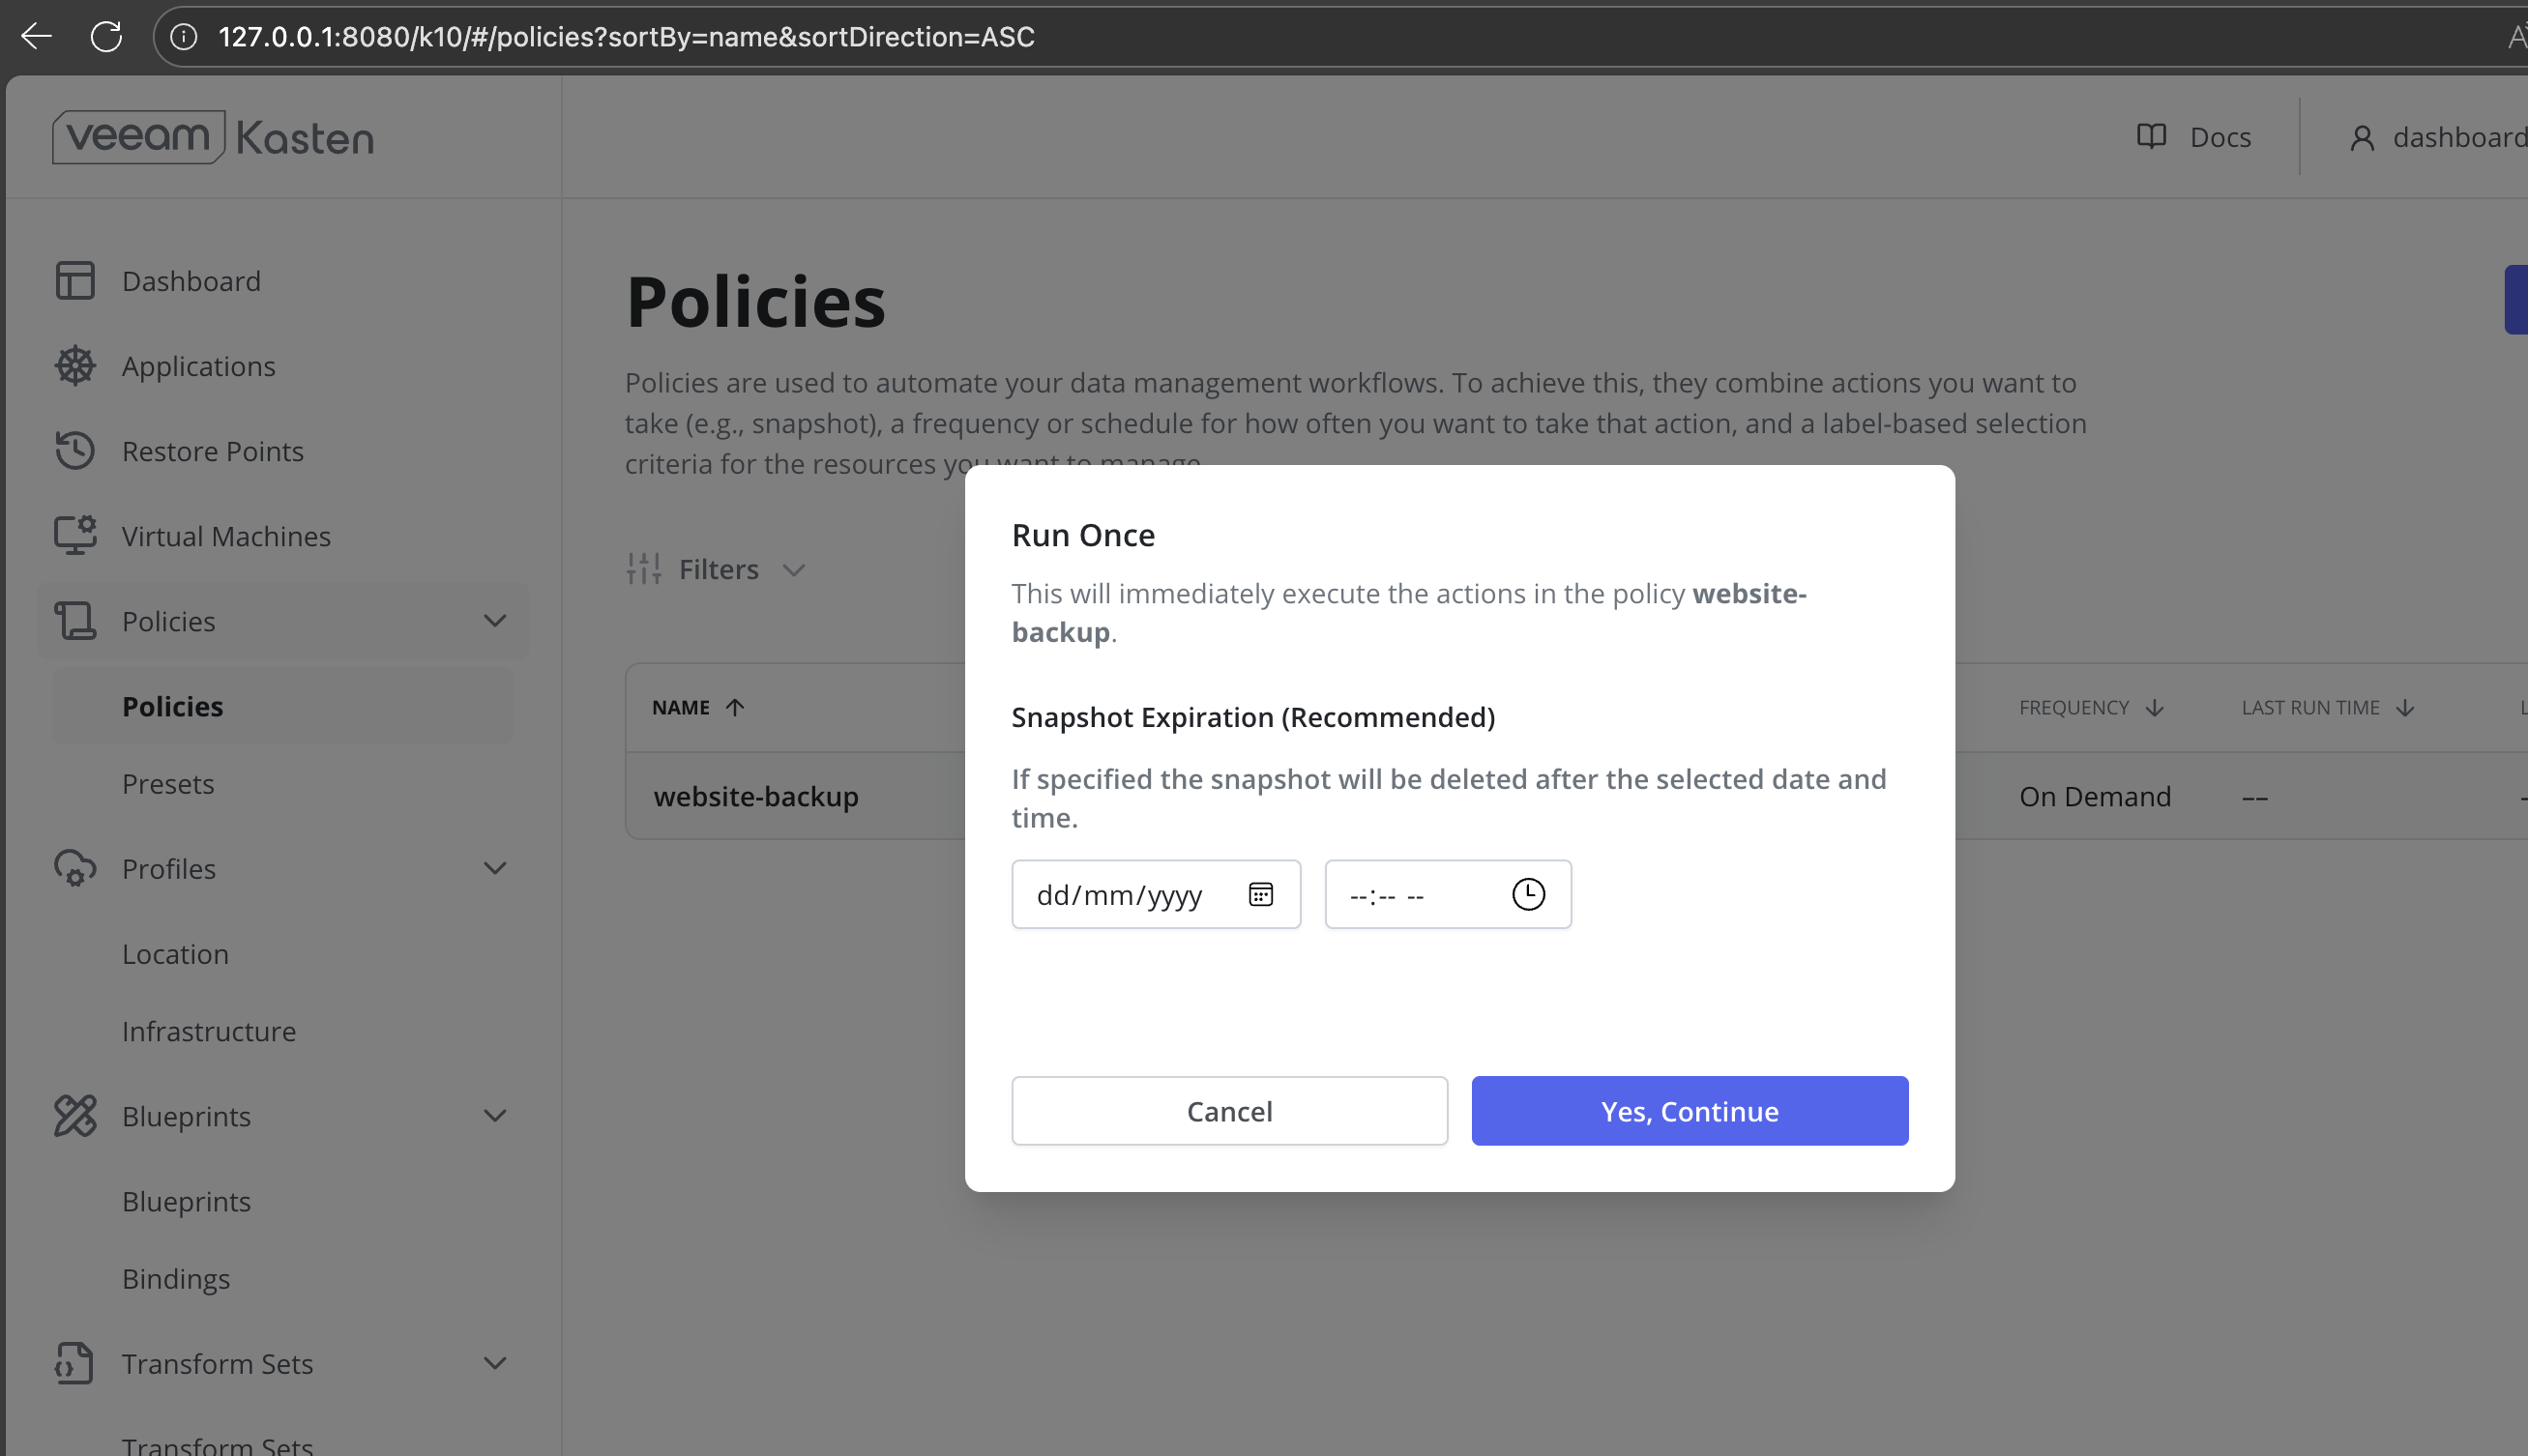
From the Policies list, open the three-dot (⋮) menu for the policy and select Run Once.
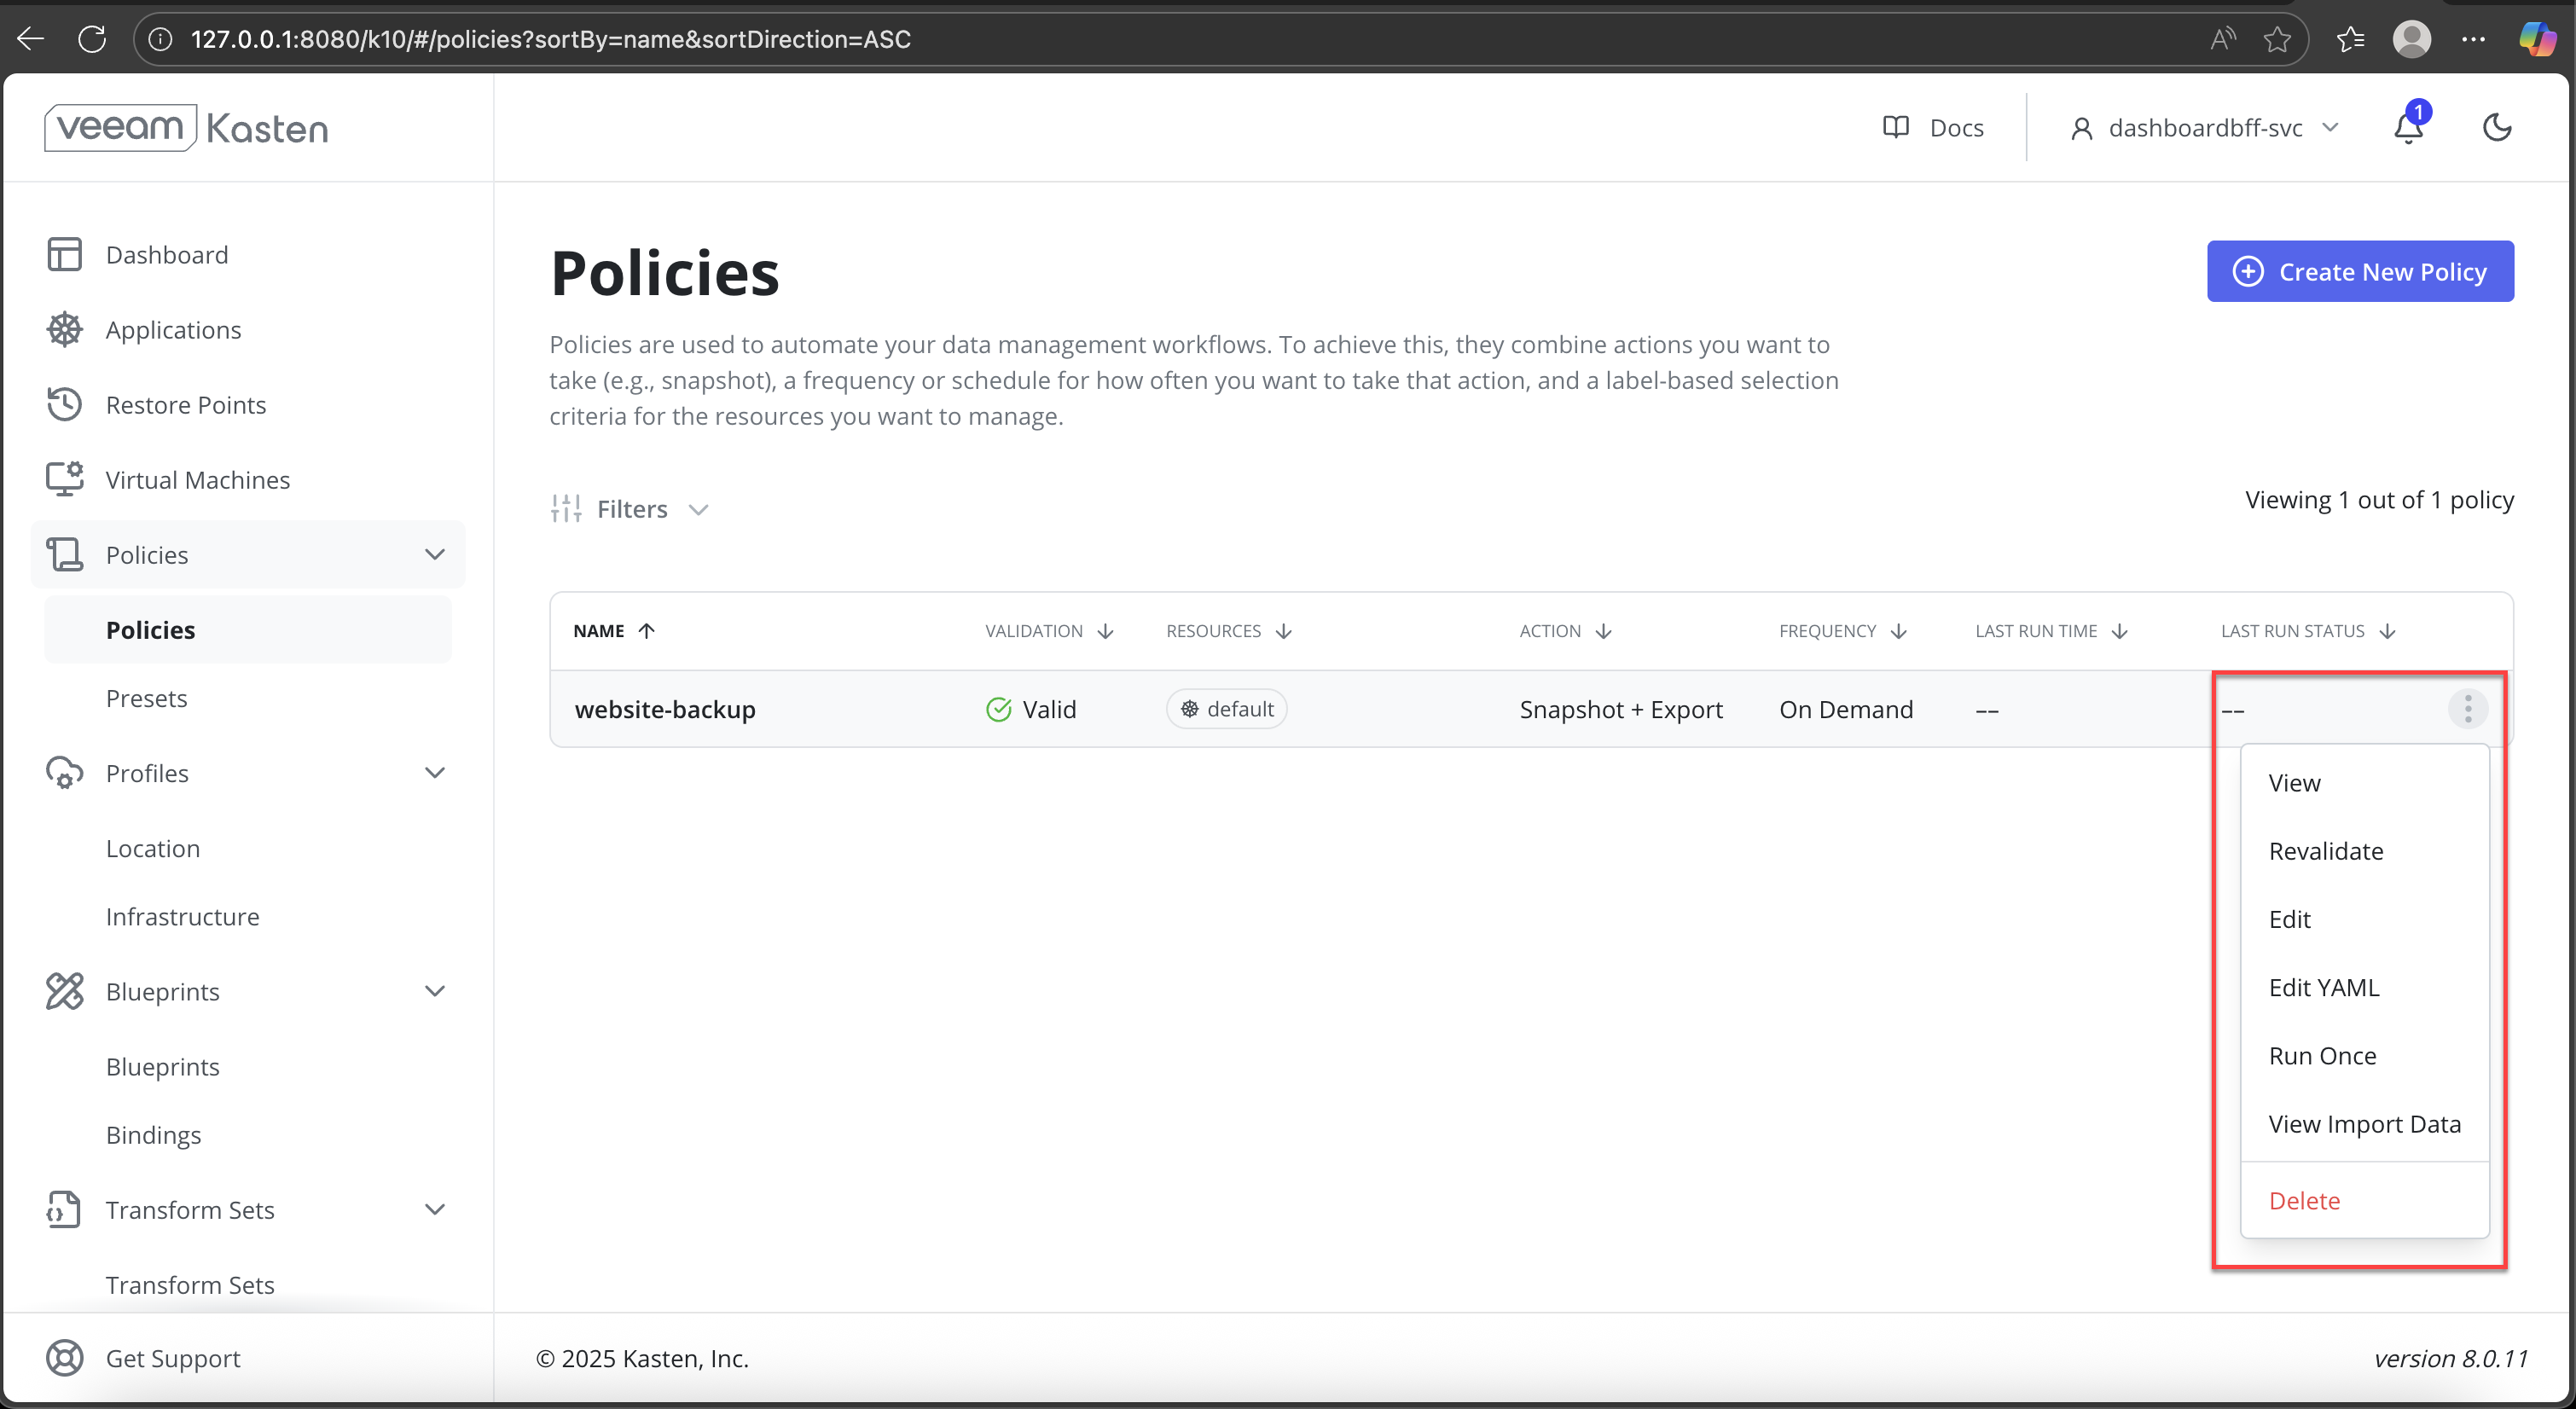
-
Specify a snapshot expiration time (optional) and confirm the operation.
-
After execution begins, monitor the following:
- Policy execution status
- Backup phases such as metadata export and restore point export
- Completion messages for each phase
-
Verify successful backup completion in the Kasten dashboard.

Simulate Application Loss
-
Verify the currently running application resources.
CopySample OutputNAME READY STATUS RESTARTS AGE
pod/nginx-75565c9485-z8btq 1/1 Running 0 18h
NAME TYPE CLUSTER-IP EXTERNAL-IP PORT(S) AGE
service/kubernetes ClusterIP 10.96.0.1 <none> 443/TCP 22h
NAME READY UP-TO-DATE AVAILABLE AGE
deployment.apps/nginx 1/1 1 1 18h -
Delete the application workloads.
Using
kubectl delete all --allcan result in the unintended deletion of essential Kubernetes resources. This command should not be used in shared, production, or multi-tenant clusters. Instead, delete only the specific application resources created for this workflow, such as Deployments, Pods, Services, and PersistentVolumeClaims.CopySample Outputpod "nginx-75565c9485-z8btq" deleted
service "kubernetes" deleted
deployment.apps "nginx" deleted -
Delete the PVC associated with the application.
-
Confirm that all application resources and PVCs have been removed.
CopySample OutputNAME TYPE CLUSTER-IP EXTERNAL-IP PORT(S) AGE
service/kubernetes ClusterIP 10.96.0.1 <none> 443/TCP 16s
Restore the Application from Backup
-
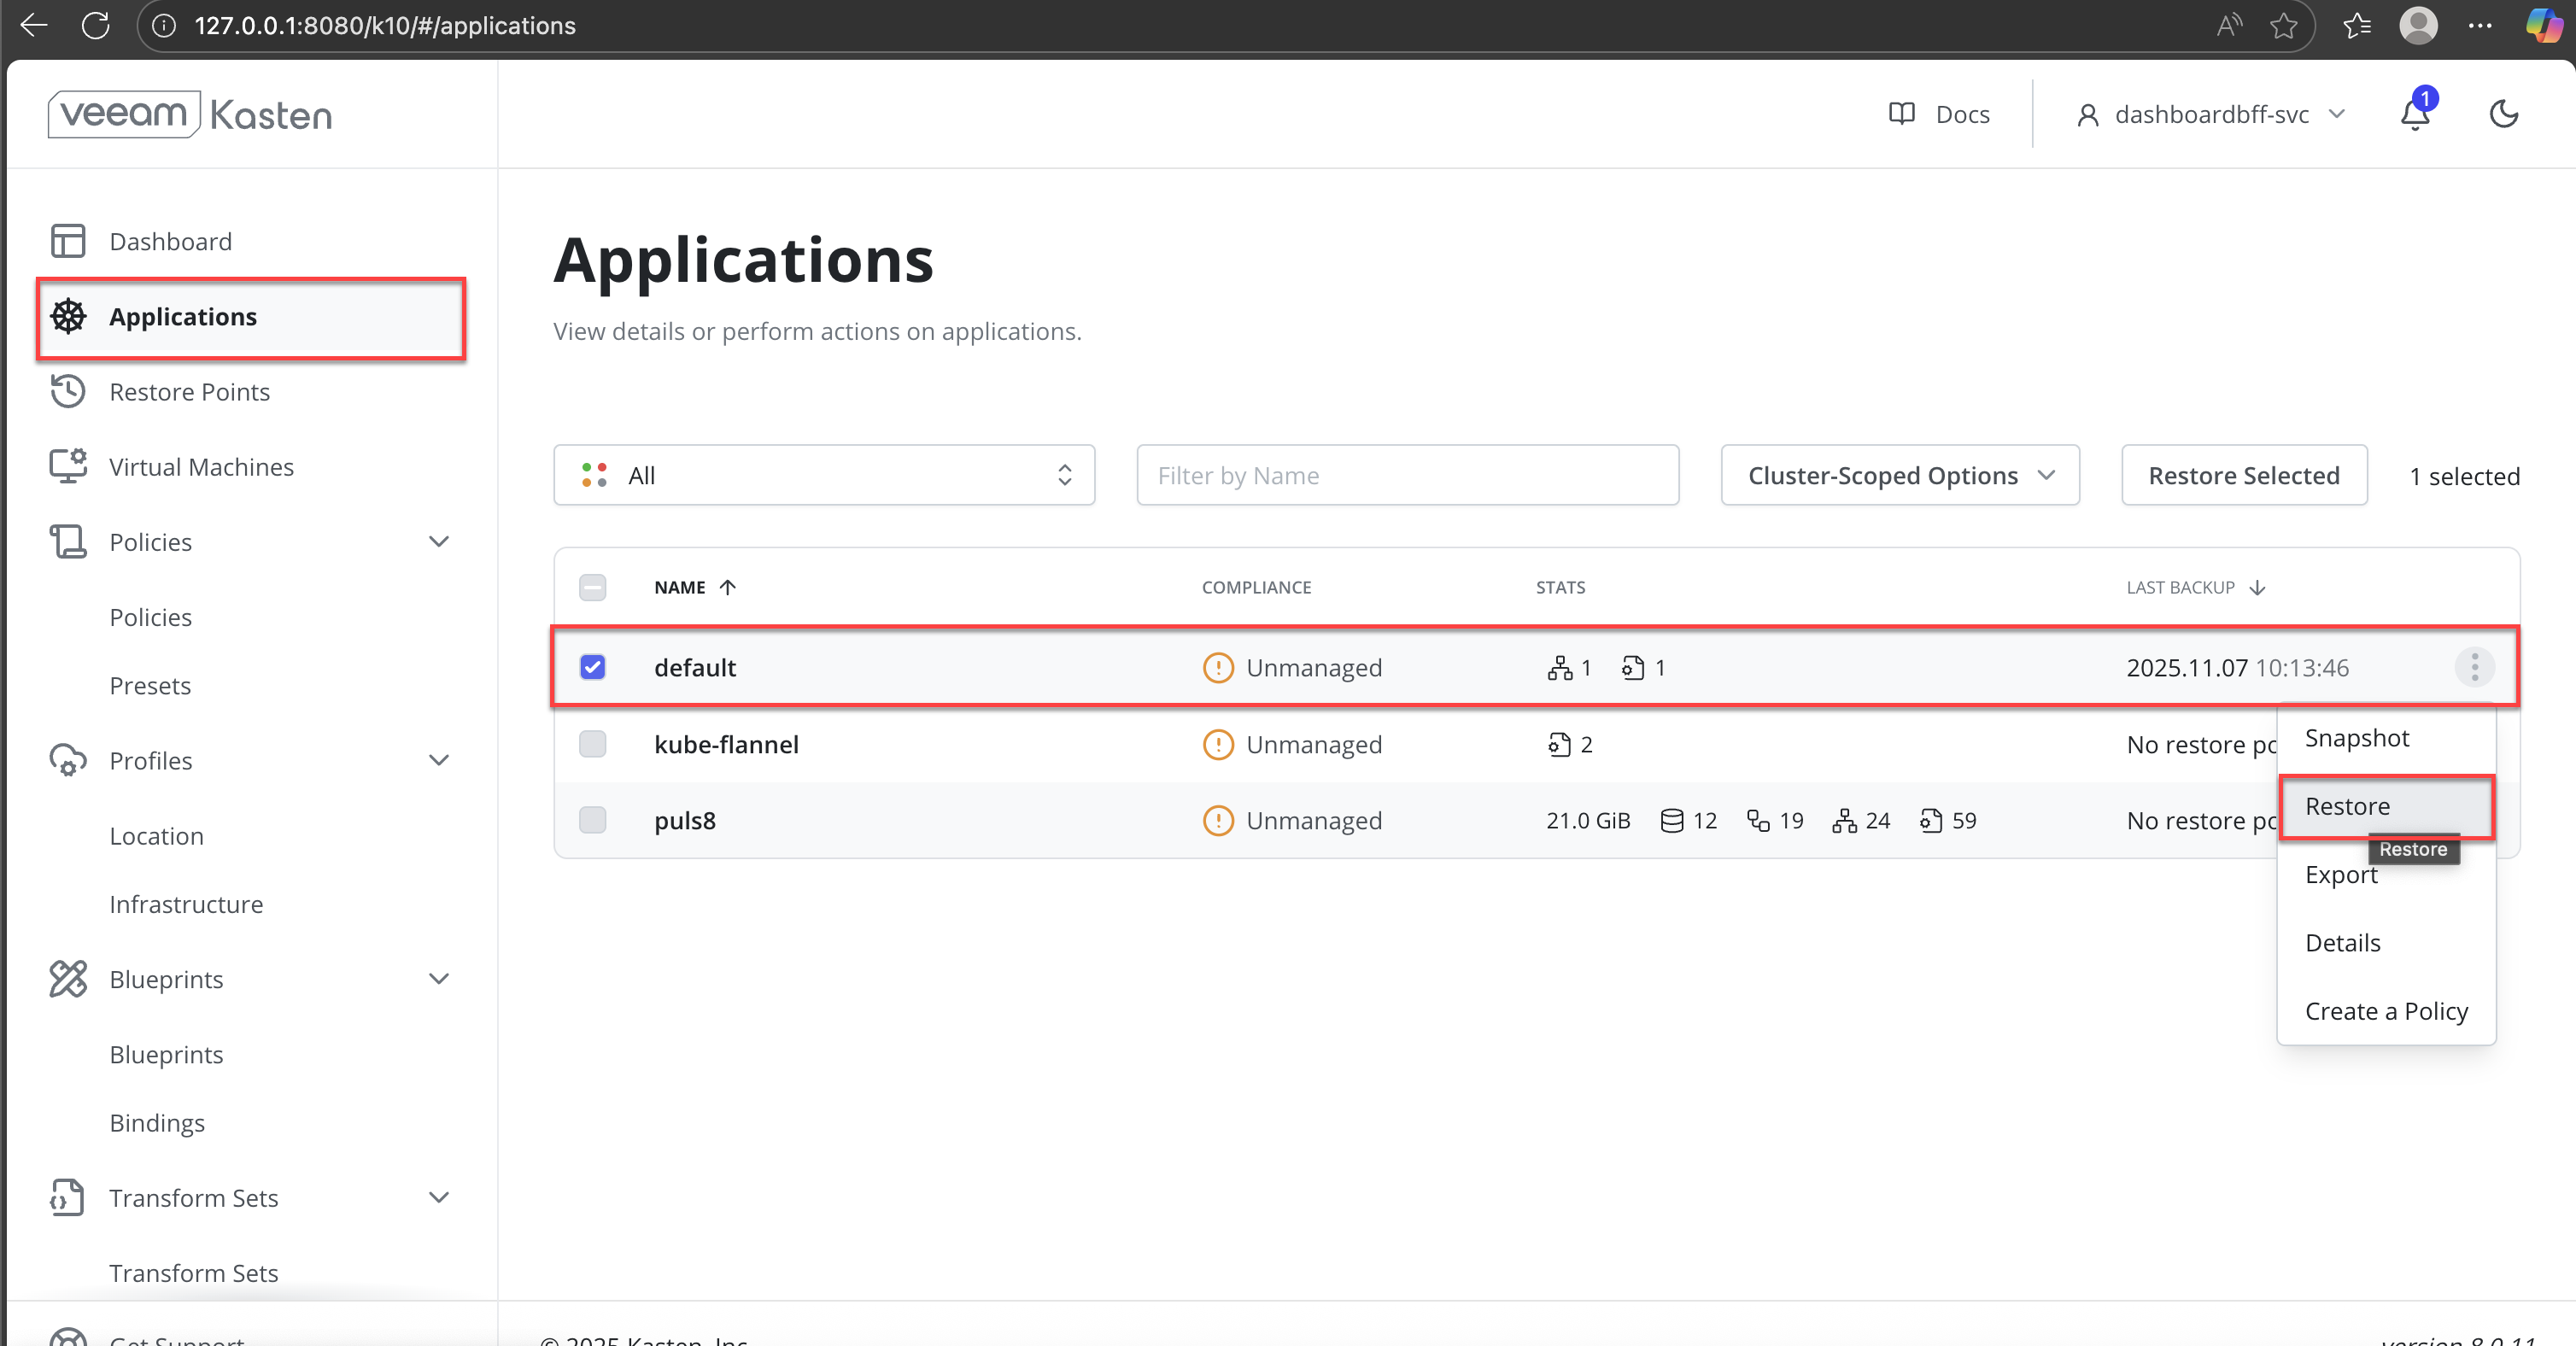
In the Veeam Kasten dashboard, navigate to Applications from the left navigation pane.
-
Locate the application namespace (for example,
default) that was previously backed up. -
Click the More options (⋮) menu next to the application and select Restore.
-
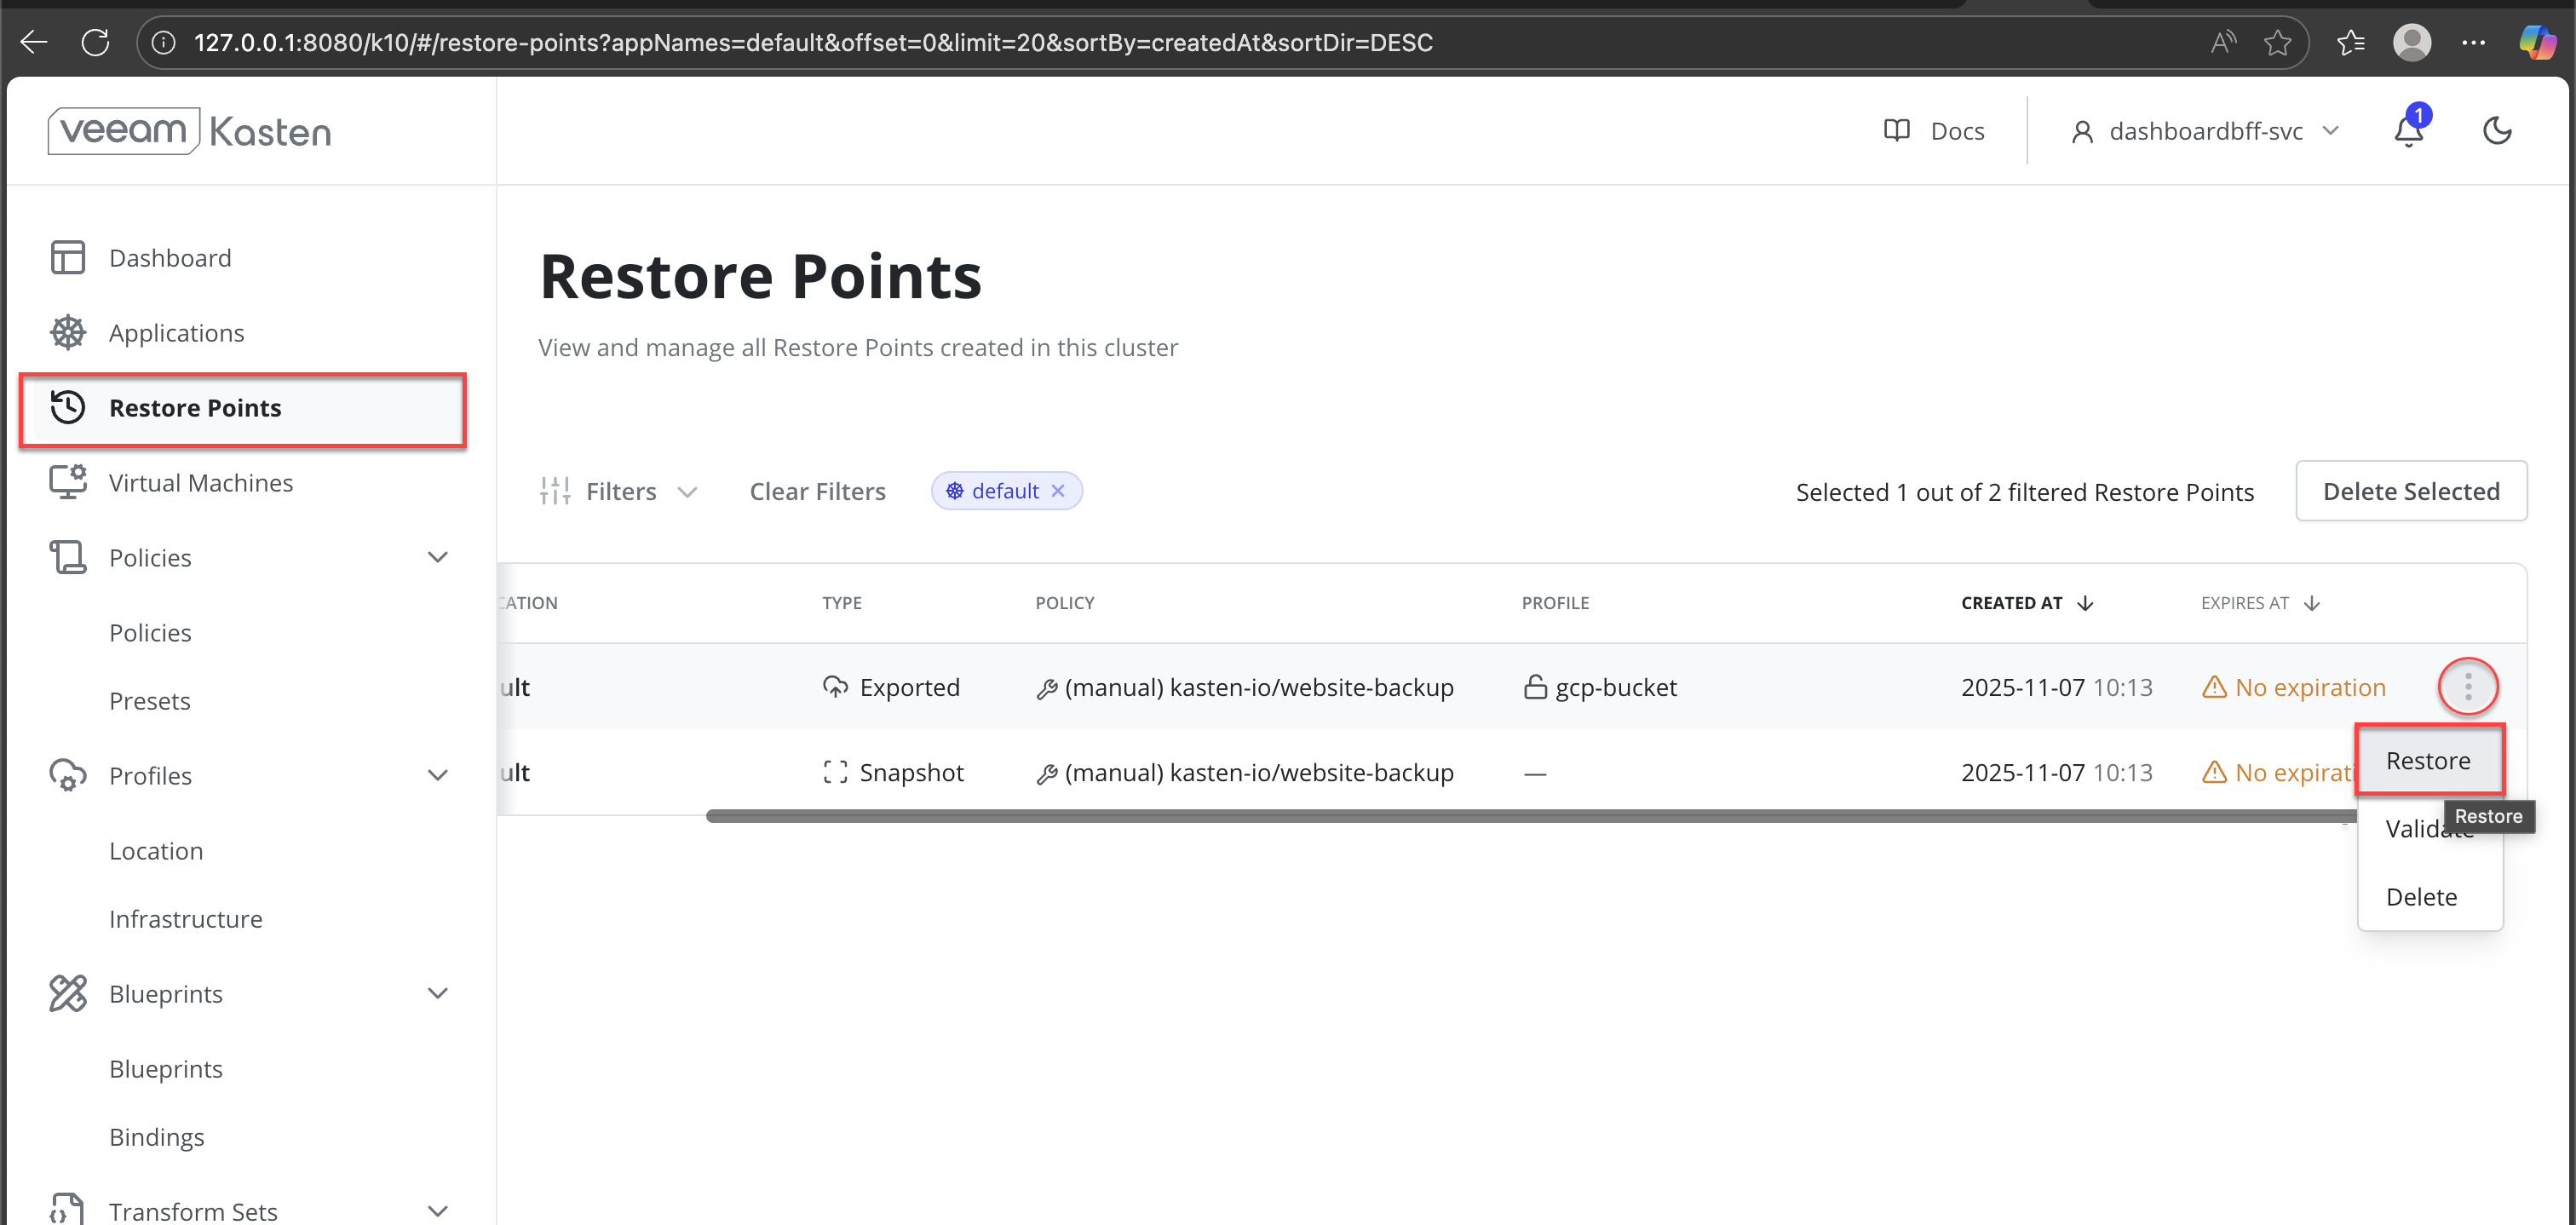
In the Restore Points view, identify the most recent exported restore point associated with the backup policy.
-
From the More options (⋮) menu for the restore point, select Restore.
-
Verify the following information in the Restore Point summary:
- Originating backup policy
- Export profile
- Creation time and restore point type
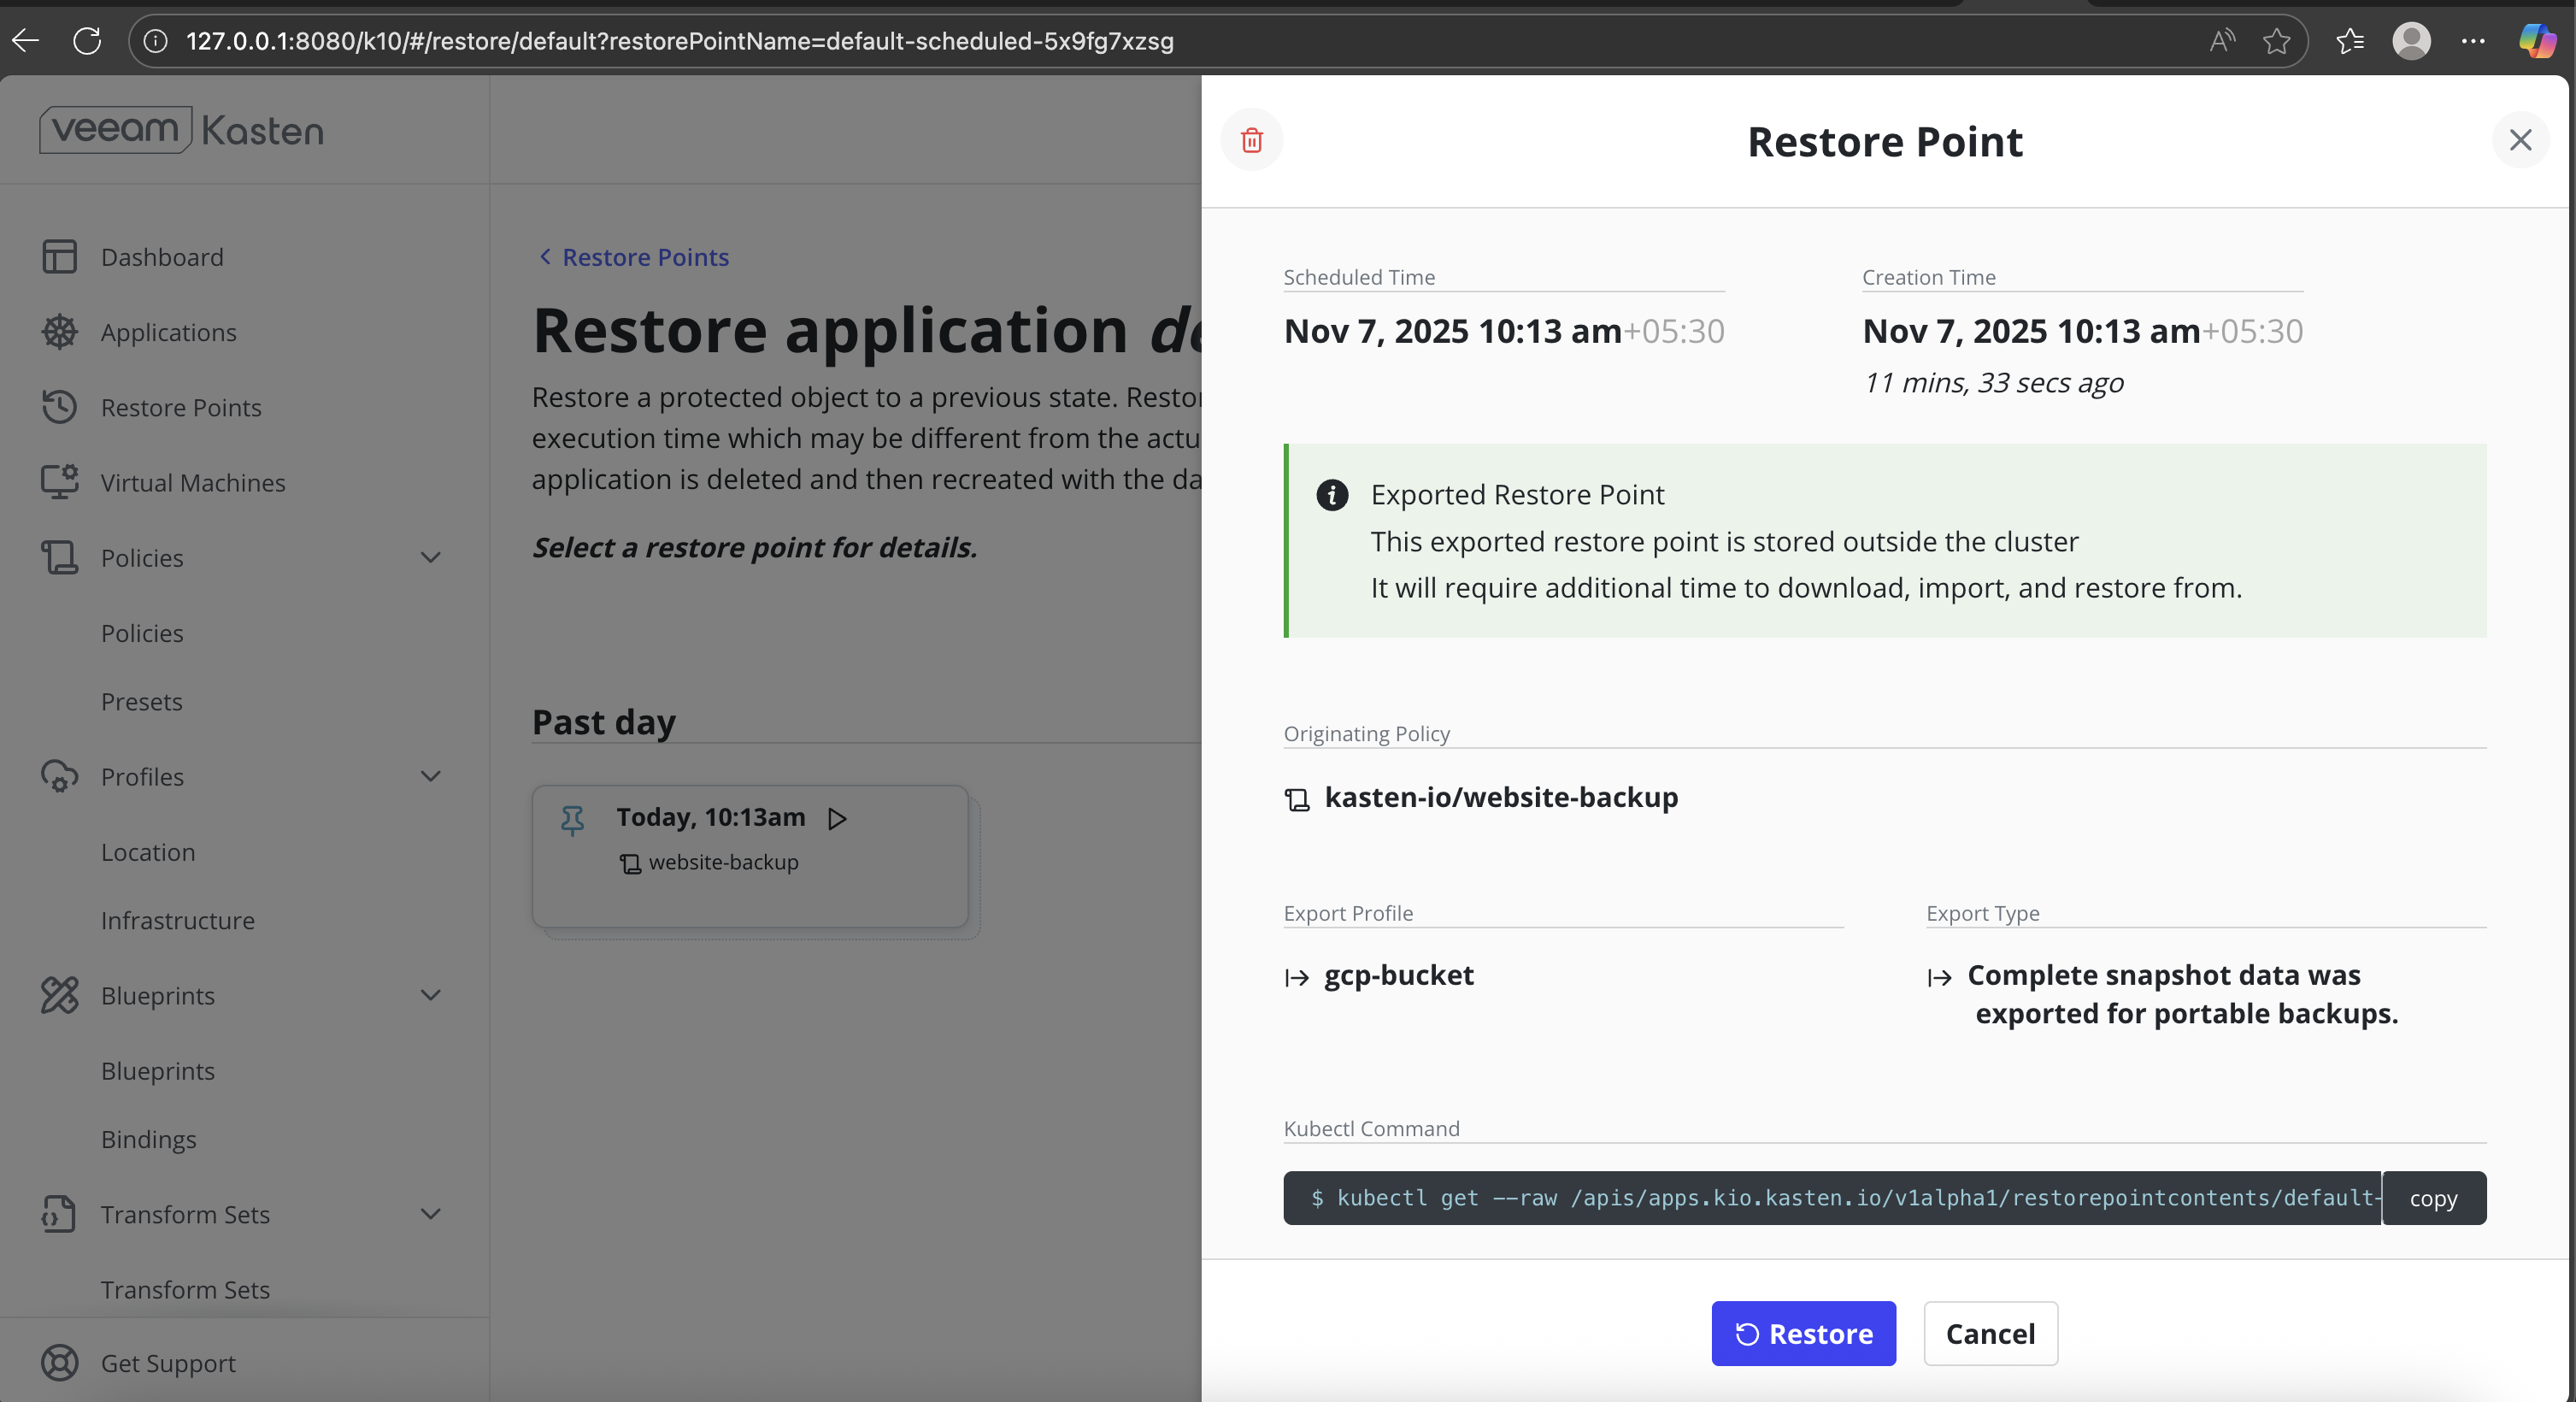
Click Restore to proceed.
-
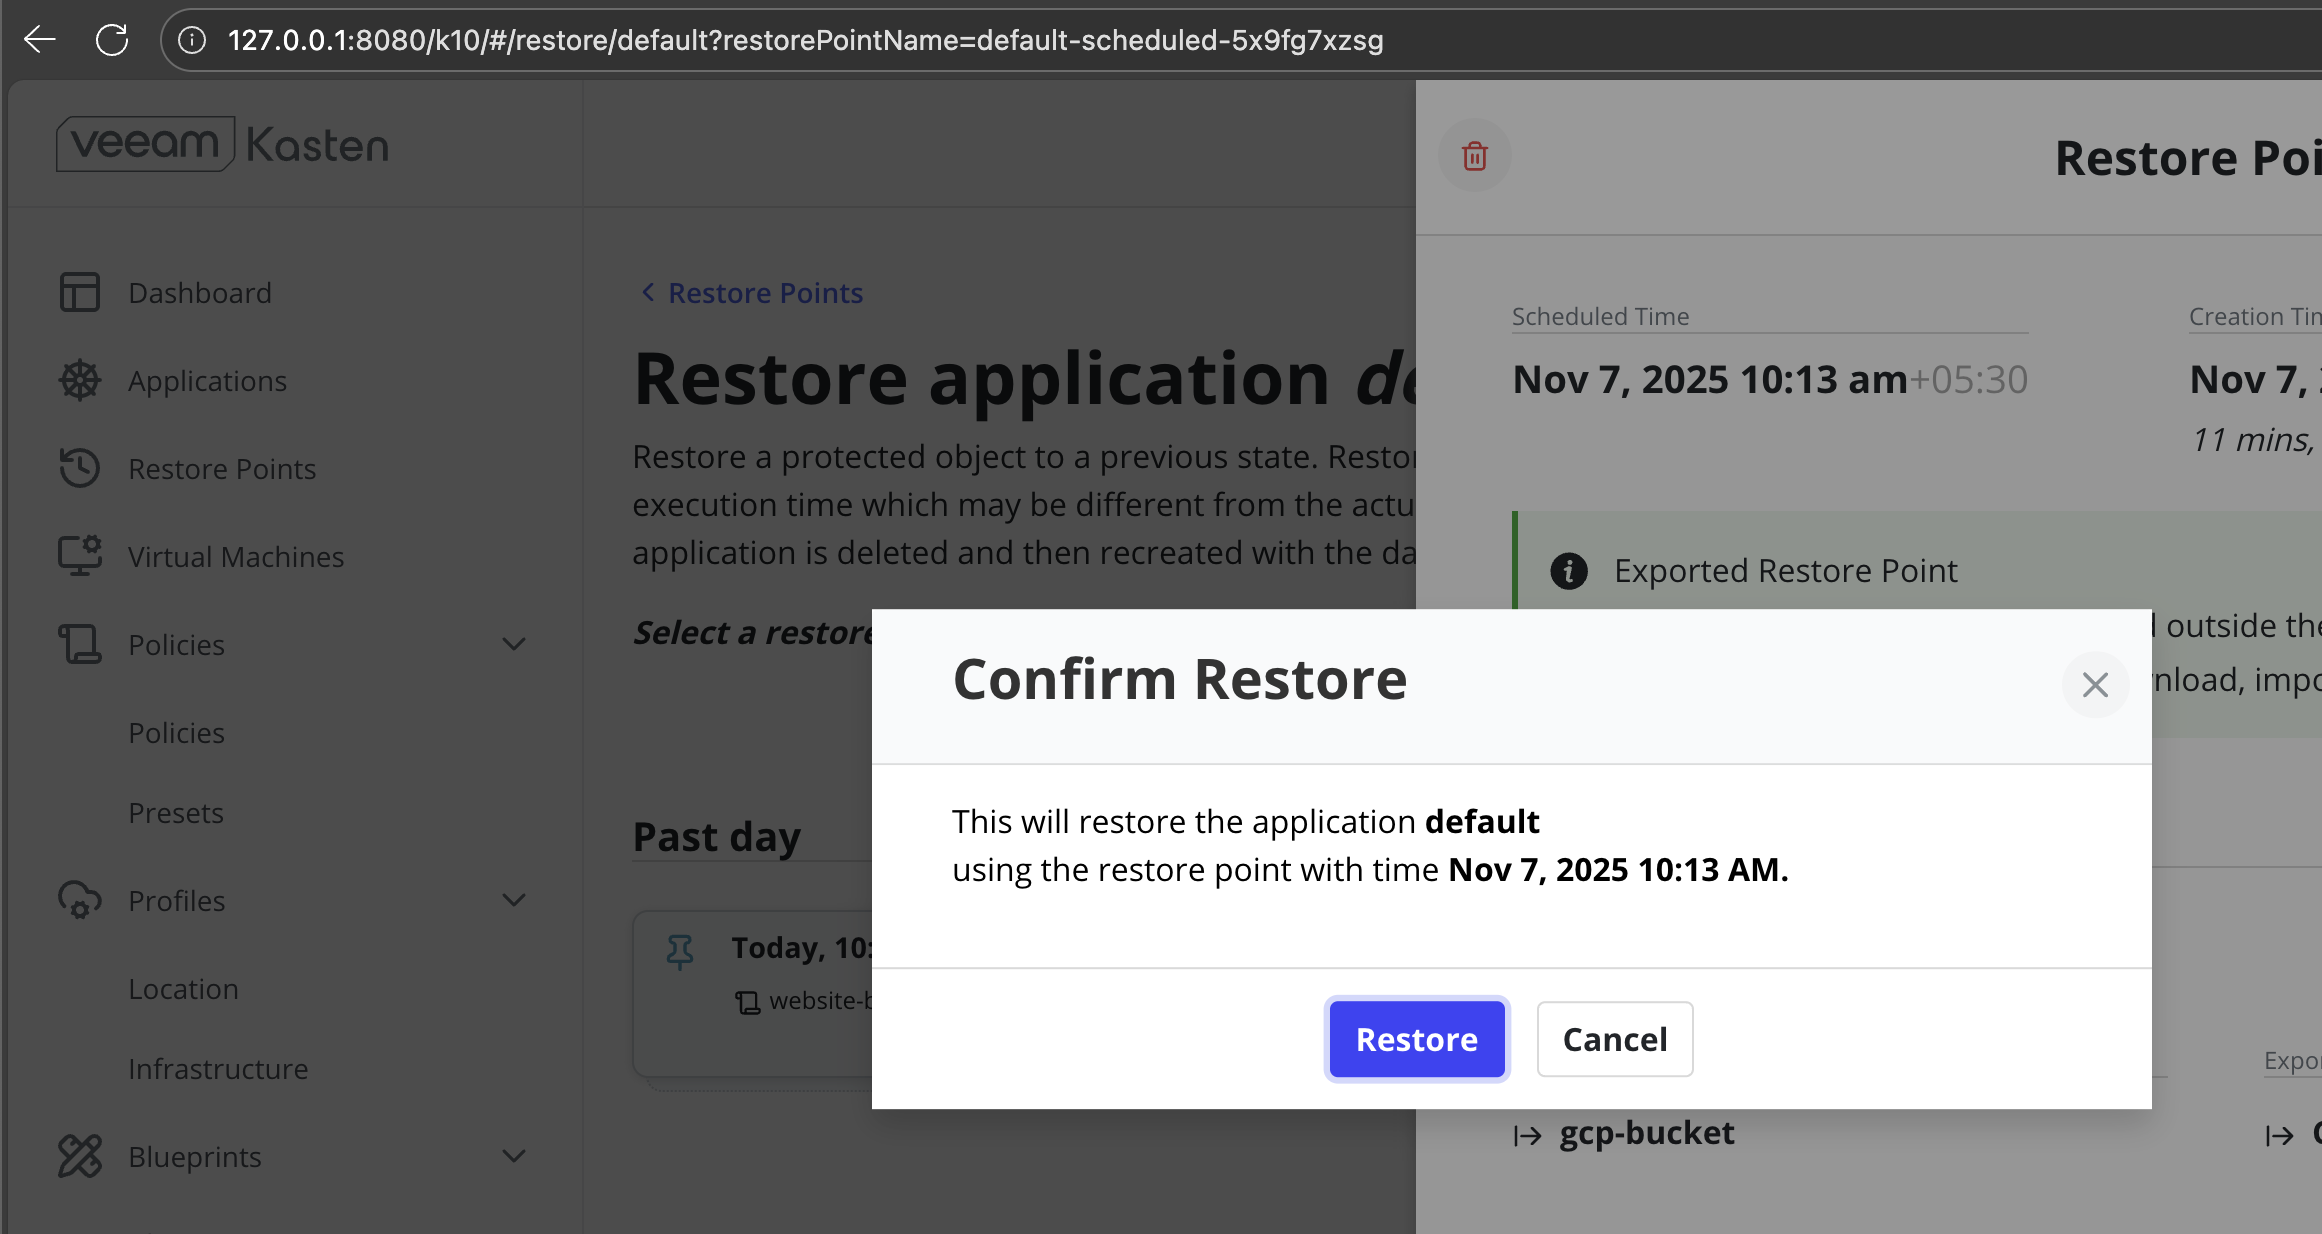
In the Confirm Restore dialog, review the target application and restore timestamp. Click Restore to start the restore process.
-
Specify a snapshot expiration time (optional) and confirm the operation.
-
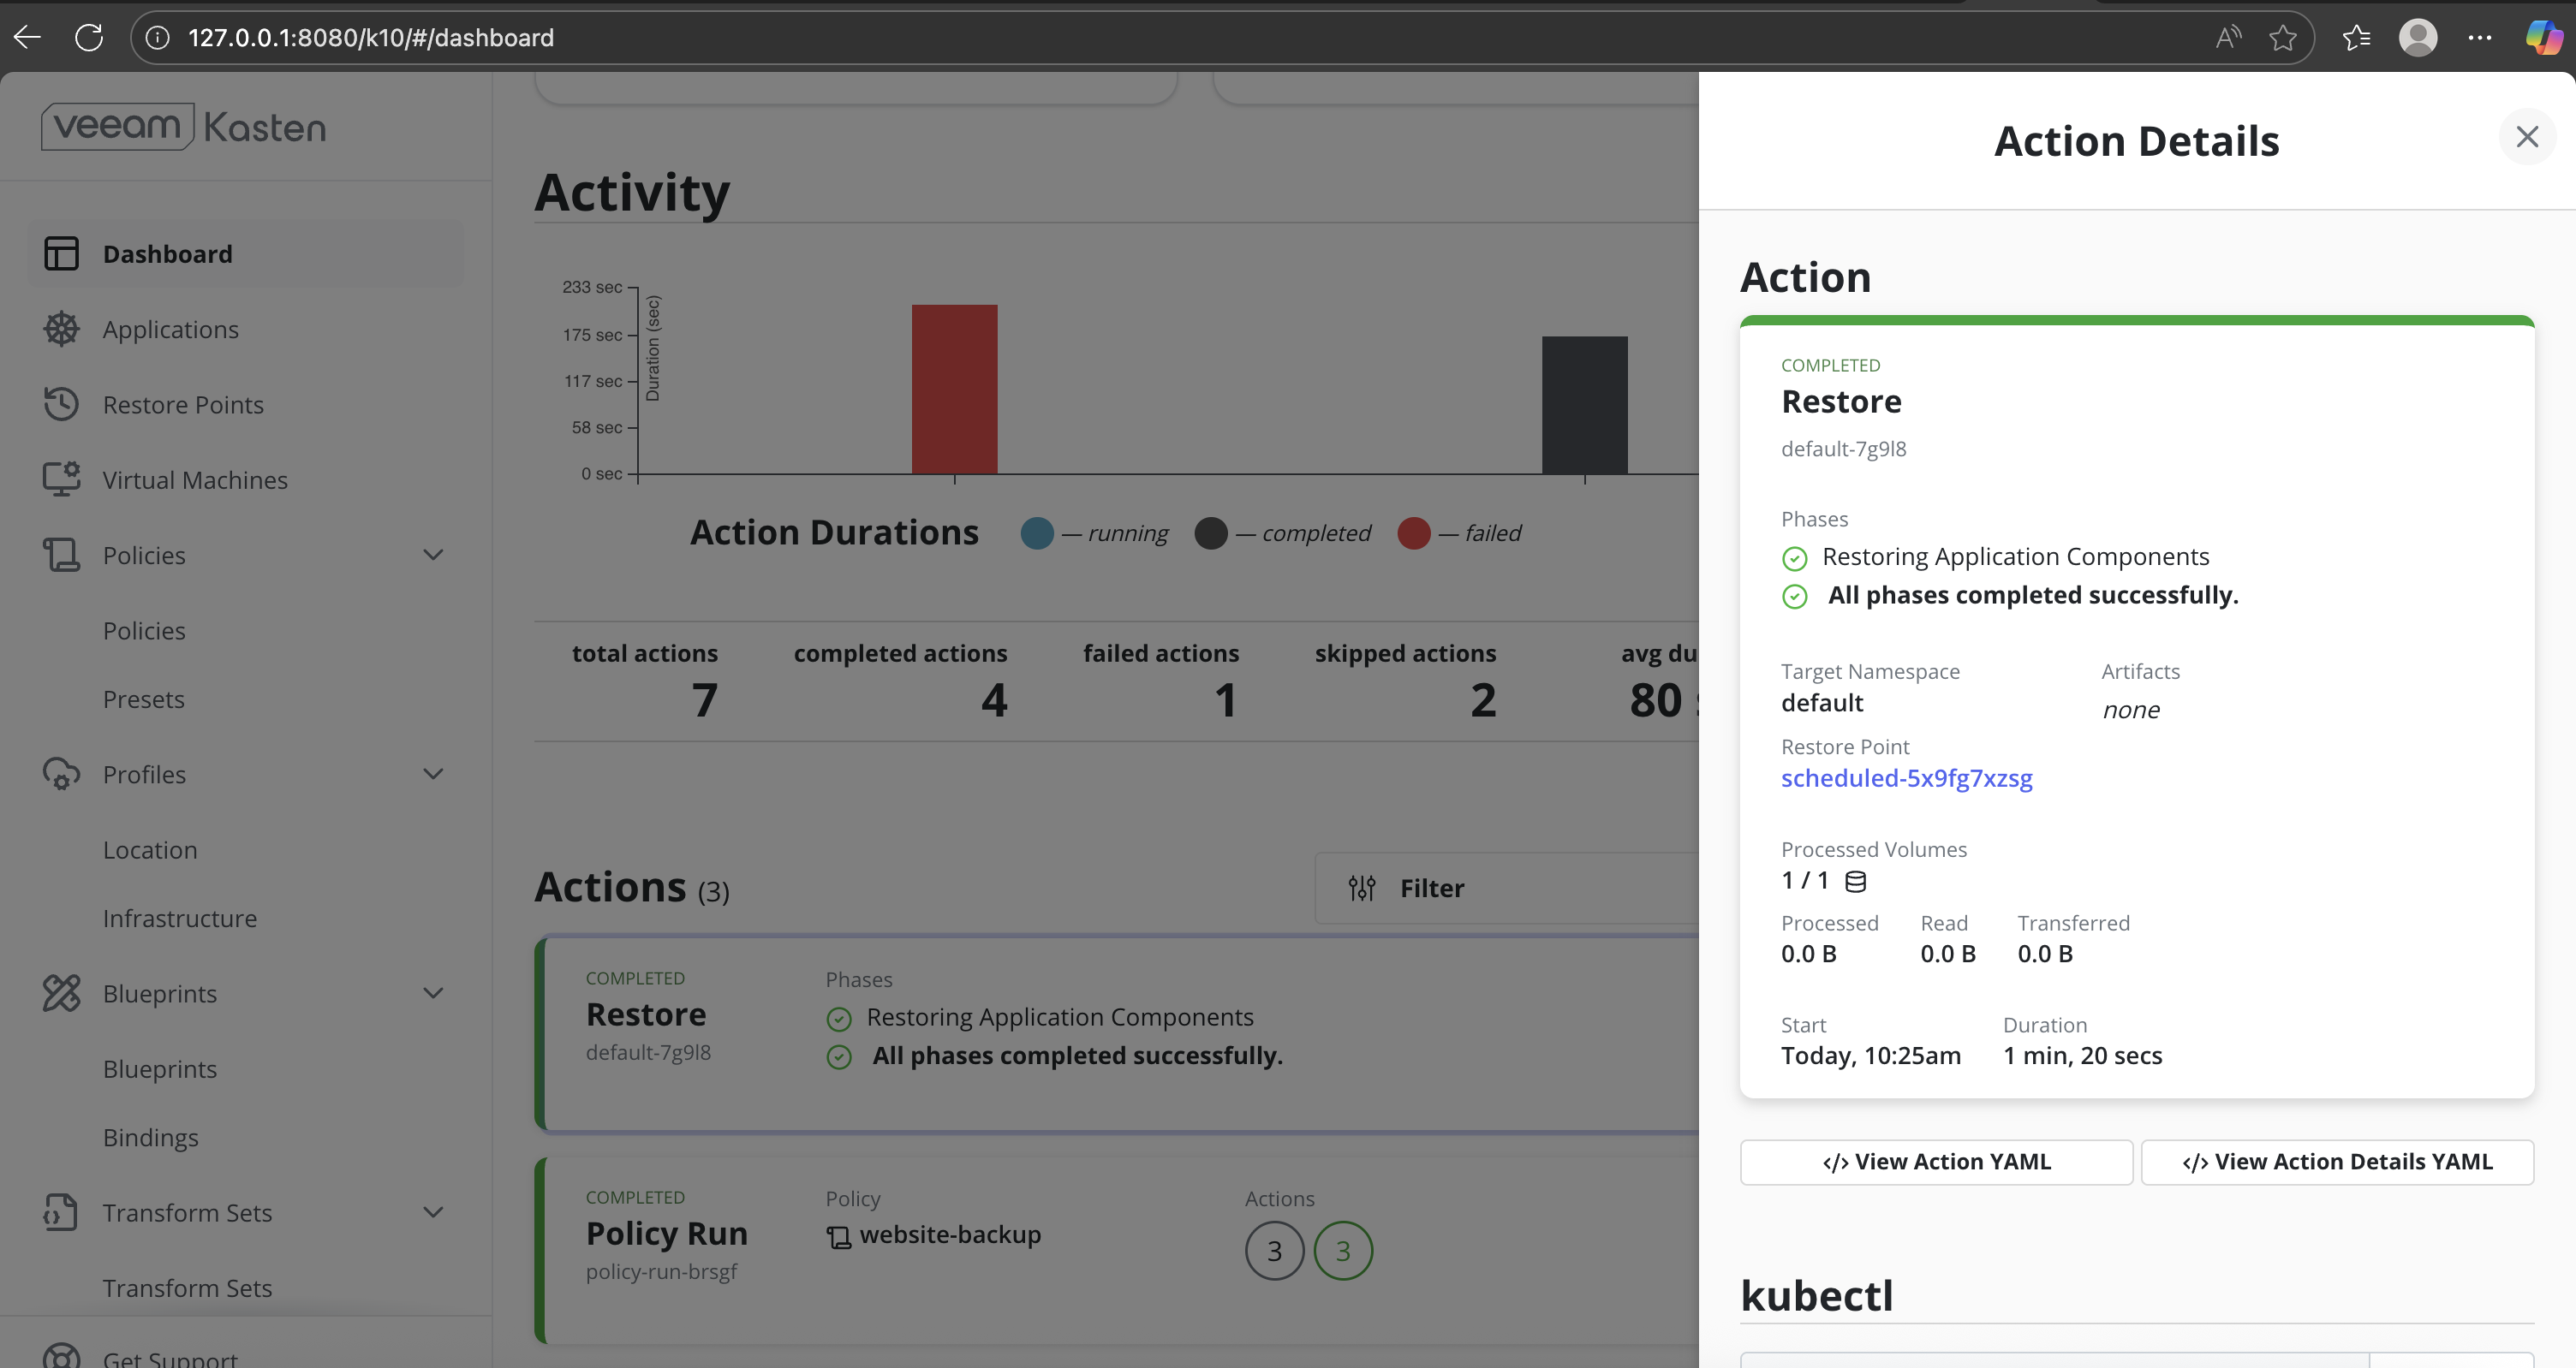
Monitor Restore progress:
- Monitor the restore action status until it shows Completed.
- Ensure all restore phases complete successfully without errors.
-
Verify restored pods and PVCs.
CopySample OutputNAME READY STATUS RESTARTS AGE
pod/nginx-75565c9485-d2dhg 1/1 Running 0 39s
NAME TYPE CLUSTER-IP EXTERNAL-IP PORT(S) AGE
service/kubernetes ClusterIP 10.96.0.1 <none> 443/TCP 7m37s
NAME READY UP-TO-DATE AVAILABLE AGE
deployment.apps/nginx 1/1 1 1 40s
NAME DESIRED CURRENT READY AGE
replicaset.apps/nginx-75565c9485 1 1 1 40s -
Confirm that the restored PVCs are successfully bound.
CopySample OutputNAME STATUS VOLUME CAPACITY ACCESS MODES STORAGECLASS VOLUMEATTRIBUTESCLASS AGE
ms-volume-claim Bound pvc-ba0cc0ff-28c7-4a2a-bcb8-e1c33b9f87c6 1Gi RWO mayastor-1-thin <unset> 50s
Validate Application Functionality
-
Access the application endpoint. Forward the application pod port to your local machine.
CopySample OutputForwarding from 127.0.0.1:8080 -> 80
Forwarding from [::1]:8080 -> 80
Handling connection for 8080 -
Verify application behavior.
Confirm that:
- The application UI is accessible.
- Application data is present and consistent with the pre-backup state.
Backup and restore operations can be performed in a similar manner using Local PV ZFS. Refer to the Configuring DataCore Puls8 Documentation for configuring and using Local PV ZFS.
Benefits of Using DataCore Puls8 with Veeam Kasten
- Application-Consistent Backups: DataCore Puls8 Replicated PV Mayastor and Local PV ZFS integrate seamlessly with Veeam Kasten to enable snapshot-based backups that capture application state and persistent data consistently.
- Snapshot-Based Data Protection: Application backups are performed using CSI snapshots, allowing persistent data to be captured and restored without manual volume handling.
- Operational Visibility Through Veeam Kasten UI: Backup execution, restore progress, and completion status are clearly tracked using the Veeam Kasten dashboard.
- Storage-Aware Restore Verification: Post-restore verification confirms that Puls8-backed PVCs are correctly rebound and application data is accessible after recovery.
Learn More