Snapshot Operations
Explore this Page
- About Snapshot Operations
- Creating Snapshots
- Creating Immutable Snapshots
- Updating Snapshots
- Promoting to Full
- Enabling Encryption and Compression for an Existing Snapshot
- Enabling NVMeoF for an Existing Snapshot
- Reverting from Snapshots
- Splitting Snapshots
- Deleting Snapshots
- Setting the Mapstore Pool
- Setting the Preferred Snapshot Pool
- Setting the Default Snapshot Pool
About Snapshot Operations
A snapshot is a single logical(differential snapshot), or fully independent (full snapshot) image of a virtual disk at a particular point in time (snapshot point).
Before creating your first snapshot, see Snapshot for snapshot information and additional operations which can be performed on existing snapshots.
Changing the system clock of the source DataCore Server can affect the timestamp of snapshots. For instance, if a snapshot is created at 11:00 a.m. and the host writes to the served virtual disk, and then you change the system clock to 10:00 a.m. and create another snapshot, the "older" snapshot created at 10:00 a.m. will contain the newest data changes.
| Snapshot Operations | |
|---|---|
|
Create Snapshot |
Creates a logical image or fully usable clone of the data residing on a virtual disk at a specific point in time (snapshot point). (After the snapshot is created, additional operations can be performed on the snapshot.) See Creating Snapshots. |
|
Update Snapshot |
Updates the snapshot with the latest changes that have occurred on the source virtual disk. (The percentage of data changes between the snapshot and source virtual disk can be viewed in the Delta Map column on the Virtual Disk Details page>Snapshots tab for the virtual disk.) See Updating Snapshots. |
| Create Immutable Snapshot | Creates a snapshot that cannot be modified or deleted until the retention period expires. Refer to Creating Immutable Snapshots for more information. |
|
Revert from Snapshot |
Resynchronizes the source virtual disk and the snapshot, so that the source becomes an image of the current state of the snapshot. See Reverting from Snapshots. |
|
Abort |
Cancels the current operation being performed. |
|
Promote to Full |
Migrates any unmigrated * blocks from the source to the destination and upgrades the snapshot type from a differential snapshot (logical image) to a full snapshot. Changes to the snapshot before promoting to full will be preserved in the snapshot, and in this case after promoting to full, the source and snapshot will be different. After migration is successfully completed, a full snapshot exists and operates independent of the source. (The snapshot can be split.) Once promoted, the ability to demote to a differential copy does not exist. See Promoting to Full. * Unmigrated blocks are blocks that have not been changed on either the source or the snapshot. |
|
Terminates the relationship between the source virtual disk and a full snapshot. See Splitting Snapshots. |
|
|
Delete Snapshot |
Deletes the snapshot image and leaves the source virtual disk intact. See Deleting Snapshots. |
Snapshot operations can be performed from:
- The Virtual Disk Details page > Snapshot tab. Some operations can be performed from the Ribbon > Virtual Disk Actions tab when the details page is open.
- The context menu in the DataCore Servers panel, Hosts panel, or Virtual Disks list.
(This topic provides instructions using one method.)
Creating Snapshots
- The best practice is to create a snapshot when data is in a known good state. Whenever possible before creating the snapshot, perform an application-specific flush and quiesce for consistent data, then pause I/O on the application until after the snapshot is created.
- Snapshots cannot be created from a rollback.
- Snapshots cannot be mirrored unless they are split first.
- Differential snapshots are dependent on the source. When a source virtual disk is deleted, any differential snapshots created from the source which are not served to hosts will also be deleted. To preserve differential snapshots, they must be promoted to full snapshots first and then delete the source.
- See Virtual Disk Groups for important information about creating snapshots on a virtual disk group.
- The timestamp in the default snapshot name is the creation time displayed in UTC (Coordinated Universal Time).
To create a snapshot:
- In the Virtual Disk Details page > Snapshots tab, click the link Create Snapshot.
(Alternatively, snapshot operations can be initiated from context menus in panels and virtual disk lists.)
- In the page that opens, a default name is provided for the snapshot. The default name consists of the name of the source virtual disk and timestamp (snapshot point) of when the snapshot was created. Change the name if desired. Add a description if desired.
- The snapshot can only exist on one server. If the virtual disk is mirrored or dual, or if a snapshot is being created on a virtual disk group consisting of virtual disks from more than one server, select the DataCore Server where the snapshot should be created.
If a preferred snapshot pool is set for virtual disks, that server and pool will be pre-selected, but can be changed if required.
- Select the Storage Profile. The default setting for the storage profile is Normal, select a different level if required. (See Storage Profiles for more information.)
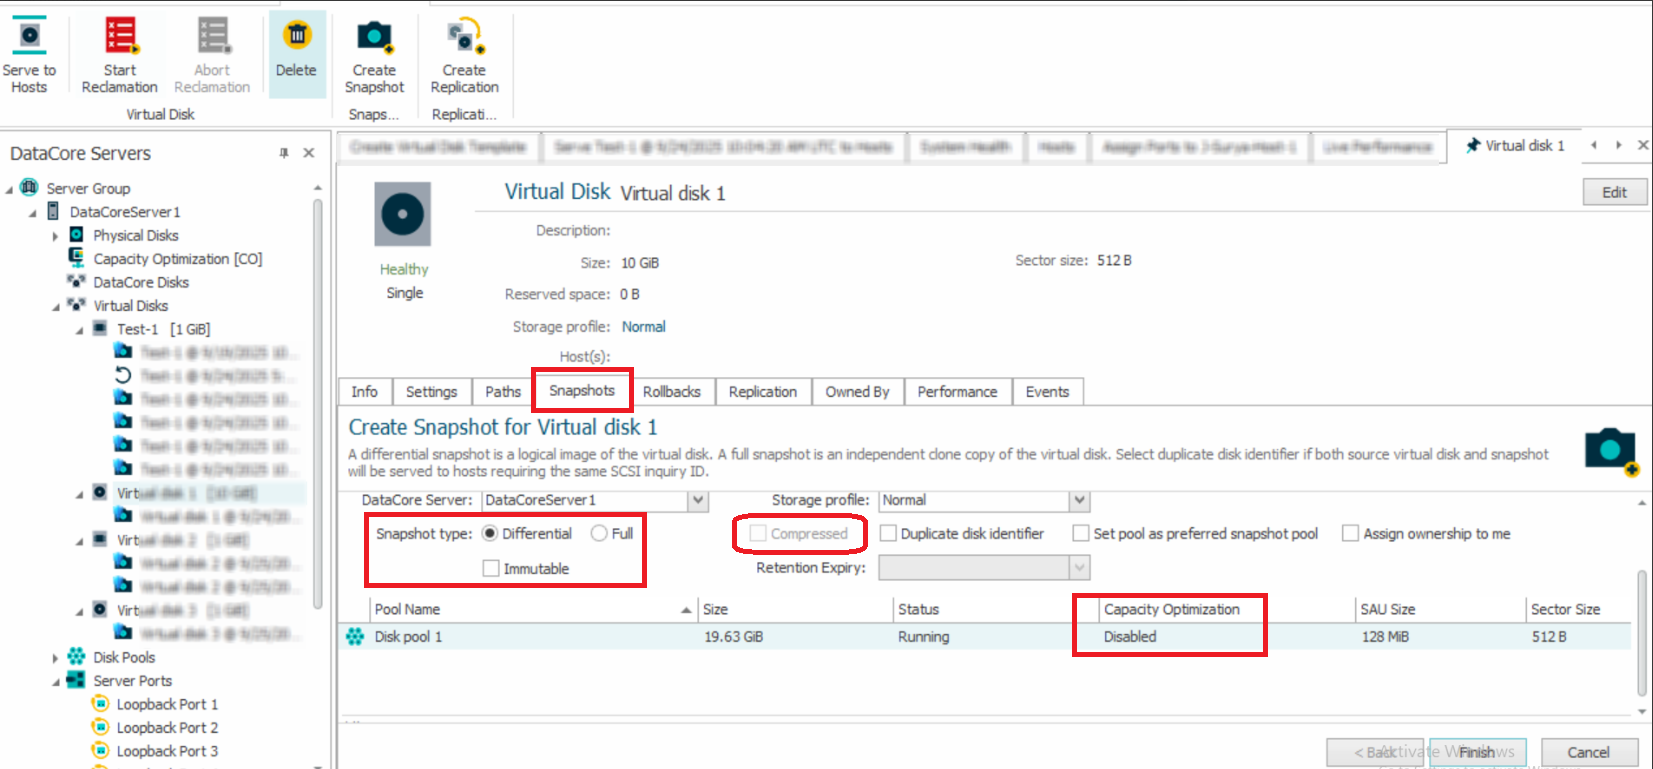
- Select the snapshot type:
- Differential - A logical image of the source virtual disk at the snapshot point. The snapshot is dependent on the source.
- Full - A clone copy of the source virtual disk at the snapshot point. After migration is successfully completed, the snapshot is fully usable and can exist and operate independently of the source from which it was created.
Creating full copies requires more resources than creating differential copies. The load on the DataCore Server that is migrating data is dependent on the available resources of the server.
- To set the compression while creating snapshots of this virtual disk, select the Compressed check box.
- Only select the Duplicate disk identifier check box if both source virtual disk and snapshot will be served to hosts requiring the same SCSI inquiry ID (virtual product information). For instance, this is required for ESXi clusters.
- To set the selected pool as the preferred snapshot pool to use when creating snapshots of this virtual disk, enable the Set pool as preferred snapshot pool check box. This option is not available for virtual disk groups or if the pool has already been set.
- Select the Assign ownership to me check box to assign exclusive ownership to the user account currently logged in and creating the snapshot. This restricts all operations on the snapshot to only the account logged in and the Administrator account.
- You can make the snapshot immutable by selecting the Immutable checkbox. This ensures the snapshot is protected from any modifications or deletions for the duration of its retention period. Refer to Creating Immutable Snapshots for more information.
- In the list, select the pool to use to create the snapshot or click Create Disk Pool to create a new pool.
- Click Next.
- The first time a snapshot is created on the server, the Designate a Pool for Snapshot Mapstore page opens. Select the pool from which to create the mapstore. This option is not available for virtual disk groups; the mapstores must be set before a snapshot can be created for the group.
- Click Finish.
The Compressed check box is unavailable for virtual disks when the selected destination pool has Capacity Optimization disabled.
After creating a snapshot:
- The snapshot will appear under the source virtual disk in the DataCore Servers panel. To view the progress of data migration and operations and other information, open the details page for the snapshot.
- The status of the snapshot can also be monitored in the Virtual Disk Details page > Snapshots tab.
- While the snapshot operation is active, the operation is reflected in the Operation column and the percentage complete is reflected in the Status column. See Snapshot Status.
- When the snapshot is complete, the Operation column is clear and the Status column should reflect Healthy.
Creating Immutable Snapshots
You can make a snapshot immutable to protect it from modification, deletion, or reconfiguration for a defined retention period. Immutability can be enabled when creating a new snapshot or applied later to an existing snapshot.
Immutable snapshots support retention expiry, seal verification, approval-based revocation, and retention extension workflows. For detailed instructions, prerequisites, limitations, and immutability management procedures, see Creating Immutability for SANsymphony Objects.
Updating Snapshots
Updates the snapshot with the latest changes that have occurred on the source virtual disk. The snapshot will become an image of the current state of the virtual disk. The snapshot point will be updated to reflect the time of the update.
To update the snapshot:
- In the Virtual Disk Details page > Snapshots tab, right-click the snapshot to update and select Update Snapshot from the menu.
- A confirmation message will appear, Select the check box and click Yes to continue with the operation.
The Update Snapshot operation is disabled for immutable snapshots.
Promoting to Full
Upgrades a differential snapshot (logical image) to a full snapshot.
To promote the snapshot from differential to full:
- In the Virtual Disk Details page > Snapshots tab, right-click the snapshot to promote and select Promote to Full Snapshot from the menu.
- Click Yes on the confirmation message. Operation status is displayed in the Operation and Status columns in the Virtual Disk Details page > Snapshots tab. When the Operation field is empty, the snapshot is idle. After the snapshot is promoted, the snapshot becomes an independent image and fully usable virtual disk which can be split.
Enabling Encryption and Compression for an Existing Snapshot
You can enable Encryption and Compression for an existing snapshot.
- Open the Snapshot Details page. For more information, see Snapshot Details.
- Under the Settings tab, select the required options:
- Encrypted
- Compressed
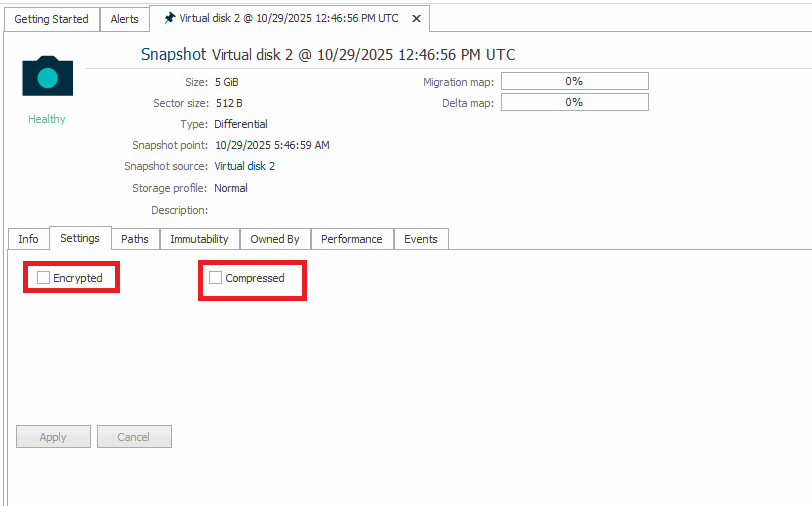
- Click Apply.
Enabling NVMeoF for an Existing Snapshot
You can enable the NVMeoF option for a snapshot. This option is visible only if the NVMeoF feature is enabled in the DataCore Server Group. To enable NVMeoF for an existing snapshot:
-
Under the Settings tab, select the NVMe Namespace checkbox.
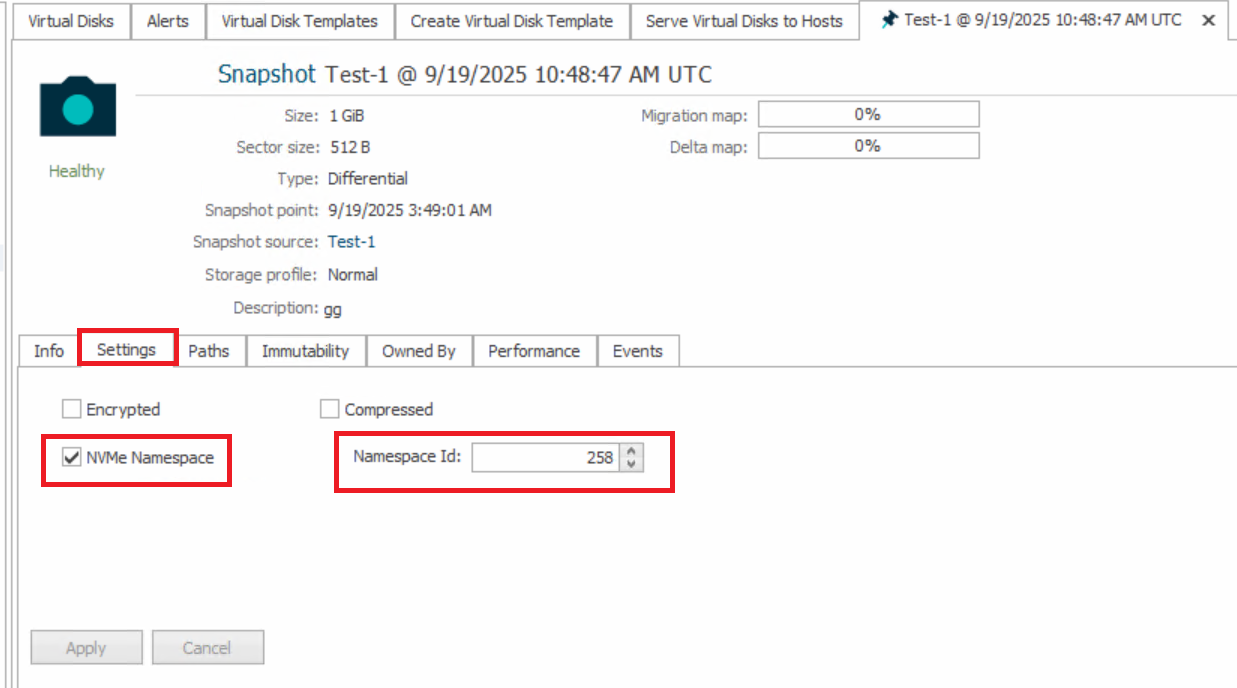
- Specify a Namespace ID (range: 256 – 65535). The Namespace ID must be unique within the Server Group.
- By default, the namespace is assigned the next available value in the range.
- You can also manually specify any unused value within the range, as long as it is unique within the Server Group. Example: If IDs 256, 257, and 258 are already in use, you could set 300 (or any other unused number in the range).
- The Namespace ID cannot be modified once the snapshot is served.
- Click Apply. The snapshot is now NVMe-enabled, and hosts accessing this snapshot will recognize it as an NVMe Namespace with the assigned Namespace ID.
When you create a Snapshot of an NVMe namespace virtual disk, the NVMe Namespace checkbox is selected by default, making the Snapshot NVMe-enabled. You can manually select or clear the "NVMe Namespace" checkbox for each Snapshot after it is created.
Reverting from Snapshots
Reverting will overwrite all changes that have occurred on the source virtual disk after the snapshot point. Before this command is performed, I/O operations should be stopped. After the operation is complete, the host must invalidate the cache. The method of invalidating the cache is dependent on the host operating system.
To revert from the snapshot image:
- Stop I/O operations from the host.
- In the Virtual Disk Details page > Snapshots tab, right-click the snapshot to use to revert and select Revert from Snapshot from the menu.
- A confirmation message will appear; read the message carefully. To continue with the operation, click the check box, then click Yes.
Operation status is displayed in the Operation and Status columns in the Virtual Disk Details page > Snapshots tab. When the Operation field is empty, the snapshot is idle.
- After the revert operation is complete, the host must invalidate the cache and then I/O operations can be resumed.
Splitting Snapshots
Terminates the relationship between the source virtual disk and the snapshot. After the split operation is complete, the designation of the snapshot is elevated to a virtual disk and all the options available to a virtual disk (mirroring, Continuous Data Protection, Snapshot and so on) are granted.
Only full snapshots can be split. The command does not change the status of the data on the source virtual disk or the snapshot.
When a snapshot group is split, a new virtual disk group will be created and the resulting virtual disks will be added to the new group.
Use caution when a virtual disk is using duplicate disk IDs and is involved in snapshots. If the snapshot is split, both virtual disks will have the same SCSI device ID. Under these circumstances, the SCSI device ID for one virtual disk may need to be changed in order to make it unique. See SCSI Standard Inquiry Data.
To split the snapshot:
- In the Virtual Disk Details page > Snapshots tab, right-click on the full snapshot to split and select Split Snapshot from the menu.
- Click Yes on the confirmation message. Operation status is displayed in the Operation and Status columns in the Virtual Disk Details page > Snapshots tab. When the Operation field is empty, the snapshot is idle.
The Split Snapshot operation is disabled for immutable snapshots.
Deleting Snapshots
Deleting a snapshot permanently destroys the data on the snapshot and removes it from the configuration. Snapshots cannot be deleted if served to a host.
When a snapshot group is deleted, all snapshots in the group will also be deleted.
To delete the snapshot:
- In the Virtual Disk Details page > Snapshots tab, right-click on the snapshot to delete and select Delete from the menu.
- A confirmation message will appear; read the message carefully. To continue with the operation, click the check box, then click Yes.
The Delete Snapshot operation is disabled for immutable snapshots.
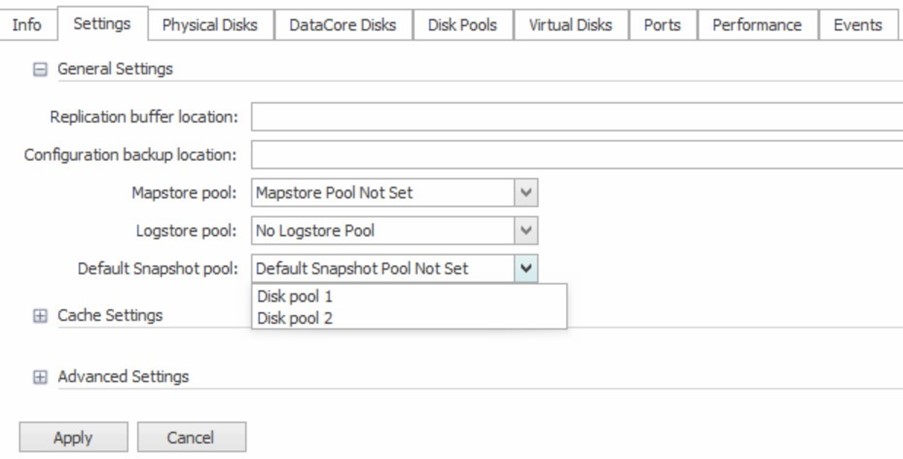
Setting the Mapstore Pool
When the first snapshot is created on a DataCore Server, the disk pool used to create the mapstore must be selected. The pool can be changed later, if required. Pools with inadequate space will not be considered as mapstore candidates.
To assign or change the location of the mapstore:
- In the DataCore Server Details page > Settings tab, expand General Settings.
- In Mapstore pool, use the pull-down menu to select the pool from which to create the mapstore.
- Click Apply.
Setting the Preferred Snapshot Pool
A disk pool can be designated as the preferred pool to use when creating snapshots for a virtual disk. The preferred snapshot pool is set per virtual disk. (A preferred snapshot pool cannot be assigned at the virtual disk group level.)
Setting a preferred snapshot pool enables snapshots to be created for virtual disks in a group which do not belong to the same server. Once set, all snapshots for that virtual disk will be created from the designated pool on the designated server. The pool assigned must belong to a server that created the virtual disk. For instance, mirrored virtual disks can select any pool on either server that created the virtual disk.
- If a preferred snapshot pool is set and the pool is unavailable, the preferred snapshot pool will have to be changed in order to create a snapshot of the virtual disk.
- The best practice when using preferred snapshot pools for virtual disks in groups is to set a preferred snapshot pool for all virtual disks in the group. (A mapstore pool is required to be set for all applicable servers.)
- When a snapshot is created, the preferred snapshot pool will be pre-selected in the wizard, but can be changed if necessary.
To assign or change the pool:
- In the Virtual Disk Details page > Settings tab, click Advanced Options.
- In the Snapshot Sources area, select the DataCore Server and then the Preferred Pool.
- Click Apply.
Setting the Default Snapshot Pool
A disk pool can be designated as the default snapshot pool when creating snapshots for a virtual disk (VD). The default snapshot pool can be set per server.
Setting a default snapshot pool enables the snapshots to be created in a designated pool in the server. Once set, all snapshots for that virtual disk or virtual disk group get created in the designated pool on the designated server.
- Selection of preferred snapshot pool for a virtual disk ensures that the snapshot, created for that virtual disk, is created in the preferred snapshot pool.
- Snapshot disk pool selection order is: Preferred snapshot pool (on VD) >> Default snapshot pool (on server) >> Random disk pool (if there is no preferred pool and snapshot pool) for both virtual disk (single, mirror, and NWAY) and virtual disk group.
- Snapshots can also be created on different pools, despite having both preferred and default snapshot pools.
- For a virtual disk group, the disk pool selection page is greyed out if the preferred and default pools are set, and the snapshots are created on these pools only.
- In a virtual disk group, selection of the snapshot pool is allowed only if no virtual disk has been set with preferred or default pool.
To assign a default snapshot pool:
- In the DataCore Server Details page > Settings tab, expand General Settings.
- In Default Snapshot pool, use the pull-down menu to select the pool from which to create the snapshot.
- Click Apply.
Learn More
- Snapshot Details
- Snapshot Status
- Virtual Disk Groups for important information on performing snapshot operations on groups.