Creating Immutability for SANsymphony Objects
Explore this Page
- Overview
- Creating Immutable Snapshots
- Applying Immutability to Virtual Disks
- Creating Immutable Rollback
- Adding Approvers for Immutable Objects
- Immutability Revocation
Overview
This page explains how to apply immutability for SANsymphony objects such as snapshots, virtual disks, and rollbacks. Immutability helps protect critical data from accidental or unauthorized changes by making objects read-only. While immutability is active, immutable objects cannot be modified, deleted, or reconfigured.
Once immutability is applied, the object remains protected, ensuring data integrity and retention compliance. SANsymphony also supports approval-based workflows that allow owners to request revocation for immutable objects or retention extension before the expiry period.
Immutable objects remain protected even after the retention expiry is reached. To remove immutability protection and perform restricted operations, immutability must be explicitly revoked.
To revoke immutability or extend the retention expiry before the retention period expires, at least one approver must be added when the immutable object is created. If no approvers are configured, these actions can only be performed after the retention period expires. For information about configuring approvers and managing immutability requests, see Adding Approvers for Immutable Objects and Immutability Revocation.
Prerequisites
- Immutable snapshots require SANsymphony PSP21 or later.
- Immutable virtual disks and immutable rollbacks require SANsymphony PSP22 or later.
- Make sure there is sufficient disk pool space before applying immutability to objects like Snapshots, rollbacks, and virtual disks.
You can refer to the following topics for information about creating immutable SANsymphony objects:
Creating Immutable Snapshots
The Immutable Snapshot feature protects critical data from accidental or unauthorized changes by enforcing immutability. Once a snapshot is marked Immutable in DataCore Management Console, it becomes read-only and cannot be modified, deleted, or reconfigured. The snapshot remains immutable after the retention expiry is reached and must be explicitly revoked before restricted operations can be performed.
Prerequisites
- SANsymphony PSP21 or later is required.
- Ensure that sufficient disk pool space is available before creating an immutable snapshot.
Creating an Immutable Snapshot
You can make a snapshot immutable either during snapshot creation or by applying immutability to an existing snapshot. For more information about applying immutability to an existing snapshot, see Making an Existing Snapshot Immutable.
This section explains how to enable immutability when creating a new snapshot from a virtual disk.

- Select the virtual disk and open the Snapshots tab.
- While creating the snapshot, in the Snapshot Details window, select the Immutable checkbox.
- If you have selected the Snapshot type as Differential, it will automatically be changed to Full when you enable immutability. Simultaneously, the Assign Ownership to Me checkbox is selected by default, making the user who creates the immutable snapshot the owner of the immutable object. This ensures that all data blocks are included in the hash calculation, maintaining the snapshot’s integrity.
- Once enabled, the snapshot becomes read-only and protected by immutability. The retention expiry defines when the retention period ends, but the snapshot remains immutable until immutability is explicitly revoked.
- Specify the Retention Expiry:
- Enter the date and time for the retention expiry. The minimum retention period is 24 hours from the creation time.
System Health alerts are triggered by default when an immutable object (virtual disk, snapshot, or rollback) is within 3 days of its retention expiry. You can adjust these alert thresholds in Global Default Thresholds.
When creating a new immutable snapshot or making an existing snapshot immutable, if the specified retention expiry is less than 24 hours, a warning popup will appear. It informs you that the retention period will automatically be adjusted to 24 hours and requires your confirmation.
-
Select one or more Approval Users.
- Click Finish to create the immutable snapshot.
- Review the summary section, which shows Start Date, Expiry Date, Immutable Until, and Status in the Immutability tab.
- The snapshot is created, and hash calculation begins automatically. You can monitor hash calculation progress in the Immutability details page.
- Progress is shown as a percentage. Larger snapshots take longer.
- Wait until the hash calculation is completed.
- If the hash calculation fails for any reason, the immutable snapshot goes into a Failed state. You must restart the snapshot creation process.
- During hashing, the snapshot is already protected in read-only mode.
- Once hashing is complete, the snapshot status updates to Retention Locked, indicating that the snapshot is fully immutable and remains protected until immutability is revoked.
- (Optional) Add Immutable Objects as counters in Live Performance View for real-time monitoring.
- To validate the seal, click Start Seal Verification in the Immutability tab to recalculate and verify the hash.
- The verification process begins. You can monitor the progress in the same tab (displayed as a percentage) and wait until the verification is completed.
- The system recalculates the hash and compares it to the stored seal hash.
- If the values match, the snapshot’s integrity is confirmed, and the status updates to 'Verified' with the date of verification.
- If the values do not match, the snapshot is flagged as Compromised. Importantly, the snapshot remains immutable (still read-only and protected).
- You can also extend the retention expiry for the immutable snapshot:
- In the Immutability tab, select Extend Expiry.
- Specify the new date and time in Requested Date.
- Enter the request reason.
- Click Request Changes. The request is sent to the configured approvers for approval.
- You can revoke the immutability. To revoke immutability for the snapshot:
- In the Immutability tab, select Revoke Immutability.
- Enter the request reason.
- (Optional) Add users in Additional Approval Users if additional approvals are required.
- Click Request Changes. The revocation request is sent to the configured approvers.
- You can send revocation or retention expiry extension requests to the configured approvers to revoke immutability or extend the retention expiry. Revocation requests can be submitted only after the snapshot enters the immutable state, and at least one approver must be configured to process revocation or retention expiry extension requests. For more information, see Immutability Revocation.
- You can perform a split operation on an immutable snapshot. For more information, see Split Operation for Immutable Snapshots.
Making an Existing Snapshot Immutable
This section helps you make an existing snapshot immutable, monitor hash calculation, and perform seal verification to validate data integrity.
-
In the left pane, select an existing snapshot that is not already immutable.
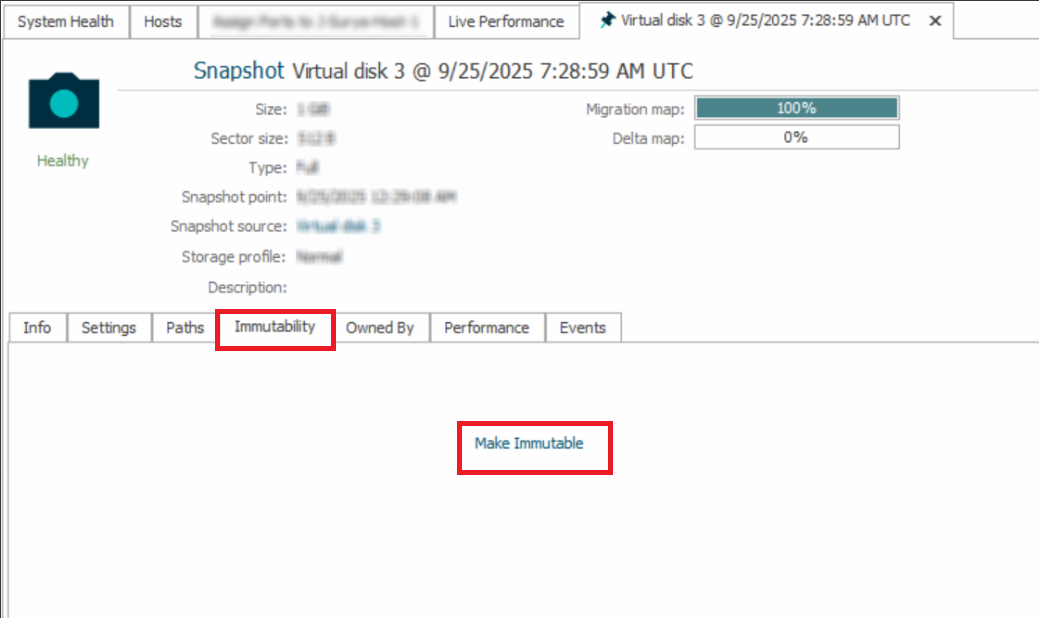
- Open the snapshot and select the Immutability tab.
- Click Make Immutable.
- Configure the retention expiry and complete the remaining steps as described in Creating Immutable Snapshots section.
- Operations such as renaming or updating cannot be performed on an immutable snapshot.
- You can enable immutability only on snapshots you own; attempts to enable immutability on snapshots owned by others will fail.
- If the retention period expires while hash calculation or seal verification is in progress, the operation continues until completion. Immutability is not automatically removed when the snapshot expires.
- Immutable snapshots remain protected and are restored in read-only mode after a system restart.
Split Operation for Immutable Snapshots
This section explains how to split an immutable snapshot. For information about creating immutable snapshots, see Creating Immutable Snapshots. When an immutable snapshot is split, it is converted into an independent virtual disk while retaining its immutable protection.
To split an immutable snapshot:
- In the left pane, navigate to DataCore Servers > Virtual Disks and select the required immutable snapshot.
- Right-click the immutable snapshot and select Snapshot > Split Snapshot.
- Review the confirmation message and click Yes to continue.
- After the operation completes, the immutable snapshot is converted into an independent virtual disk and is displayed as an immutable virtual disk.
- The split virtual disk remains read-only and protected as an immutable virtual disk.
- After the immutable snapshot is split and converted into an independent virtual disk, you can add a mirror to the split virtual disk if required.
- If required, you can revoke immutability before the retention expiry by submitting a revoke request to the configured approvers along with a request message. After the retention expiry is reached, immutability remains active until it is explicitly revoked. For more information, see Immutability Revocation.
Applying Immutability to Virtual Disks
This section explains how to apply immutability to virtual disks. The retention expiry defines when the retention period ends, but the virtual disk remains immutable until immutability is explicitly revoked.
You can apply immutability to single, dual, mirrored, and 3-way virtual disks.
Prerequisites
Before making a virtual disk immutable:
- Ensure it is not served with read/write access. It should be either read-only or unserved.
- If required, disable read/write access before enabling immutability. For more information, see Modifying Paths.
To make a virtual disk immutable:
- In the left pane, navigate to DataCore Servers > Virtual Disks.
- Perform one of the following:
- Right-click the virtual disk and select Make Immutable.
- Double-click the virtual disk, select the Immutability tab, and click Make Immutable.
- In the Immutability page:
- Specify the Retention Expiry date and time.
- The minimum retention period is 24 hours.
- (Optional) Select users from the Approval Users drop-down list to add approvers for immutability change requests, such as revocation or retention expiry extension. For more information, see Adding Approvers for Immutable Objects.
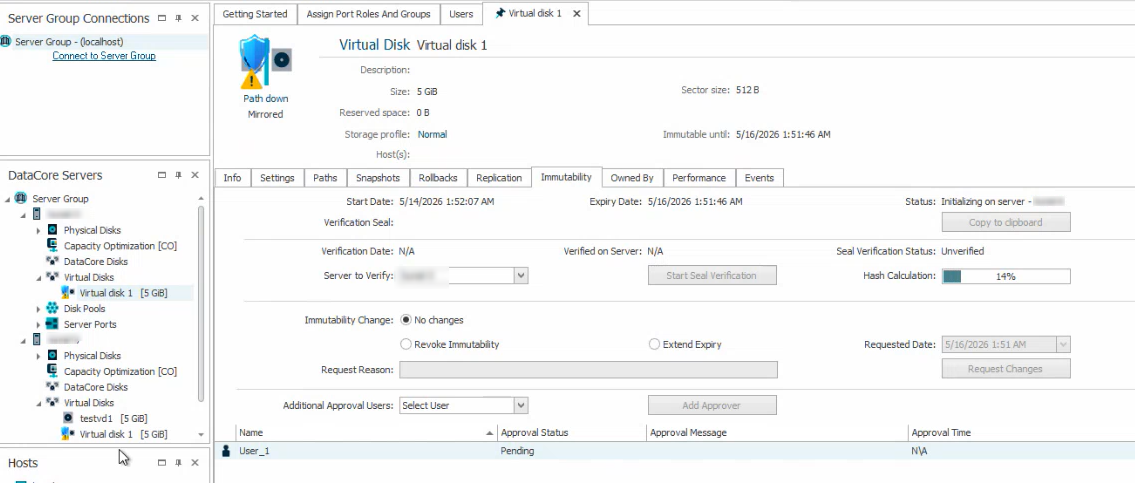
- Click Finish. Monitor the Hash Calculation progress displayed as a percentage. During hash calculation, the virtual disk is already protected in read-only mode.
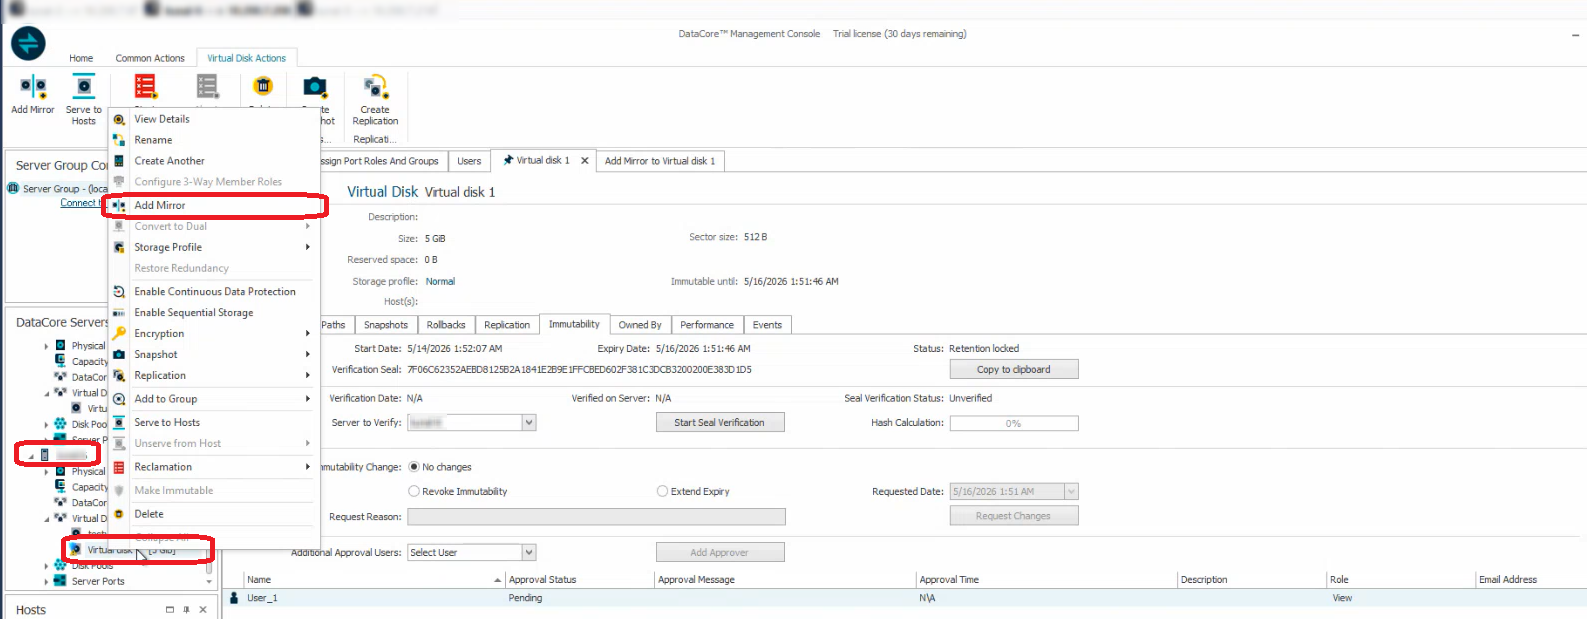
- Once hashing is completed, the status changes to Retention Locked, indicating that the virtual disk is fully immutable and remains protected until immutability is revoked.
- To validate the seal, click Start Seal Verification. The system recalculates and validates the hash to verify data integrity.
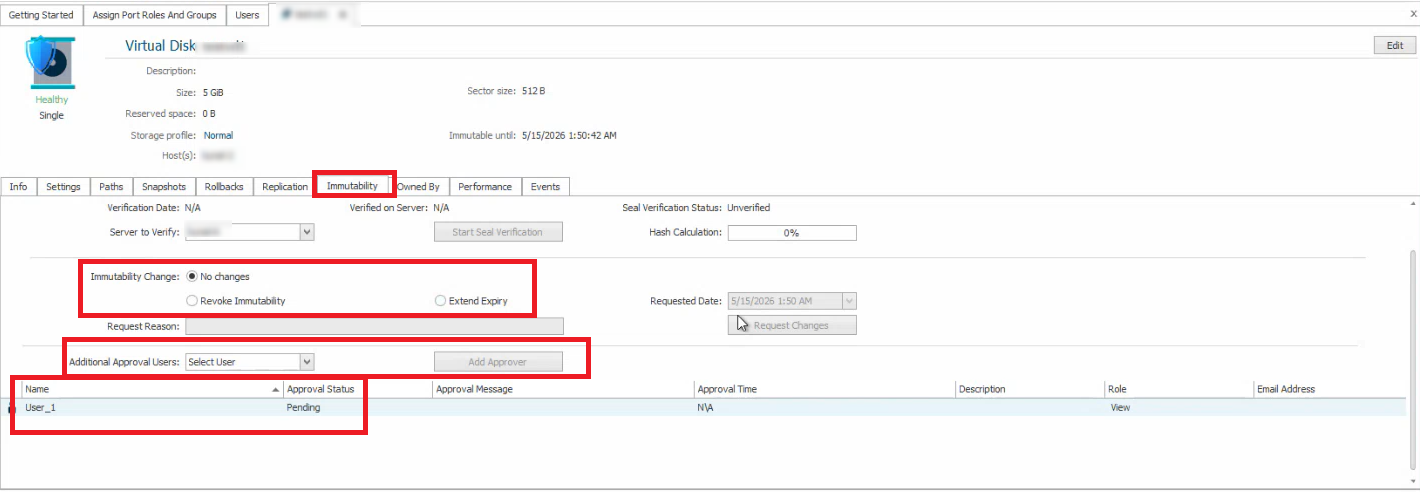
- You can also extend the retention expiry for the immutable virtual disk:
- In the Immutability tab, select Extend Expiry.
- Specify the new date and time in Requested Date.
- Enter the request reason.
- Click Request Changes. The request is sent to the configured approvers for approval.
- You can revoke the immutability. To revoke immutability for the virtual disk:
- In the Immutability tab, select Revoke Immutability.
- Enter the request reason.
- (Optional) Add users in Additional Approval Users if additional approvals are required.
- Click Request Changes. The revocation request is sent to the configured approvers.
You can send revocation or retention expiry extension requests to the configured approvers to revoke immutability or extend the retention expiry. Revocation requests can be submitted only after the virtual disk enters the immutable state, and at least one approver must be added to perform revocation or retention expiry extension requests. For more information, see Immutability Revocation.
- Once the request is approved by all approvers, click Complete Request to proceed with revocation, or click Cancel Request if required.
- The same procedure applies to single, dual, mirrored, and 3-way virtual disks.
Replication operations for immutable virtual disks are currently not supported. As a workaround, create a clone of the immutable virtual disk, split the clone, and perform a one-time replication to the destination system. After replication completes, remove the replication relationship and enable immutability on the destination virtual disk. Verify that the source and destination hash values match to confirm data integrity.
Creating Immutable Mirrored Virtual Disks and Performing Split Operations
This section explains how to apply immutability to mirrored virtual disks and perform Split and Unserve operation on immutable mirrored virtual disks. When immutability is applied to a mirrored virtual disk, both mirrored virtual disks on the participating DataCore servers become immutable. For information about Split and Unserve operations on immutable mirrored virtual disks, see Split and Unserve Operation for Immutable Mirrored Virtual Disks .
Making a Mirrored Virtual Disk Immutable
To make a mirrored virtual disk immutable:
-
In the left pane, navigate to either instance of the mirrored virtual disk under any participating DataCore server.
- Select the Immutability tab and click Make Immutable.
- Configure the retention expiry and complete the remaining steps as described in Applying Immutability to Virtual Disks.
Split and Unserve Operation for Immutable Mirrored Virtual Disks
You can perform a Split and Unserve operation on the immutable mirrored virtual disk, which creates one standard virtual disk on the selected server while the virtual disk on the peer server remains immutable.
Additionally, you can:
- Add a mirror to an immutable virtual disk, or
- Make the resulting standard virtual disk immutable again.
To split and unserve an immutable mirrored virtual disk:
-
In the left pane, right-click the immutable mirrored virtual disk.
- Select Split and Unserve, and then select the required DataCore server.
- Review the confirmation message and click Yes to continue.
After the operation completes:
- A standard virtual disk is created on the selected SANsymphony server.
- The corresponding virtual disk on the peer server remains immutable.
For example:
- If the mirrored virtual disk is split and unserved from Server-1, the standard virtual disk is created on Server-1, while the immutable virtual disk remains on Server-2.
- If the mirrored virtual disk is split and unserved from Server-2, the standard virtual disk is created on Server-2, while the immutable virtual disk remains on Server-1.
Additional Operations
- You can add a mirror to the immutable virtual disk by right clicking the immutable virtual disk and selecting Add Mirror.
- You can make the resulting standard virtual disk immutable again from the Immutability tab.
- For mirrored immutable virtual disks, hash initialization takes place only on one side of the mirror when the mirrored virtual disk is made immutable. To synchronize and validate the seal hash on the other side, navigate to the required virtual disk, open the Immutability tab, select the required server in Server to Verify drop-down, and click Start Seal Verification. The system recalculates and verifies the seal hash for the selected server virtual disk.
- For 3-way mirrored immutable virtual disks, seal verification can be performed only on the Parent or Secondary virtual disk. The Backup virtual disk is not available for seal verification.
Immutable virtual disks (single, dual, mirrored, and 3-way virtual disks) cannot be resized while immutability is active. You must revoke immutability before resizing the virtual disk.
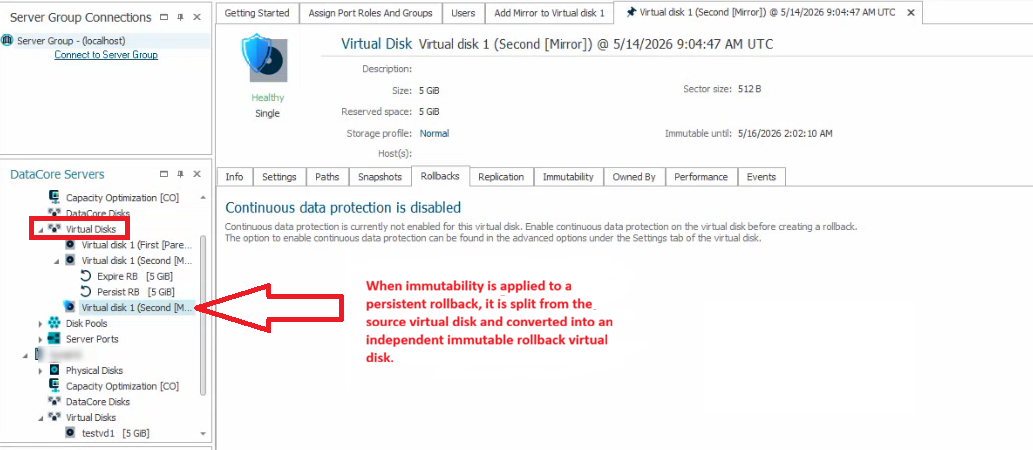
Creating Immutable Rollback
This section explains how to create an immutable virtual disk from a persistent rollback. When an immutable rollback is created, SANsymphony first splits the selected persistent rollback from the source virtual disk and creates a standalone virtual disk. Immutability protection is then applied to the newly created virtual disk.
You can create the immutable virtual disk during rollback creation or apply immutability later to an existing persistent rollback. For more information about creating persistent rollbacks, see Continuous Data Protection Operations.
Prerequisites
Before creating an immutable rollback, ensure the following:
- Continuous Data Protection (CDP) must be enabled for the virtual disk.
- The rollback type must be a Persistent Rollback.
Immutable rollbacks are supported only for persistent rollbacks and cannot be created for expiring rollbacks.
Creating an Immutable Rollback
- In the DataCore Management Console (DMC), navigate to DataCore Servers and double-click the required virtual disk.
- Select the Rollbacks tab.
- Create or select a Persistent Rollback. Alternatively, if a persistent rollback already exists, you can apply immutability later from the Immutability tab.
- Select the Immutable checkbox. When the Immutable checkbox is selected, the Persistent Rollback will be selected automatically.
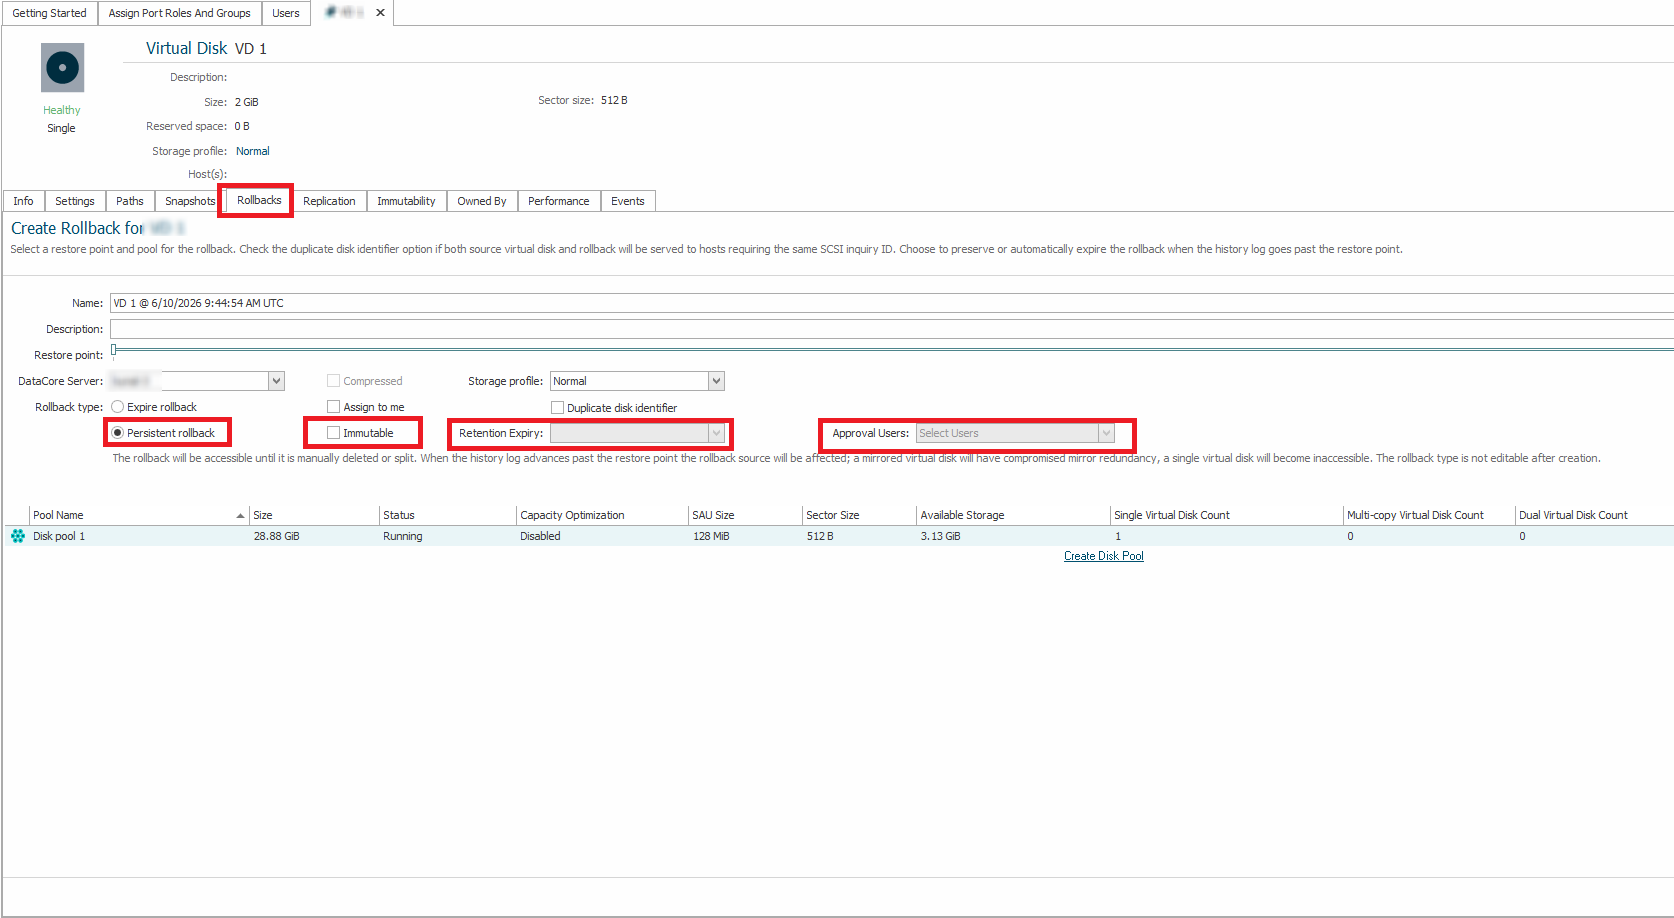
- Specify the Retention Expiry date and time.
- (Optional) Add approvers from the Approval Users list. For more information, see Adding Approvers for Immutable Objects.
- Click Create. SANsymphony begins splitting the persistent rollback from the source virtual disk and creates a standalone virtual disk. Immutability protection is then applied to the newly created virtual disk. The split operation may take several minutes depending on the amount of data being processed.
- After the operation completes, the immutable rollback virtual disk appears as an independent virtual disk.
- The hash calculation starts automatically. Monitor the Hash Calculation progress in the Immutability tab.
- Once hashing is completed, the status changes to Retention Locked, indicating that the rollback virtual disk is fully immutable and remains protected until immutability is revoked.
- You can send revocation or expiry extension requests for the immutable rollback virtual disk to the configured approvers. For more information, see Immutability Revocation.
Adding Approvers for Immutable Objects
You can add approvers while creating or converting SANsymphony objects (virtual disks, snapshots, and rollbacks) to immutable. Approvers can review and approve or reject requests for immutability changes, such as revoking immutability or extending the retention expiry.
To revoke immutability or extend the retention expiry before the retention period expires, at least one approver must be added while creating the immutable object from the Immutability tab. If no approvers are configured, the owner cannot revoke immutability or extend the retention expiry until the retention period expires. After the retention period expires, the owner can directly revoke immutability or extend the retention expiry without requiring approvals.
Only registered SANsymphony users can be selected as approvers. User registration, role assignment, privileges, and ownership-based authorization are managed through the DataCore Management Console. For more information, see Registering Users and Assigning Roles.
Approvers must be valid SANsymphony users and must have sufficient access to appear in the approver selection list (typically at least view-level access, depending on role configuration). Approvers do not require administrative privileges and are limited strictly to approving or rejecting immutability-related requests. They cannot modify immutable objects or their configuration.
Ownership of immutable objects is managed separately from the approval workflow. Only existing owners of an immutable object can add additional owners to that object. Users who are not owners cannot assign ownership of an immutable object. A user configured as an approver for an immutable object cannot also be assigned as an owner of the same object. This separation ensures that approval and ownership responsibilities remain independent. Approvers are limited to reviewing and approving or rejecting immutability-related requests. Ownership does not grant approval privileges, and approver status does not grant ownership privileges."
A user cannot be both an owner and an approver for the same immutable object. Additionally, only existing owners of an immutable object can assign ownership to other users.
Immutability Revocation
Revocation requests for immutable virtual disks, snapshots, and rollbacks can be sent to the configured approvers.

Revocation requests can be submitted only after the SANsymphony objects are made immutable. When a revocation request is submitted, approvers can review the request and view its status as Pending from the virtual disk details page for the immutable object. Revocation requests are also notified through Events and Operations.
If no approvers are configured while creating immutability, revocation or expiry extension requests cannot be performed before the retention period expires.
If all approvers approve the request, the owner can click Complete Request to revoke immutability before expiry.
If any approver rejects the request, it cannot be completed, and immutability remains active. The owner can cancel and resubmit the request if required.
After the retention period expires, the immutable object continues to remain in the immutable state, and the immutability icon continues to be displayed for the object. To remove immutability protection and perform restricted operations, immutability must still be explicitly revoked. For expired immutable objects without configured approvers, the owner can directly revoke immutability or extend the retention expiry without requiring approvals.
The approver status is displayed as N/A until a request is submitted, and updates to Approved or Rejected based on approver actions.
Approvers are limited strictly to approving or rejecting requests and do not have permissions to modify immutable objects or their configuration.
Even after all approvers have approved the revocation request, the owner can cancel the request before completing the operation. No System Administrator privileges or special permissions are required.