Snapshots
DataCore vFilO supports share level snapshots to protect data in a share. Share snapshots are non-disruptive to client reads and writes.
Snapshots can be manually triggered via GUI, CLI, REST API, or scheduled to happen automatically. Snapshot schedules also have retention rules.
Example snapshot schedules:
- an hourly snapshot schedule with a retention of 7 days
- a daily snapshot schedule with a retention of 7 years (to meet compliance rules)
- a weekly snapshot schedule with a retention of 12 weeks
Each share is limited to 4095 snapshots.
A snapshot consumes no extra data space until existing data in the share is modified, then only the files that are modified use additional space. Each snapshot will use a small amount of metadata space for the snapshot itself and for every file modified after the snapshot.
We recommend offloading older snapshot data from primary storage into cloud/object storage to reduce the impact of retaining that many snapshots. When data is offloaded into cloud/object storage, it is globally deduplicated and compressed, effectively creating a very space efficient backup of the data.
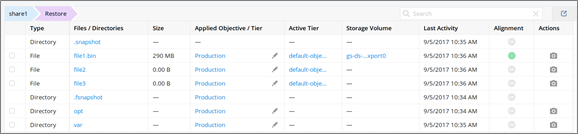
Share snapshots are available in a virtual .snapshot folder and via Windows Previous Versions. The .snapshot folder is not visible over SMB data access.
The .snapshot folder is available in every directory in the share, representing the data from that directory and down.
DataCore vFilO creates schedules for hourly, daily, and weekly snapshots. In addition, administrators can define custom schedules as described in Schedules and Retention policies.
Share snapshots can be created and restored in the following ways:
- From the GUI
- From the admin command line
Creating Snapshots from the GUI
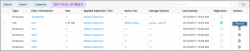
- Select Infrastructure & Data from the left navigation bar and select the Shares tab.
- Click on the Snapshot icon in the Actions column for share you want to snapshot.
-
Select a Schedule and Retention for the Snapshot. For Schedule you can chose Now, select an existing schedule, or create a new schedule. For Retention you can choose, select an existing retention policy, or create a new policy.
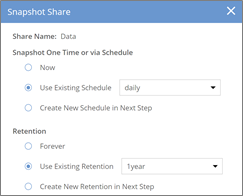
This example takes the snapshot immediately and uses an existing rentention policy “5_copies”.
- Select Now.
-
Select Use Existing Retention, select the "5_copies" retention policy, then click Snapshot.
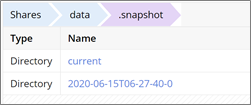

When share snapshots have been created, the files can be seen in the .snapshot directory from the UI and via NFS clients. Snapshots are by default identified by a timestamp to make it easy to see when the snapshot was taken.
Creating Snapshots from the Command Line
To create a snapshot of a share:
# share-snapshot-create --share-name test --now
To list the snapshot of a share:
# share-snapshot-list --share-name test
To restore files from a snapshot of a share:
# share-snapshot-restore --share-name test --filename /VM2/*.vmdk
        --snapshot-name test-2017-01-25T16-59-27.371Z-0
Restoring Snapshots
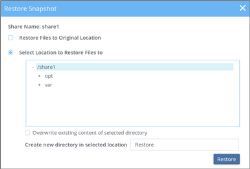
When restoring a share snapshot, you can restore to the original location or select a location to restore to. When selecting the location you can also create a new directory to restore to. Restoring to the original location will overwrite any changes made since the snapshot was taken. Choose another location to restore to if you want to avoid overwriting changes.
This example restores to /share1 and creates a new directory called "Restore." Restoring to the original location will overwrite any existing data made since the snapshot was taken.
To restore a snapshot:
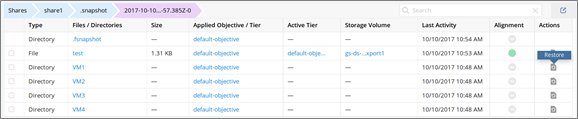
- Click on the .snapshot directory, find the snapshot you want to restore, then click on the restore icon.
- Click Restore, then click Restore again to confirm.
-
You can see the files restored from a client or in the UI by selecting the share and directory of the restore.
- Click on .snapshot to restore a file or directory from a share.
-
Select the timestamped directory and click the restore icon for the file or directory.

Restoring to the original location will overwrite any changes made since the snapshot was taken. Choose another location to restore to if you want to avoid overwriting existing data.
File Clones/File Snapshots
DataCore vFilO also supports individual file cloning, which is called "file snapshot" in the GUI. Despite the snapshot name, this operation creates a clone of the select file and the clone is placed in a virtual sub-directory called .fsnapshot/<FILENAME>/<TIMESTAMP>
You can also set up a file cloning schedule and retention policy to protect files on a regular basis.
Cloned files can be recovered manually using the GUI or via accessing the .fsnapshot via NFS protocol.
Do not confuse file clones with share snapshots. Share snapshots are the recommended approach to protect more than one file in a share. File clones do not maintain special VERSION metadata, further differentiating them from share snapshots. File clones will not show up as a file version using Windows Previous Versions. For an example objective that moves file clones to cloud/object storage, see Keep file clones (snapshots) on cloud/object storage.