Assimilation
DataCore vFilO can be installed and immediately used to manage existing data without having to copy data into DataCore vFilO. This means that DataCore vFilO can be pointed to an existing share or directory on a NAS filter, and can simply assimilate the metadata while leaving the original data untouched.
Assimilation is an on-demand and background operation, enabling the administrator to assimilate any amount of directories and files in just a minute.
Assimilation can be used to include many different sources (exports, volumes, different vendors) and combine them into a new namespace. The namespace is not stitched or symlinked together but rather represented as a new share using DataCore vFilO. Traditional data services such as snapshots, clones, tiering, archiving and data replication are now managed using DataCore vFilO functionality.
Assimilation has two modes, Read-Write and Read-Only.
- Read-Write workflow In this workflow, the assimilation has stringent needs on the underlying storage (outlined below as well as in the storage configuration section) and it will create hardlinks to the original data from its own directory structure. Read-Write assimilation is not destructive, none of the original data is modified or removed but rather referenced from DataCore vFilO. It is a requirement that clients are switched from the original export and mount the namespace from DataCore vFilO. The downtime for a client is effectively only the mount/unmount process, in typical environments, this is less than a minute.
- Read-Only workflow In this workflow, the assimilation creates a reference in the DataCore vFilO metadata that points to the source location but does not in any way write to the source location. In fact, the source location can be a snapshot. If a user wants to write to data that comes from a read-only source, Anvil will non-disruptively, copy the data to a Read-Write volume and automatically enable Read-Write access. That workflow example assumes that the user has actual NFS or SMB permissions to write to the data.
Assimilation progress is logged by default at the root of the share in a directory called assimilation-logs. This directory can be removed once an assimilation has finished. The log file will not be present in the directory until after the assimilation has finished.
Assimilation can be resumed in case of situations such as power outages or other events.
An assimilation job can be manually canceled, this will effectively stop assimilation and not make any further progress however it will not delete already assimilated files. These files could have been modified by the user and it is up to the administrator to clean up after canceled assimilation jobs.
Assimilation is prompted automatically in the GUI when existing data is detected on the volume that is added in the system. However, assimilation does not have to be completed at that time, adding a volume with existing data and choosing NOT to assimilate is completely non-disruptive to the data on that volume. The data stored using an export from DataCore vFilO is safely stored in a private directory structure on the underlying storage and does not interfere with existing data on that volume.
Assimilation is done using a single sweep, even for data that comes from both NFS and SMB. In the background, the system will first grab metadata such as directory names, file names and NFS permissions using NFS, and following that, it will copy the SMB metadata.
Requirements for Assimilation
For assimilation to complete successfully there are a few requirements that must be met. Assimilation of metadata falls into two categories, NFS metadata and SMB metadata. While assimilation is done as a single background job with on-demand access when needed it requires different permissions to read all the appropriate metadata depending on the protocol.
Generic
- All volumes under management must have NFS access with Anvil and DSX nodes enabled to use root credentials
NFS
- NFS access to source data. This is required even for storage that have primarily been used for SMB data access, such as a Windows file server
Server Message Block (SMB)
- Credentials that can read all SMB metadata such as ACLs. It is highly recommended that a user with backup role membership is used as that role typically does not force the source system to evaluate the ACLs but is able to simply let Anvil read the appropriate metadata
- Before SMB assimilation can be started, the DataCore vFilO cluster must be joined to the same Active Directory domain as the source system
Server Message Block (SMB) Assimilation Specifics
Several assimilations can be done concurrently. Be advised that the more concurrent assimilations that are done, the longer each may take. This is to ensure that the system continuous to be responsive to user needs.
Orphaned Data Detection
SMB assimilation discovers and matches all existing Owners and Groups of file data with valid entries in Active Directory. For example, if a user is no longer in Active Directory, the system can map this user to another user or even a generic user. This mapping has one huge benefit – it identifies data that is no longer owned by a user or group in the company.
Once data has been identified, it can be filtered using metadata tools or regular file management tools. DataCore vFilO can also archive the data and objectives can be assigned to the data to for example, archive it to cloud storage.
SMB assimilation is supported in both the GUI as well as on the CLI.
Assimilation Examples
NFS – Read/Write
The following example takes two shares and assimilates them into a single new share.
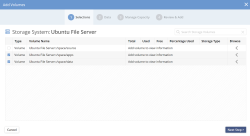
- Select the volumes for assimilation
Multiple volumes from the same storage system can be selected. It is expected at this point in the Read-Write assimilation workflow that there are no clients accessing these volumes.
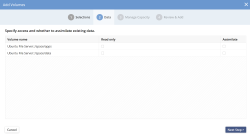
- Verify assimilation sources
Make sure the correct volumes are selected. The next step is to configure where the sources will be placed in the file system.
While this workflow describes assimilation, it is also possible to assimilate data from a volume after it is added. This is currently only supported on the CLI.
- Placement selection
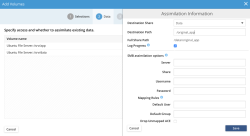
Click the assimilate checkbox for each volume to select where in the file system the assimilated data will be accessible. It can be located in any empty or new directory in the file system. The example below assimilates each source into a new sub-directory, in an existing share.
DataCore vFilO only creates the destination directory if it doesn’t already exist. When DataCore vFilO auto-creates a directory, it may not have the desired ACLs or permissions and it is up to the administrator to ensure these are correct.
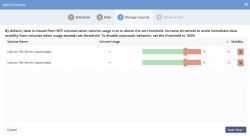
- If the volume being assimilated has a capacity usage rate higher than the manage-to setting, then DataCore vFilO will automatically move files from the assimilated volume until the manage-to capacity is met. This setting is very important as triggering automatic mobility may not be intent at the time of assimilating the data.
The source volume existing usage may not be related to the data being assimilated in case other parts of the volume are unmanaged by DataCore vFilO. If adding a shared volume, ensure that it is understood what kind of capacity usage it currently has.
DataCore vFilO will automatically adjust the manage-to setting to be higher than the actual usage, the default setting is 75%.
To disable the automatic mobility, set the manage-to setting to 100%. This is only recommended in situations where automated mobility at the time of adding the volume is not desired.
The manage-to setting can be changed later by editing the volume settings in the GUI or CLI.
If assimilating a Read-only source, and the manage-to setting is lower than actual usage, the automatic mobility will try to free up capacity by moving (copying in this case as the source is Read-only) to other volumes. By default for Read-only volumes, the manage-to setting is set to 100% which disables automatic mobility.
- Assimilation example
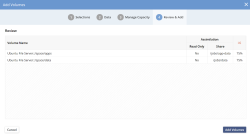
Review the settings and press Add Volumes to submit the assimilation job. The data being assimilated will be available very quickly, the assimilation process can handle on-demand data access before the background job is finished.
- Status
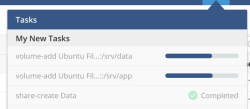
Status for assimilation can be viewed in the Task drop-down in the GUI, task-list on the CLI or simply by monitoring the Volumes page
