Proxmox: Host Configuration Guide
Explore this Page
- Overview
- Configuring the Network
- Creating a Cluster
- Adding a Node
- PVE iSCSI
- iSCSI Settings
- PVE-Fiber Channel
- SCSI Disk Timeout
- iSCSI Multipath
- Serving a SANsymphony Virtual Disk to the Proxmox Node
- Creating a Proxmox File-System
- RAW Device Mapping to Virtual Machine
- Restarting the Connection after Rebooting the Proxmox Server
Overview
This guide provides information on the configuration settings and considerations for hosts that are running Proxmox with DataCore SANsymphony.
The basic installation of the nodes must be carried out according to the Proxmox specifications. Refer to the Proxmox installation guide.
The Proxmox host is referred to as "PVE" throughout this guide, consistent with Proxmox terminology.
Version
The guide applies to the following software versions:
- SANsymphony 10.0 PSP18
- Windows Standard Server 2022
- Proxmox version 8.3.2
Network Design
When designing the PVE server, it should be considered that all functions in the network area are given sufficient performance and redundancy.
This is important in terms of minimizing any impact on the functionality of the environment in productive operations.
The next two points are a recommendation based on the consideration of a high-availability and redundant design.
- Proxmox
- Web -UI = 2 x Gbit as Active / Backup Bond
- Corosync Cluster = 2 x Gbit as 2- Single-Ports, no Bond
- VM /Container = 2x 10/25 Gbit in LACP or Active / Backup Bond (based on existing switch infrastructure).
- SANsymphony
- Frontend Port = 2 x 10 Gbit (iSCSI)
Configuring the Network
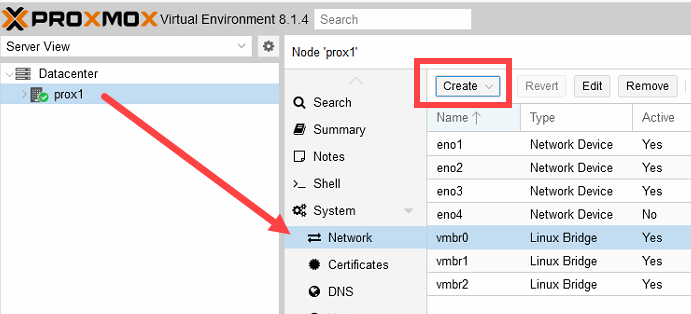
The networks or network configuration is performed in the Proxmox Host (PVE) Graphical User Interface (GUI) under Host > Network.
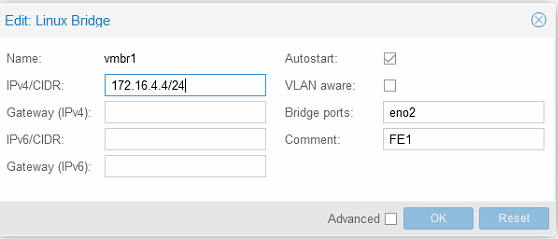
For each Network Interface Card (NIC) that is required for the SANsymphony iSCSI, a "Linux Bridge" vNIC (2 x FrontEnd (FE) with static IP) must be created via the Create button.
- Name: Enter an applicable name. For Example: vmbr[N], where 0 ≤ N ≤ 4094.
- IPv4/CIDR: Enter the IP address / Subnet mask.
- Autostart: Check the box to enable this option.
- Bridge ports: Enter the NIC to be used.
- Comment: It is recommended that a function name is entered here, as this makes it easier to administer the environment.
- Advanced: Select an MTU size to support the Jumbo Frames. The Add the Comment field is displayed to specify the function of the Linux Bridge.
- Select OK to apply the configuration settings.
- Click Reset to clear the existing options selected/ details entered, and to update different details.
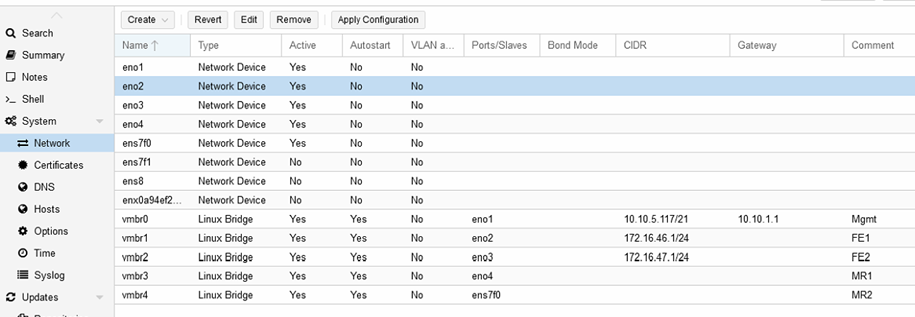
The configuration settings applied only become active after clicking the "Apply Configuration" button.
Activating changes via CLI is possible with the command:
Creating a Cluster
A minimum of three fully functional PVE nodes is required, or alternatively, two nodes plus a quorum device (QDevice). The steps below for creating a cluster do not cover configuration of the quorum device or high availability (HA). For those details, refer to the Proxmox Cluster Manager section on the official Proxmox website.
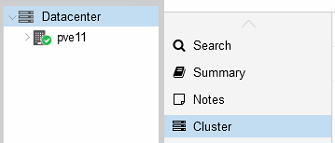
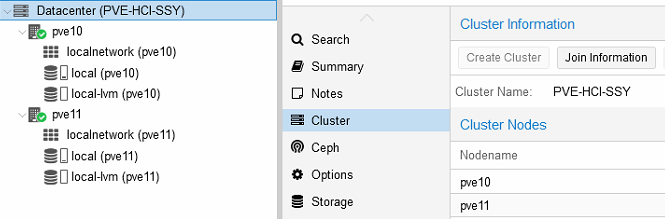
- Under Datacenter > Cluster, click Create Cluster.
- Enter the cluster name.
- Select a network connection from the drop-down list to serve as the main cluster network (Link 0). The network connection defaults to the IP address resolved via the node’s hostname.
Adding a Node
- Log in to the GUI on an existing cluster node.
- Under Datacenter > Cluster, click the Join Information button displayed at the top.
- Click the Copy Information button. Alternatively, copy the string from the Information field.
- Next, log in to the web interface on the node you want to add.
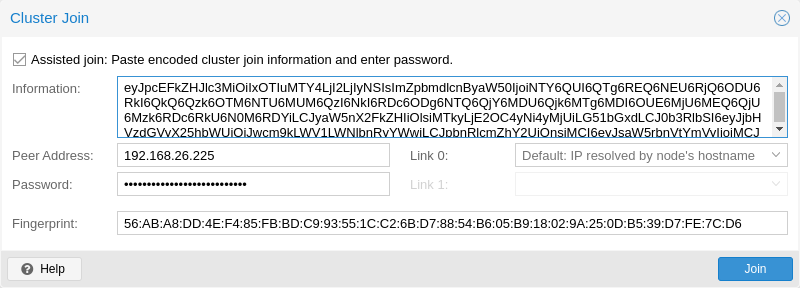
- Under Datacenter > Cluster, click Join Cluster.
- Fill the Information field with the Join Information text copied earlier. Most settings required for joining the cluster will be filled out automatically.
- For security reasons, enter the cluster password manually.
- Click Join.

The node is added.
PVE iSCSI
The iSCSI function was implemented based on the Proxmox Wiki article, which reflects the current recommendations of the manufacturer. The steps below were useful at the time of creation.
Before setting up iSCSI, it is recommended to read the Proxmox ISCSI installation - Proxmox VE wiki article.
Installing iSCSI Daemon
iSCSI is a widely employed technology that is used to connect to storage servers. Almost all storage vendors support iSCSI. There are also open-source iSCSI target solutions available, which is based on Debian.
To use Debian, you need to install the Open-iSCSI (open-iscsi) package. This is a standard Debian package, however, not installed by default to save the resources.
Changing the iSCSI-Initiator Name on each PVE
The Initiator Name must be unique for each iSCSI initiator. Do NOT duplicate the iSCSI-Initiator Names.
- Edit the iSCSI initiator name in the /etc/iscsi/initiatorname.iscsi file to assign a unique name in a way that the IQN refers to the server and the function. This change makes administration and troubleshooting easier.
- Restart iSCSI to take effect using the following command:
Original: InitiatorName=iqn.1993-08.org.debian:01:bb88f6a25285
Modified: InitiatorName=iqn.1993-08.org.debian:01:<Servername + No.>
Discovering the iSCSI Target to PVE
- Before attaching the SANsymphony iSCSI target, you must discover all the iqn-portname using the following command:
- Attach all the SANsymphony iSCSI targets on each PVE using the following command:
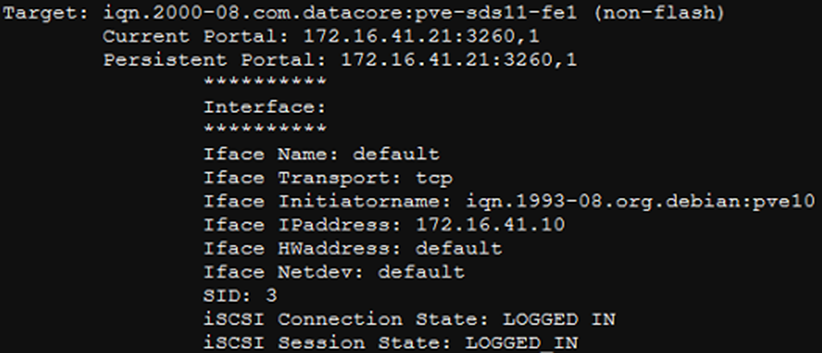
iscsiadm --mode node --targetname iqn.2000-08.com.datacore:pve-sds11-fe1 -p 172.16.41.21 --loginDisplaying the Active Session

Detailed information about the iSCSI connections and the hardware can be displayed with this command:
iSCSI Settings
The iSCSI service does not start automatically by default when the PVE-node boots. Refer to the iSCSI Multipath document for more information.
The /etc/iscsi/iscsid.conf file must change the line so that the initiator starts automatically.
The default 'node.session.timeo.replacement_timeout' is 120 seconds. It is recommended to use a smaller value of 15 seconds instead.
If a port reinitialization is done, it can be that the port is unable to login on its own. In this case, the attempts must be increased:
Restart the service using the following command:
Logging in to the iSCSI Targets on Reboot
For each connected iSCSI target, you need to modify the node.startup parameter in the target to automatic. The target is specified in the
If the connection after reboot the PVE-Server fails
The services must be started with the command:
or
Re-connect all iSCSI targets:
If an error occurs, then first:
PVE-Fiber Channel
Installing Required Packages
Packages for FC-SAN support
apt-get update
apt-get install scsitools
apt-get install -y sysfsutils
apt-get install lvm2
This command updates your package lists and installs the required tools. LVM2 is required for the management of logical disks.
Checking HBA Info and Drivers
Determine the Manufacturer and Model of the HBAs
Get the Vendor and Device IDs for the HBAs installed
Example:
1077 = vendor ID from Qlogic
2031 = device ID
Check if the driver modules are installed
This can be done by searching the list of available modules. (Replace 6.8.12-4-pve with your kernel version in the command below).
Find Kernel version / System information
Check drivers for these HBAs are loaded in the kernel
Reload Module
Getting HBA Information
Simple
You can find more detailed information about the Fiber Channel adapters in the directory /sys/class/fc_host/.
The output returns the device path with PCI address and port number for each port (host).
Detailed
The listed directories contain specific information for each adapter, such as node name (WWN), port name (WWN), type, speed, status, etc.
The easiest way to get detailed information is to use the systool command with the option -v.
Rescan SCSI-Bus
This identifies all SCSI devices, including new LUNs, and integrates them into your environment.
SCSI Disk Timeout
Set the timeout to 80 seconds for all the SCSI devices created from the SANsymphony virtual disks.
For example:
There are two methods that can be used to change the SCSI disk timeout for a given device.
- Use the ‘echo’ command – this is temporary and will not survive the next reboot of the Linux host server.
- Create a custom ‘udev rule’ – this is permanent but will require a reboot for the setting to take effect.
Using the ‘echo’ Command (will not survive a reboot)
Set the SCSI Disk timeout value to 80 seconds using the following command:
Creating a Custom ‘udev’ Rule (permanent but requires a reboot)
Create a file called /etc/udev/rules.d/99-datacore.rules with the following settings:
SUBSYSTEM=="block", ACTION=="add", ATTRS{vendor}=="DataCore", ATTRS{model}=="Virtual Disk ", RUN+="/bin/sh -c 'echo 80 > /sys/block/%k/device/timeout' "Command:
- Ensure that the udev rule is exactly as written above. If not, this may result in the Linux operating system defaulting back to 30 seconds.
- There are four blank whitespace characters after the ATTRS {model} string which must be observed. If not, paths to SANsymphony virtual disks may not be discovered.
Refer to the Linux Host Configuration Guide for more information.
iSCSI Multipath
For the installation of Multipath, we recommend the official documentation of Proxmox, which contains comprehensive and up-to-date instructions. Their documentation is a reliable source for exact installation steps and configuration details. Refer to ISCSI Multipath- Proxmox VE.
Installing Multipath Tools
The default installation does not include the 'multipath-tools' package. Use the following commands to install the package:
Creating a Multipath.conf File
After installing the package, create the following multipath configuration file: /etc/multipath.conf.
Refer to the DataCore Linux Host Configuration Guide for the relevant settings and the adjustments for the PVE in the iSCSI Multipath document.
defaults {
    user_friendly_names    yes
    polling_interval       60
    find_multipaths        "smart"
}

blacklist {
    devnode "^(ram|raw|loop|fd|md|dm-|sr|scd|st)[0-9]*"
    devnode "^hd[a-z]"
}

devices {
    device {
        vendor               "DataCore"
        product              "Virtual Disk"
        path_checker          tur
        prio                  alua
        failback              10
        no_path_retry         fail
        dev_loss_tmo          60
        fast_io_fail_tmo      5
        rr_min_io_rq          100
        path_grouping_policy  group_by_prio
    }
}
Restart Multipath Service to Reload Configuration
Restart the multipath service using the following command to reload the configuration:
Serving a SANsymphony Virtual Disk to the Proxmox Node
Following the necessary configurations in the SANsymphony Graphical User Interface (GUI) such as the assignment of the iSCSI port to the relevant host and the virtual disk, the virtual disk must now be integrated into the host.
To make the virtual disk visible in the system, the iSCSI connection must be scanned again using the following command:
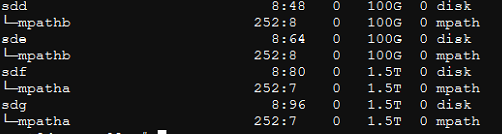
The list of block devices and whether the vDisk is correctly detected with its paths can be identified and with multipath name “mpathX” the disks have been found.
Output:
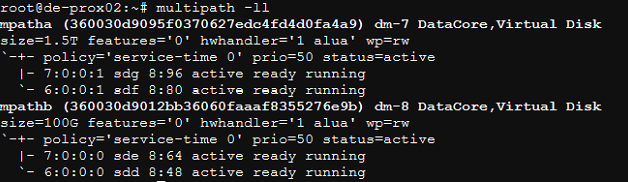
Use the 'multipath' command to determine which and whether all necessary paths are now available from the SANsymphony server for the virtual disk:
Output:
Creating a Proxmox File-System
Creating a Physical Volume for the Logical Volume
“pvcreate” initializes the specified physical volume for later use by the Logical Volume Manager (LVM).
Creating a Volume Group
Displaying a Volume Group
Output:

Finding out the UUID and the Partition Type
The blkid command is used to query information from the connected storage devices and their partitions.
Output:

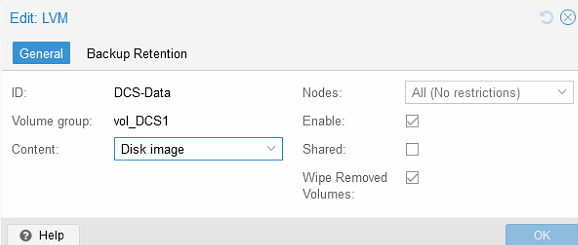
Adding LVM at the Datacenter level
To create a new LVM storage, access the PVE GUI to the datacenter level, then select Storage and click Add.
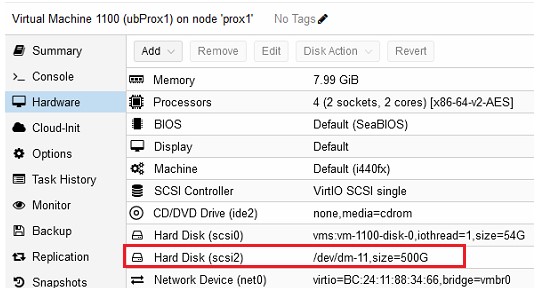
RAW Device Mapping to Virtual Machine
Follow the steps below if the prerequisites of an operating system or an application should be that a RAW device mapping into the virtual machine is necessary:
- After successfully serving the virtual disk (single or mirror) to the Proxmox (PVE) node, run a rescan to make the virtual disk visible in the system using the following command:
- Identify the virtual disk to use as a RAW device and identified multipath name “mpathX” using the following command:
- Navigate to the “/dev/mapper” directory and run the
ls -lacommand to verify which dm-X the required device is linked to.
Output:

- Hot-Plug/Add physical device as new virtual SCSI disk using the following command:
For example: