In this topic:
Adding disks to existing pools
Viewing information about pool mirrors
Also see:
Removing Physical Disks from Pools
Purging Physical Disks to Repair Failed Pools
Disk pools allow physical storage to be pooled and then allocated in storage allocation units (SAUs) of a preset size, as needed. When a pool is created, physical disks can be added.
Before creating pools, refer to Disk Pools for information about SAUs and how pools work. Also see Shared Multi-port Array Support if using physical disks shared between servers in disk pools.
![]() Physical
disks added to pools will be marked as Unknown/Not
Initialized in Windows Disk Management and must be controlled and
monitored in this software. Disk operations subsequently performed in
this software may not be known to Disk Management.
Physical
disks added to pools will be marked as Unknown/Not
Initialized in Windows Disk Management and must be controlled and
monitored in this software. Disk operations subsequently performed in
this software may not be known to Disk Management.
In order to add physical disks to pools, disks must be:
o Free of partitions.
o No larger than 1 petabyte (PB).
o Uninitialized or initialized in basic disk type and GPT layout.
![]() Uninitialized disks will
be initialized in GPT layout before adding them to pools. Disks previously
initialized in MBR layout will be re-initialized
in GPT layout before adding them to pools.
Uninitialized disks will
be initialized in GPT layout before adding them to pools. Disks previously
initialized in MBR layout will be re-initialized
in GPT layout before adding them to pools.
Important Notes
o The storage allocation unit size and sector size that is selected when the pool is created, cannot be changed after the pool is created.
o Pools can be created with sector sizes of 4 KB or 512 B. When the pool sector size is selected, only disks with the same sector size can be added to the pool. Disks of different size sectors cannot be added to the same pool. Only physical disks with a compatible sector size will be available for selection in the wizard. See 4 KB Sector Support for more information.
o Adding physical disks to a standard disk pool consumes license capacity, increasing the amounts of current managed capacity and capacity license in use displayed in Server Group Details page>License tab. Adding physical disks to a bulk storage pool consumes bulk capacity, increasing the amount of bulk capacity in use displayed in the same tab.
o We recommend that once a physical disk is added to a disk pool that it is not extended or resized later. SANsymphony software does not have the ability to automatically recognize and utilize any additional space in the pool disk as Storage Allocation Units (SAUs) are created when the disk is originally added to the pool. However, the new size of the pool disk will be detected and count toward the Storage Capacity License limit. In the event that a pool disk has already been extended or the size increased, see Extending the Size of Pool Disks for instructions.
o The Bulk storage check box in the wizard is provided for information only and cannot be changed. The setting is selected automatically based on the license applied to the server.
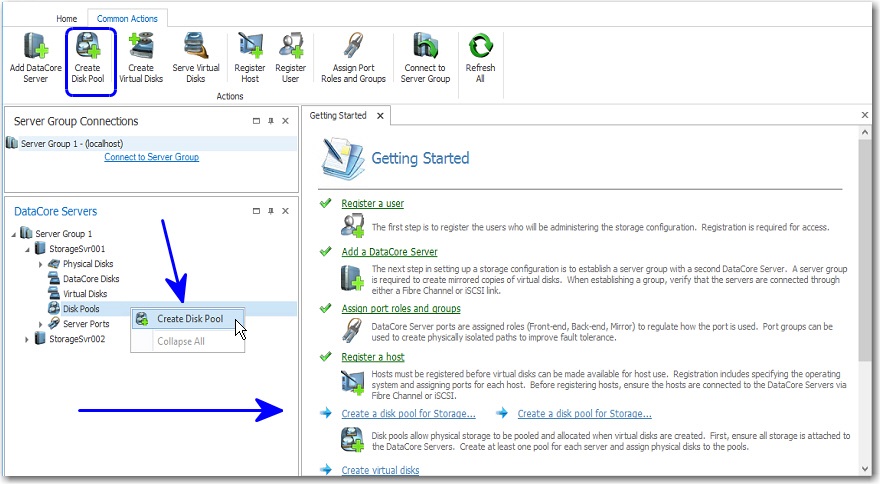
To create disk pools:
1 In DataCore Servers Panel, expand the tree for the DataCore Server.
2 In the Ribbon>Common
Actions tab, click Create Disk
Pool to open the Create Disk Pool
dialog box. ![]()
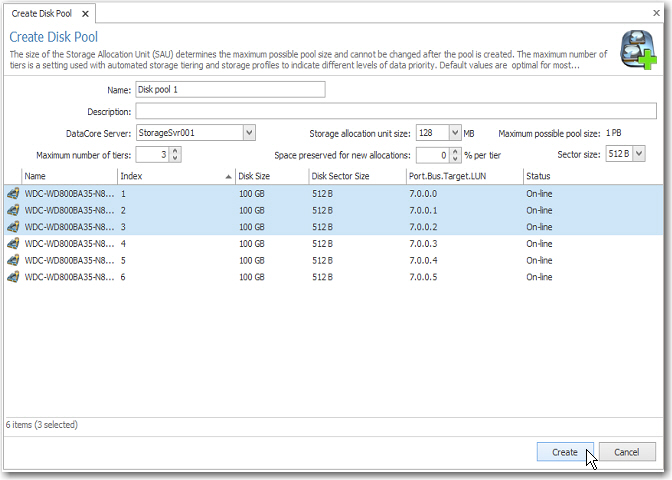
3 In Name, replace the default name with a meaningful name and provide a description is desired. Disk pool names must be unique in the server group.
4 In Server, select the correct DataCore Server (change if required).
5 In Storage allocation unit size, select the size in megabytes from the pull-down menu. The default SAU size is 128 MB, which can support disk pools up to approximately 1 PB in size. If the pool size will be greater than 1 PB, increase the SAU size accordingly, see Max possible pool size for an estimated maximum pool size based on the selected SAU size.
6 In Sector Size, select the sector size of the pool.
7 In Maximum
number of tiers, select the number of tiers based on the different
speed classifications of the physical disks to be added to the pool. This
setting is used with Automated Storage Tiering and virtual disk storage
profiles to indicate different levels of data priority. See Automated
Storage Tiering and Storage Profiles
for more information.
![]() When calculating the number of tiers in a disk pool with auto-tiering
enabled, be aware that there should be a significant
difference in performance between tiers in order to justify the
migration of data between the tiers. Data
migration will affect the disk pool performance. The default value
is optimal for most applications.
When calculating the number of tiers in a disk pool with auto-tiering
enabled, be aware that there should be a significant
difference in performance between tiers in order to justify the
migration of data between the tiers. Data
migration will affect the disk pool performance. The default value
is optimal for most applications.
8 In Space preserved for new allocations, enter the percentage of space that should be preserved in disk tiers for future virtual disk storage allocations. This setting is only valid if auto-tiering is enabled, see Tier Space Preserved for New Allocations for more information.
9 From the list of available
disks, select one or more physical disks to add to the pool. By default,
disks are added to a mid-range tier. ![]()
10 Click Create.
11 Repeat the instructions to create pools for additional DataCore Servers in the group.
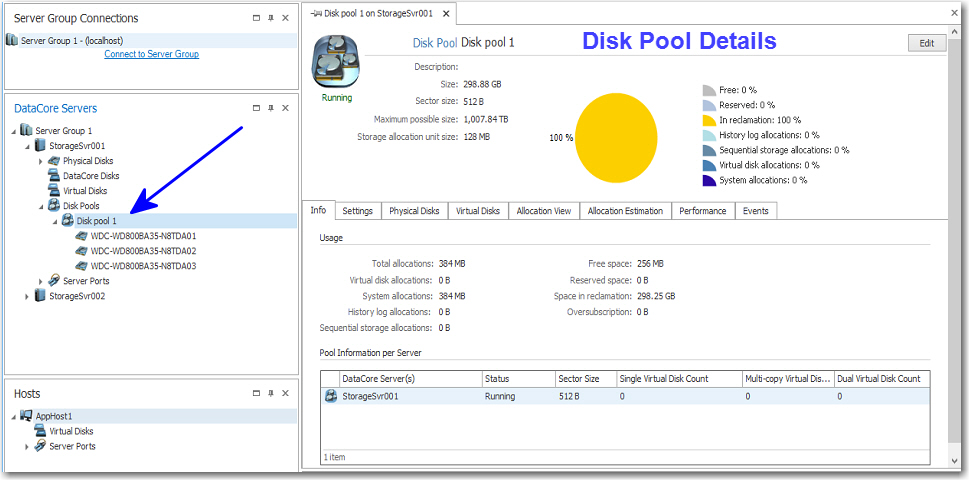
After the pool is created:
o In DataCore Servers Panel,
the new disk pool will be listed under Disk
Pools and the disks added to the pool are removed from Physical
Disks (where they were formerly listed) and listed under the pool.
![]()
o A Disk Pool Details page is created for the new pool. (See Disk Pool Details and Lists.)
· Disks added to pools go into reclamation to purge existing data. The amount of available free space will increase as reclamation progresses. Only the available free space in disks added to pools can be used to create virtual disks. Reclamation can be monitored in the pool pie chart at the top of the details page or in the Info tab on Disk Pool Details page.
o Set the tier number for each physical disk added to the pool if necessary. (See Changing Disk Tier Numbers.)
o Disks in disk pools can be mirrored to provide another level of high availability for the disk pool, see Mirroring Pool Disks.
Additional disks can be added later to pools as required.
To add one or more disks to an existing disk pool:
1 In DataCore Servers Panel, right-click the pool to add the disks to and choose Add Physical Disks.
2 In the Add Physical Disks to Pool page, select the physical disks to add from the list.
3 In the Tier for added disks box, keep the current value (last selection) or change the tier if required.
4 Click Add.
Disks added to pools go into reclamation to purge existing data. The amount of available free space will increase as reclamation progresses. Only the available free space in disks added to pools can be used. Reclamation can be monitored in the Info tab on Disk Pool Details page. (See Disk Pool Details and List.)
Disks in disk pools can be mirrored to provide another level of high availability for the disk pool, see Mirroring Pool Disks.
Fault tolerant pools can be created to add another dimension of high availability by mirroring the physical disks in pools. Mirroring pool disks is also useful when a disk needs to be replaced for a reason other than disk failure, such as when migrating data to new storage. If a disk is mirrored, then one of the disks can be removed even if virtual disks have been created from that pool.
![]() Important Notes:
Important Notes:
o The size of the mirror disk must be equal to or larger than the physical disk. We recommend using a disk of equal size for a mirror because any additional space will not be usable unless the smaller mirror disk is later removed from the disk pool, such as when migrating data to new storage. The menu option will be greyed out if there are no qualified candidates.
o Adding a pool mirror does not consume capacity unless the mirror added is larger than the physical disk it is mirroring. In which case, capacity will be increased by the difference in size.
o The sector size of mirrored pool disks must be the same.
o Pool mirrors will prevent the pool from being authorized as an SMPA pool. See Shared Multi-port Array Support.
o See Removing Physical Disks from Pools for instructions to remove a pool mirror.
To add mirrors to pool disks:
1 In DataCore Servers Panel,
expand the disk pool containing the disk to mirror.
(Alternatively, pool mirror disks can also be added from the Disk
Pools details page>Physical Disks tab.)
2 Right-click on the disk and select Add Mirror Disk, then select an available disk from the list. The disk will be listed under the same pool in the panel.
3 A full synchronization
of the pool disk mirror begins.
![]() A computer restart or stopping
the DataCore Server
which owns the disk pool will interrupt the process and cause the full
mirror synchronization to restart.
A computer restart or stopping
the DataCore Server
which owns the disk pool will interrupt the process and cause the full
mirror synchronization to restart.
To view information about disk pool mirrors:
Disk pool mirrors can be identified in Disk Pool Details page>Physical Disks tab, both disks will be listed under the Name column in this format: "Pool Member | Pool Mirror". Mirror state and status are displayed in the tab. Recovery of the mirror can be monitored under the Mirror State column and by clicking on the disks listed and viewing the information in the Physical Disks Summary at the bottom of the tab. (The estimated time for recovery will fluctuate because it is continuous recalculated and based on the network traffic at the time of calculation.)
In the DataCore Servers Panel, under the disk pools, all physical disks and associated pool mirrors are also listed in this format: "Pool Member | Pool Mirror".
To view details for a pool disk mirror:
1 Open the DataCore Server Details page.
2 In the Physical Disks tab, each disk is listed separately. Double-click the mirror to open the details page for the mirror.
In order to delete a pool, that pool cannot be used as a storage source in any virtual disks.
Pools cannot be removed if used as a storage source in a virtual disk template. The templates must be removed or changed first.
To delete a pool:
In DataCore Servers Panel, right-click the pool to delete and select Delete.