Managing Capacity Optimization
Explore this Page
- Overview
- Enabling Capacity Optimization (Inline Deduplication and Compression)
- Disabling Capacity Optimization (Inline Deduplication and Compression)
- Tracking Capacity Optimization (Inline Deduplication and Compression)
- Repairing Capacity Optimization (Inline Deduplication and Compression)
Overview
Capacity Optimization in DataCore SANsymphony uses inline deduplication and compression to reduce storage consumption and improve storage efficiency. After it is configured on a server, it can be enabled for disk pools and virtual disks.
This section describes how to enable, disable, monitor, and repair Capacity Optimization to ensure it operates correctly and continues to provide storage savings.
Enabling Capacity Optimization (Inline Deduplication and Compression)
To configure Capacity Optimization, you must have one or more unused physical disks that can be dedicated to providing Capacity Optimization storage on each server.
Enabling Capacity Optimization for a Server
Before enabling Capacity Optimization for a server, physical storage must be reserved for exclusive use as capacity optimization storage. After Capacity Optimization is enabled at the server level, you can enable Capacity Optimization for pools and virtual disks.
- Capacity Optimization is supported only on disk pools created with a 512B sector size and cannot be enabled on 4KiB disk pools.
- A minimum of 10 GB disk size is required to add a disk to the Capacity Optimization.
To enable Capacity Optimization for a server:
-
Do either of the following:
- In the DataCore Servers panel, select the applicable server under Server Group. Right-click Capacity Optimization and select Enable Capacity Optimization.
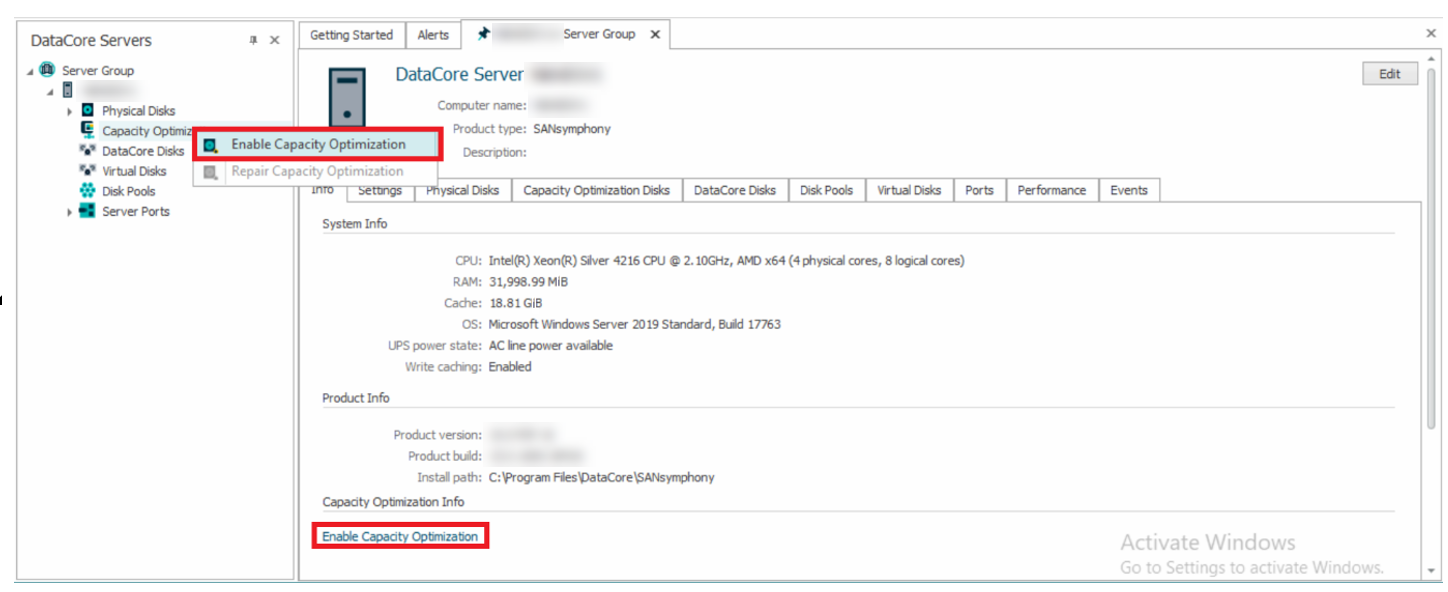
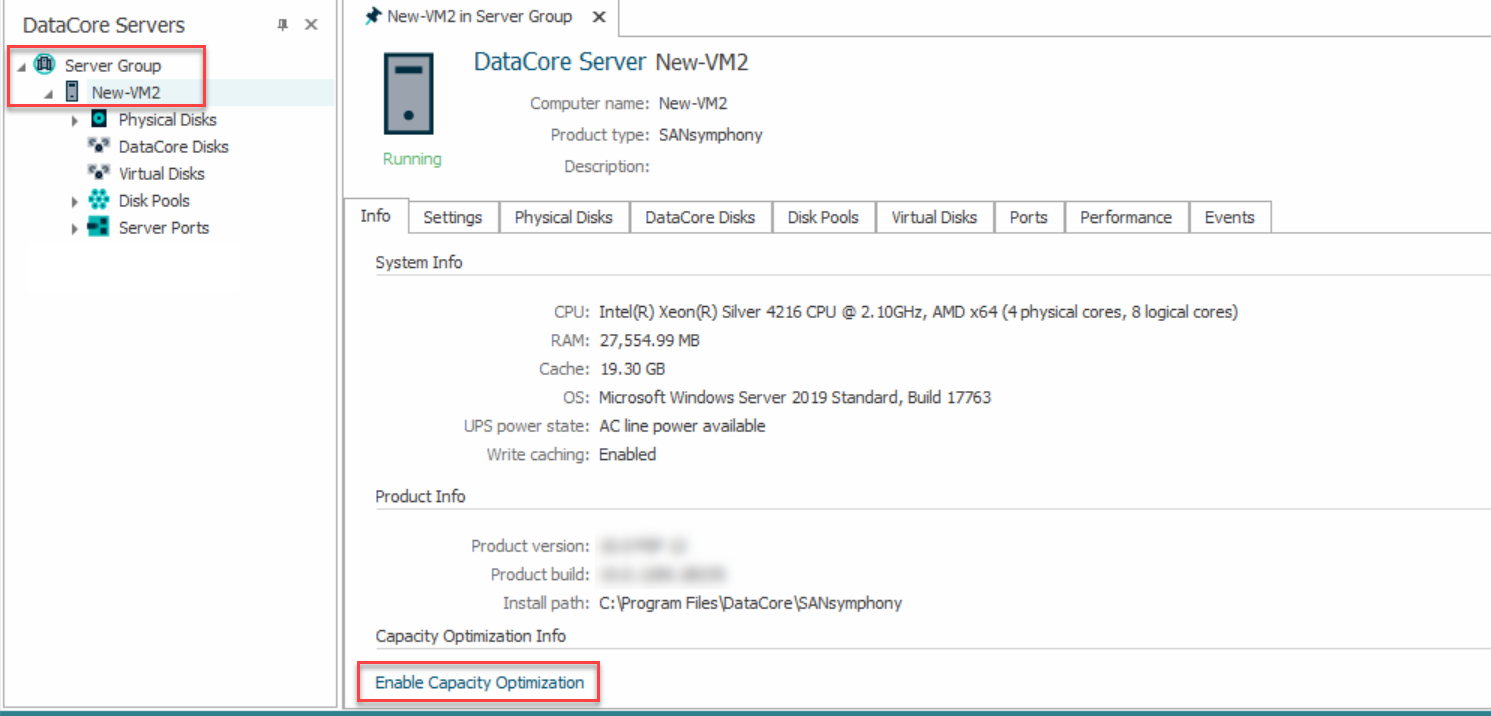
- Select the server under Server Group to open the Server Details page. On this page, click the Enable Capacity Optimization link to open the wizard.
- In the DataCore Servers panel, select the applicable server under Server Group. Right-click Capacity Optimization and select Enable Capacity Optimization.
- A message about a required stop and restart of the DataCore Server will be displayed. Click Yes to continue.
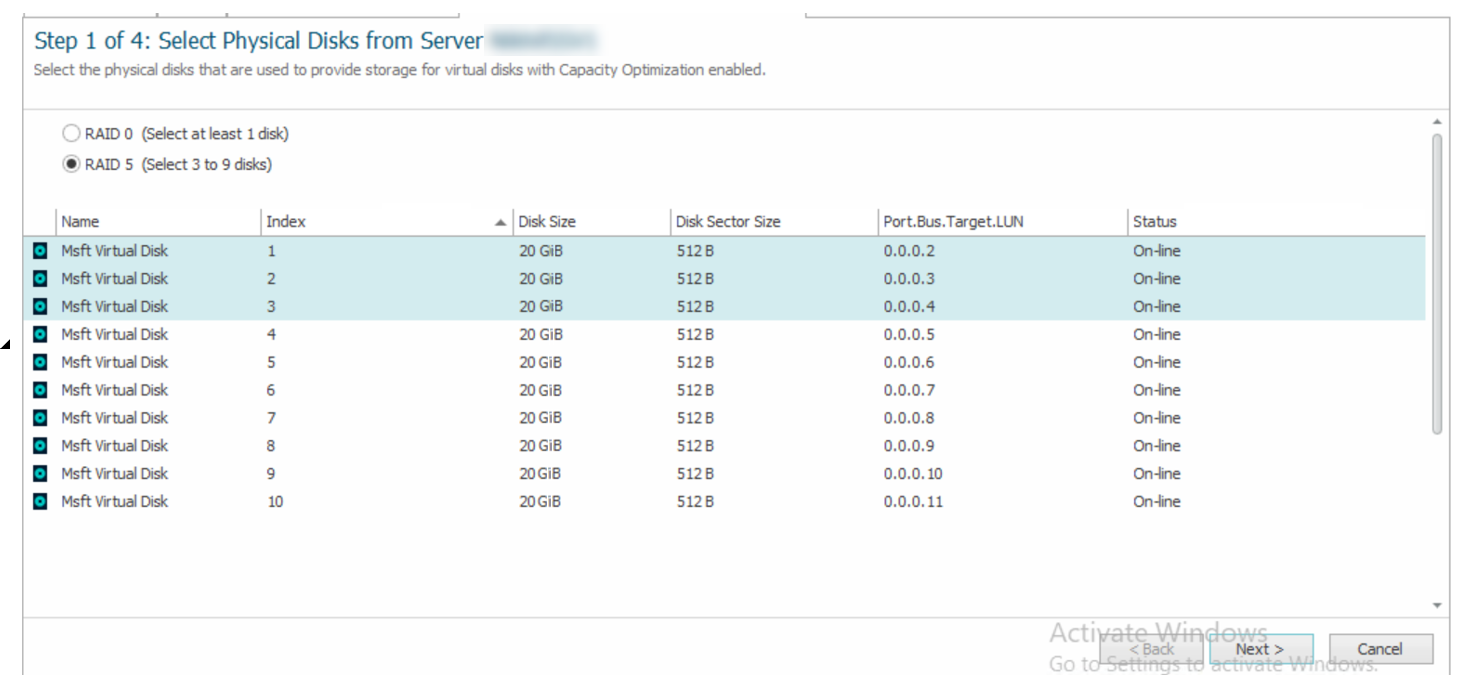
- On Step 1 of the wizard, select RAID level (RAID 0 or RAID 5) and the available physical disks that you want to include and click Next.
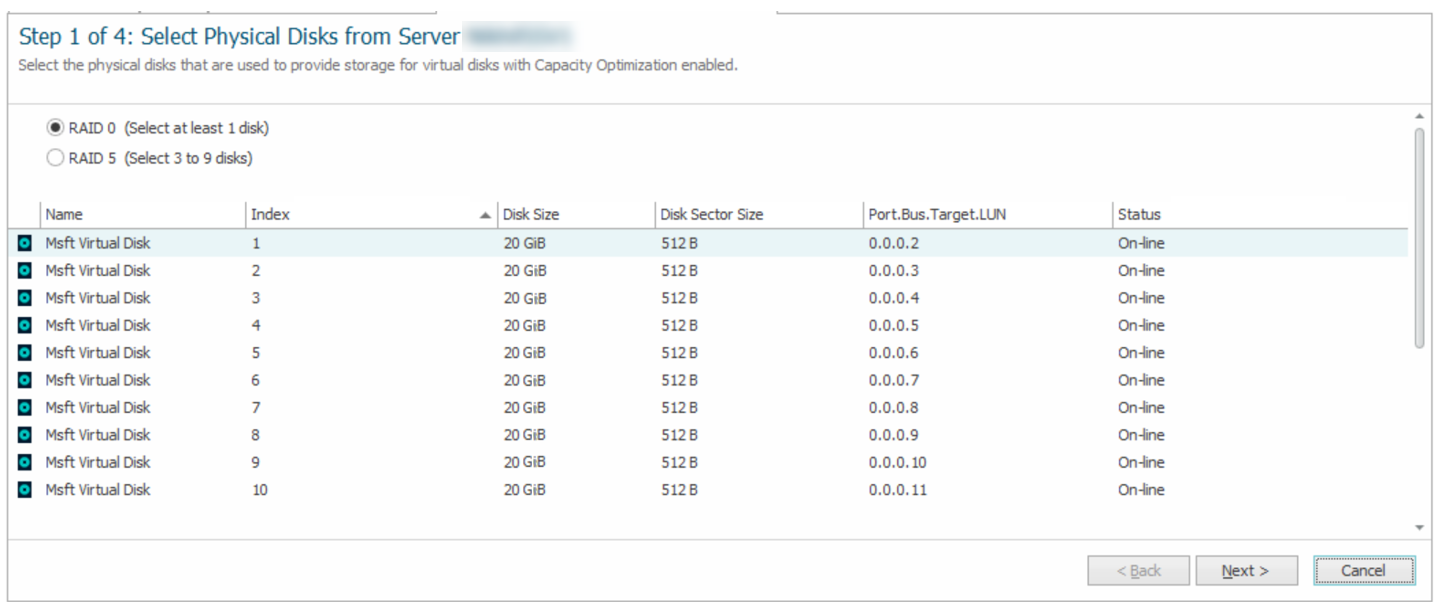
For RAID 5, Select 3 to 9 disks.
- On Step 2 of the wizard, do either of the following:
- Select a disk to configure the Level-2 ARC (L2ARC) and click Next.
- Click Skip to configure later to configure the L2ARC later. See Add Capacity Optimization disks for more information.
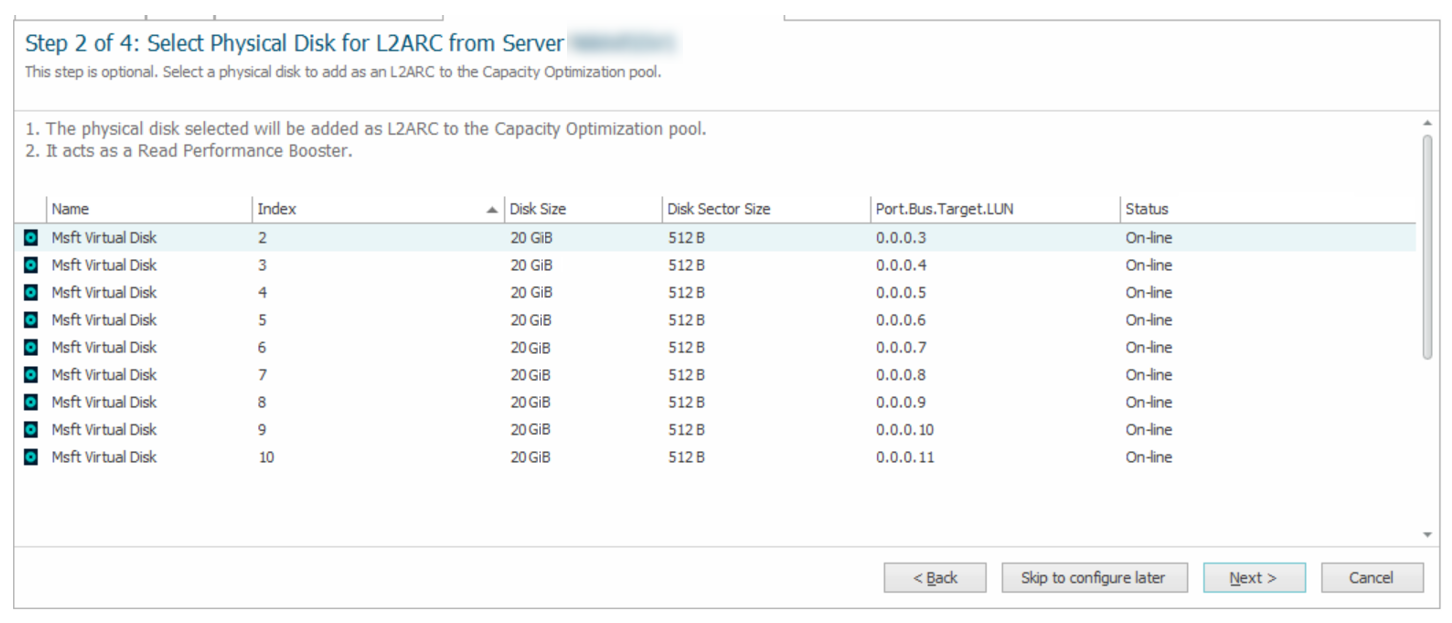
This step is optional.
-
On Step 3 of the wizards, do either of the following:
- Select two disks to configure the Mirrored Special Device and click Next.
- Click Skip to configure later to configure the Mirrored Special Device later. See Add Capacity Optimization disks for more information.
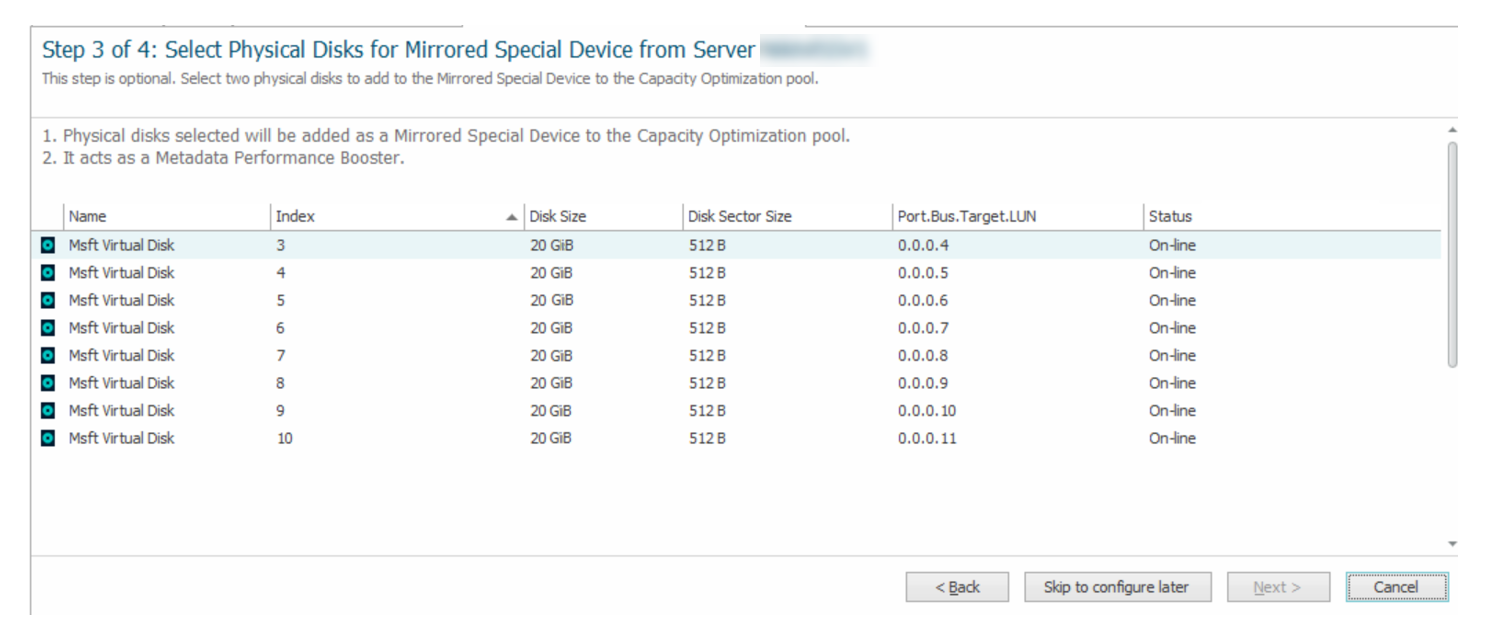
This step is optional.
-
On Step 4 of the wizards, select the disk pools to enable Capacity Optimization and click Finish.
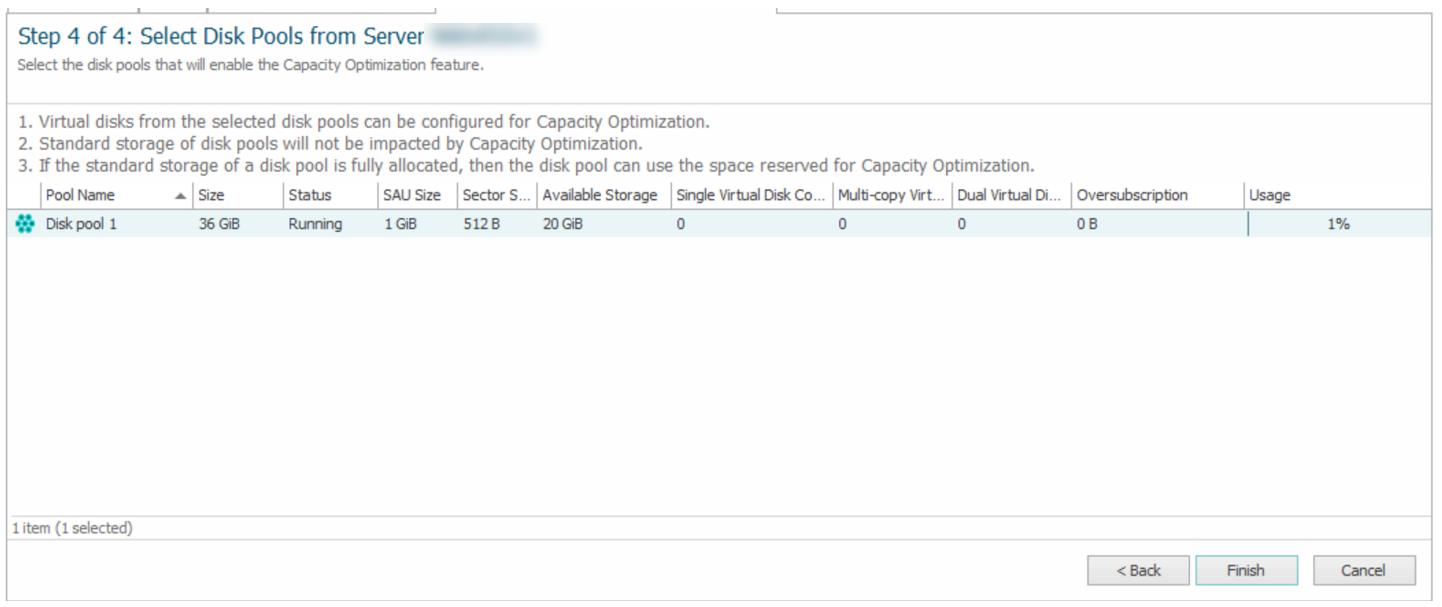
Enabling Capacity Optimization for a pool only applies it to the disks added specifically for Capacity Optimization, not all disks in the pool. Capacity Optimization only supports non-shared “standard” pools.
A message requiring a stop and restart of the DataCore Server is displayed.
- Click OK to continue.
- Stop and restart the DataCore Server.
Enabling Capacity Optimization for Virtual Disks
For mirrored virtual disks, it is not required that Capacity Optimization be enabled for all copies.
Enabling Capacity Optimization for a New Virtual Disk
You can enable Capacity Optimization while creating a new virtual disk on the Set Virtual Disk Properties page.
To enable Capacity Optimization for a new virtual disk:
- Open the Create Virtual Disk Wizard. (See Creating Virtual Disks for more information.)
- On the Set Virtual Disk Properties page, set up the virtual disk properties according to your requirements.
- Under Capacity Optimization, select the Inline Deduplication and/or Inline Compression check boxes.
- Select Optimize Stale Data Only and select the Optimization Policy (Aggressive/ Normal/ Lazy) to migrate stale data of the vDisk to the CO location. Click Next.
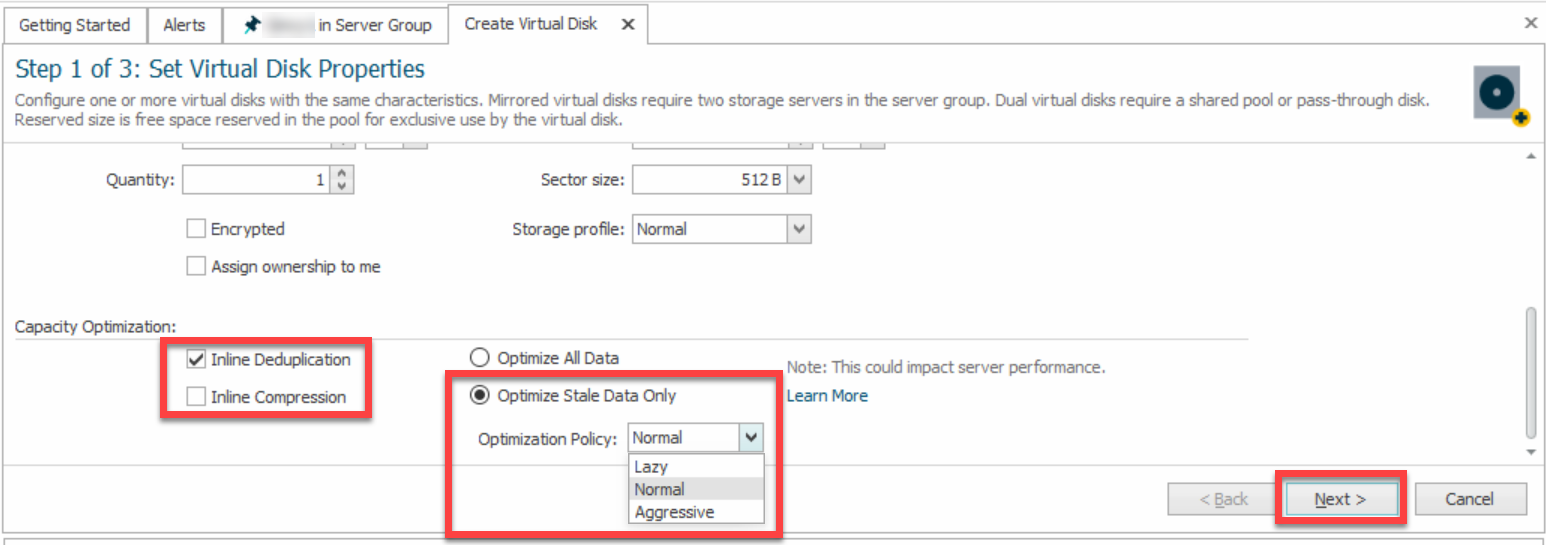
- Follow the remaining steps of the Create Virtual Disk Wizard and click Finish.
Enabling Capacity Optimization for an Existing Virtual Disk
To enable Capacity Optimization for an existing virtual disk:
- Open the Virtual Disk Details page. (See Virtual Disk Details and List for more information.)
- On the Settings tab under Capacity Optimization, select Deduplication and Compression and/or Compression Only.
- Select Optimize Stale Data Only and select the Optimization Policy (Aggressive/ Normal/ Lazy) to migrate stale data of the vDisk to the CO location.
- Click Apply.
Disabling Capacity Optimization (Inline Deduplication and Compression)
Disabling Capacity Optimization for a Pool
When you disable Capacity Optimization for a pool, the pool will switch to standard storage. If the pool does not have sufficient standard storage for what was in capacity-optimized storage, DataCore SANsymphony will display a message when the setting is disabled. You'll be able to close out of the message and return to the Disk Pool Details where the setting will be enabled again.
DataCore recommends stopping I/O before disabling Capacity Optimization. It may appear that there is enough standard storage to disable Capacity Optimization safely, but continuing I/O could consume space that prevents the expansion and migration from optimization storage to the pool’s standard storage.
To disable Capacity Optimization for a pool:
- Stop I/O.
- Open Disk Pool Details. (See Disk Pool Details.)
- Click the Settings tab and clear the Capacity Optimization check box.
-
Click Apply.
If there is sufficient standard storage available, DataCore Web Console will display a message about how the change will affect pool storage. If the pool does not have enough standard storage for what was in capacity optimization storage, DataCore Web Console will display a message about how much additional storage is needed.
Disabling Capacity Optimization on a Virtual Disk
When you disable Capacity Optimization on a virtual disk, the disk will switch to standard storage. If the virtual disk's pool does not have sufficient standard storage for what was in capacity optimization storage, DataCore SANsymphony will display a message when the setting is disabled. You'll be able to close out of the message and return to the Virtual Disk Details page where the setting will be enabled again.
To disable Capacity Optimization for a virtual disk:
- Open the Virtual Disk Details page. (See Virtual Disk Details and List for more information.)
- On the Settings tab, deselect the Inline Deduplication and Compression check box displayed under Capacity Optimization.
- Click Apply.
Deselecting Inline Deduplication and Compression will automatically deselect Optimize Stale Data Only option.
Disabling Capacity Optimization for a Server
To disable Capacity Optimization for a server, disable it on all of the server's pools, and then disable Capacity Optimization on the server. After the physical disks are removed from optimized storage, they can be added to pools as usual. After Capacity Optimization is disabled, reboot the server to reclaim the previously-reserved cache.
If any of the server's pools still have Capacity Optimization enabled, and you try to disable Capacity Optimization, DataCore SANsymphony will not allow you to proceed. You will have to disable Capacity Optimization on those pools first.
To disable Capacity Optimization for a server:
- In the DataCore Servers panel, click the server drop-down from the Server Group drop-down.
-
Right-click Capacity Optimization and select Disable Capacity Optimization.
- A confirmation message is displayed. Click Yes to continue.
- Stop and restart the DataCore Server.
Tracking Capacity Optimization (Inline Deduplication and Compression)
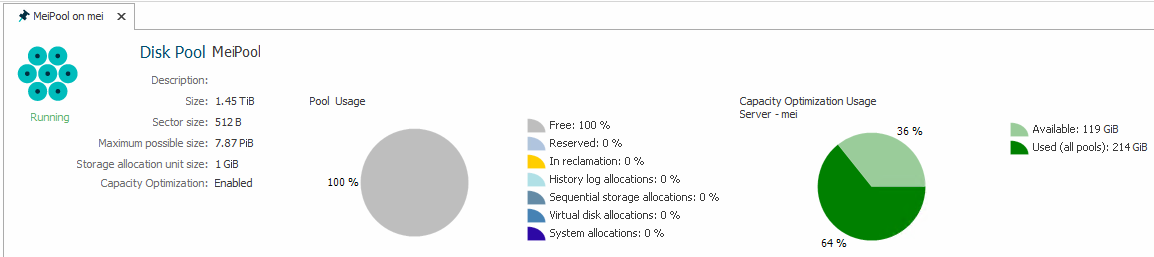
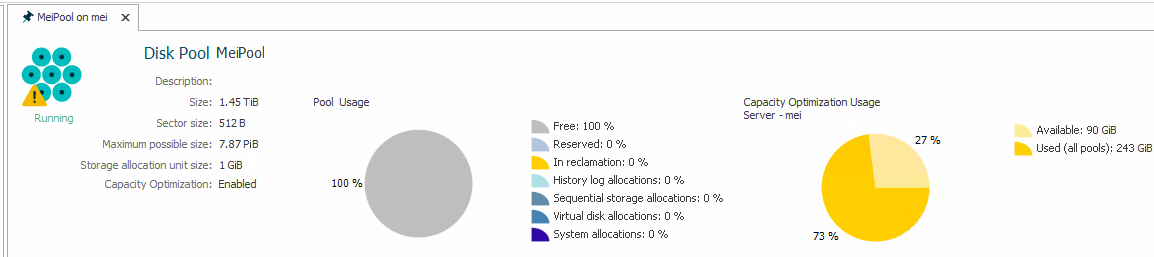
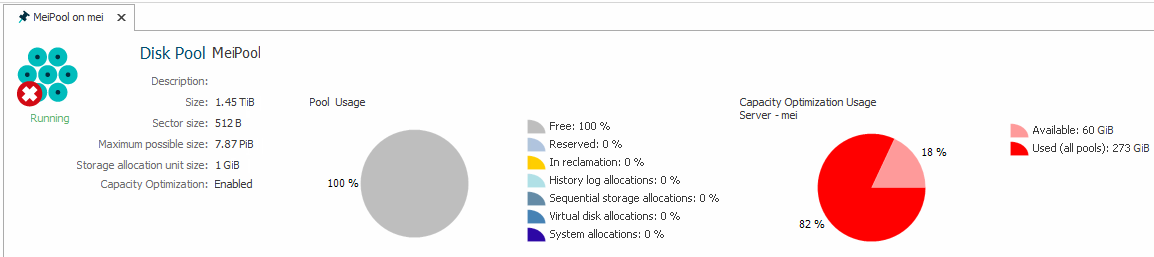
It is important to monitor the remaining Capacity Optimization space that is available per server. The Disk Pools tab shows the remaining Capacity Optimization space and whether it is at a healthy, warning, or critical level.
-
Healthy (green)
-
Warning (yellow)
-
Critical (red)
- The values that determine the warning and critical states are system-defined and cannot be modified.
- A Capacity Optimization enabled Disk Pool may take up to 30 seconds to refresh allocation values in the Disk Pool Usage Pie Chart when viewed in the DataCore Management Console. This is a display-only issue. All performance counters and alert monitors that are related to these statistics will have real-time information when queried.
If the free space on a capacity-optimized server reaches a critical level, DataCore SANsymphony will redirect any disk writes from the capacity-optimized disks to the standard disks. Once additional free space is added to the capacity-optimized storage, DataCore SANsymphony will automatically allow writes to the capacity-optimized storage again. Data that was redirected to the standard disks will be automatically migrated back to capacity-optimized storage. If the system exhausts the available storage, the dependent disk pools will go offline, and all dependent virtual disks will fail on the corresponding server.
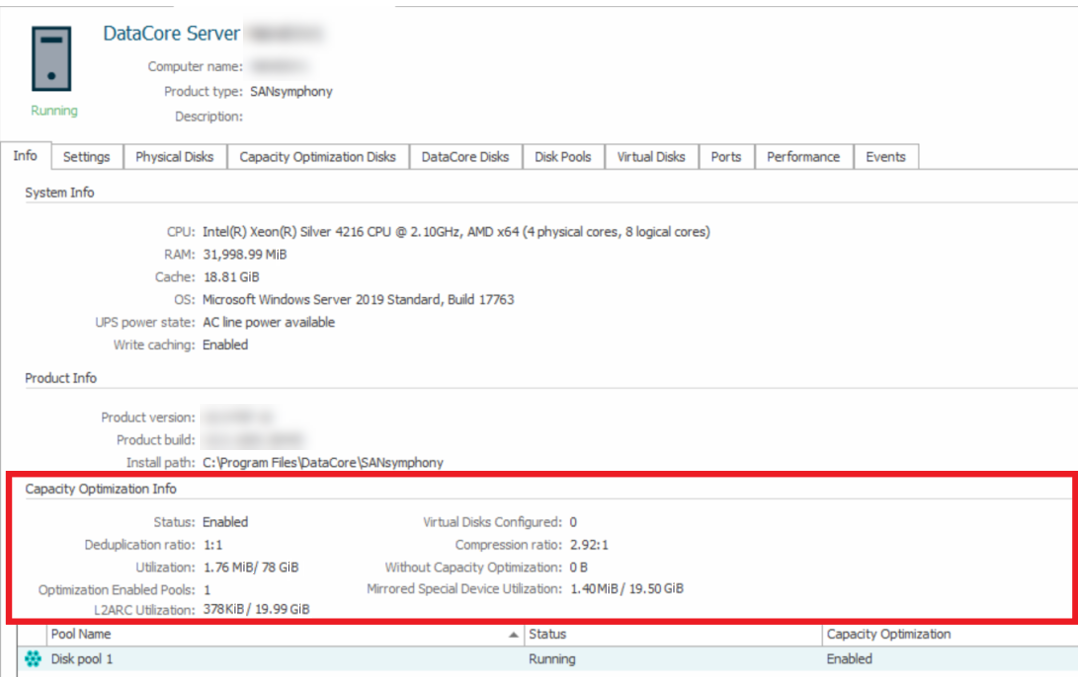
Tracking Capacity Optimization for a Server
After a server is set up, and virtual disks are using Capacity Optimization, DataCore Web Console displays relevant statistics on Server Details page, on the Info tab. In the lower half of the page, there are several performance measures and a list of pools with Capacity Optimization enabled.
The following performance indicators are available:
- How much of the available capacity-optimized storage on the server is being used
- Compression ratio
- Deduplication ratio
- How many virtual disks from the server are configured to use Capacity Optimization
- How much storage would have actually been used if Capacity Optimization was not enabled
- How much of the available Mirrored Special Device storage on the server is being used
- How much of the available L2ARC storage on the server is being used
Tracking Capacity Optimization for a Pool
You can track Capacity Optimization for pools from the Server Details page on the Disk Pools tab:
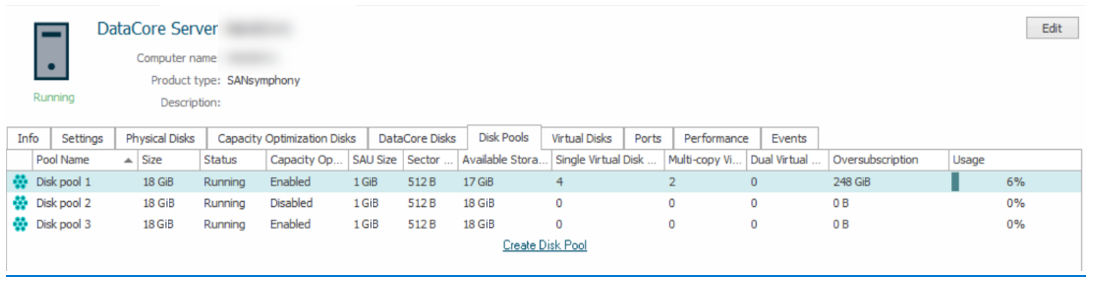
- How much of the available capacity-optimized storage on the server is being used, and if it's at a healthy, warning, or critical level
- How much of the standard storage in the pool is being used
- How much storage would have actually been used if Capacity Optimization was not enabled
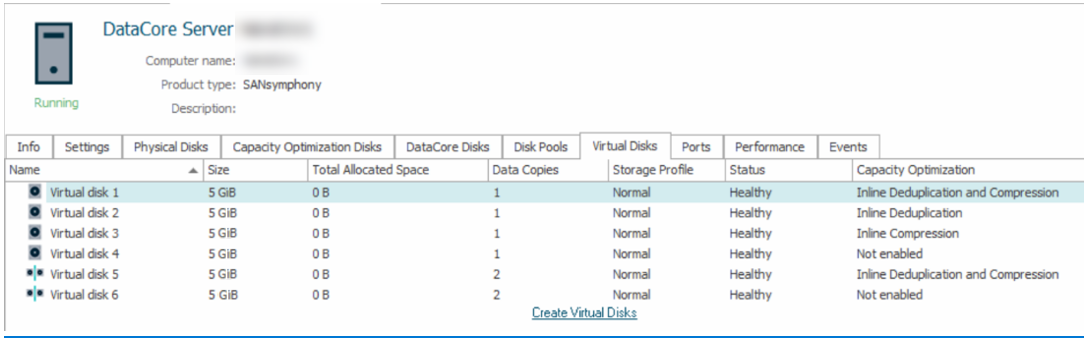
Tracking Capacity Optimization for a Virtual Disk Details page
From the Server Details page on the Virtual Disks tab, you can see whether Capacity Optimization settings are enabled for a virtual disk (Inline Deduplication and Compression).
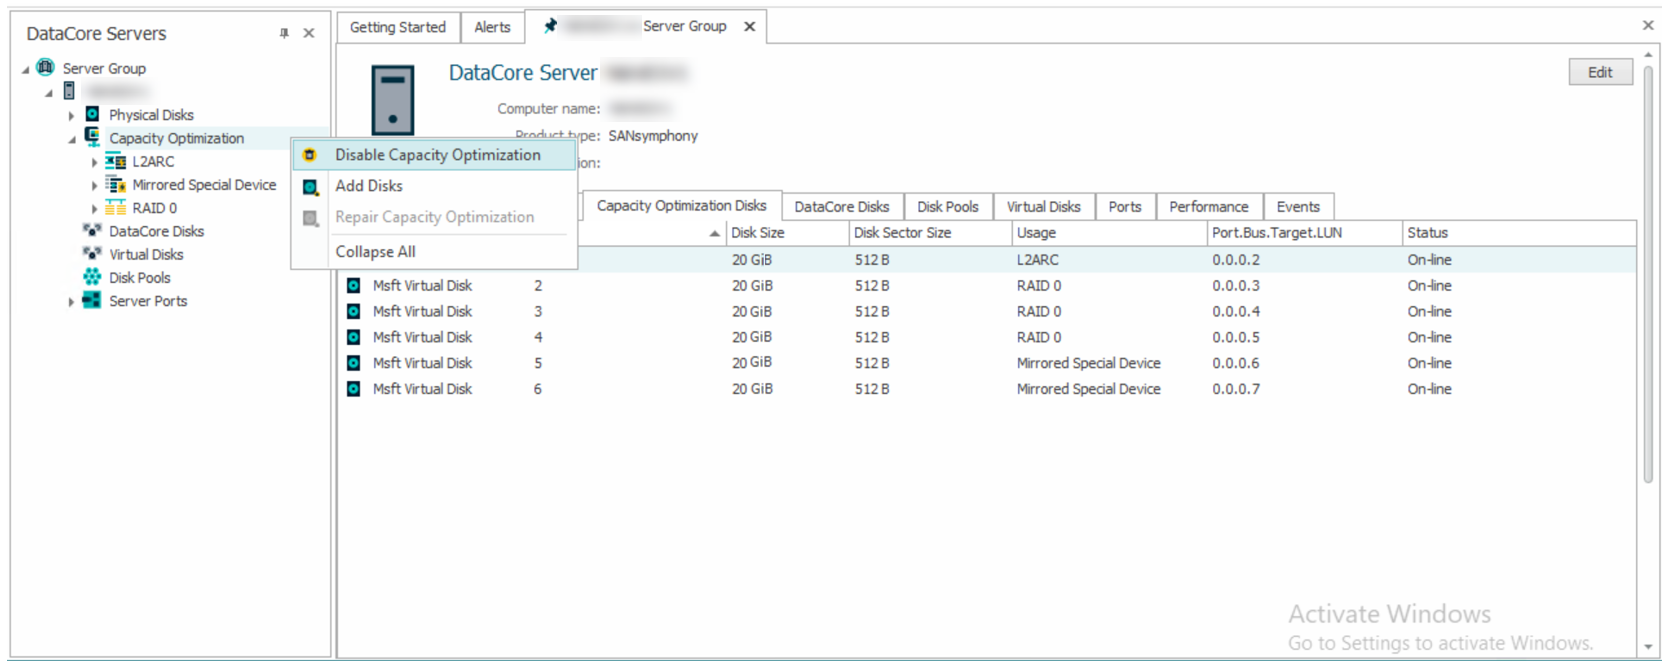
Tracking Disks in Capacity Optimization
You can track disks in Capacity Optimization from the Server Details page under the Capacity OptimizationDisks tab.
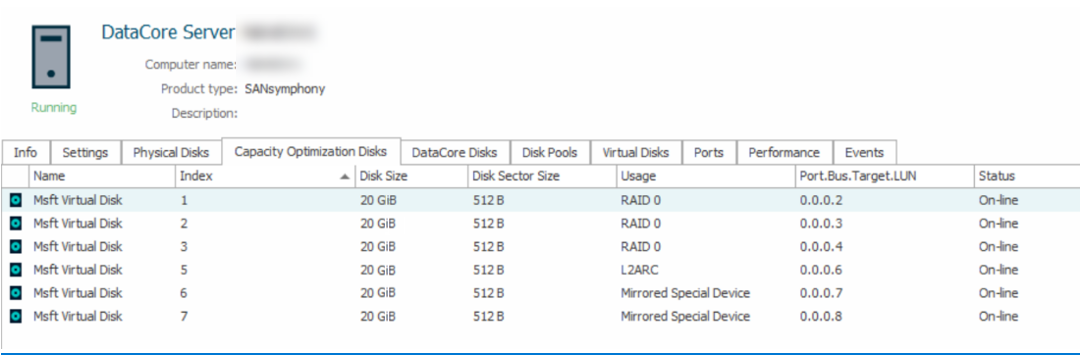
The following information of the physical disks added to the Capacity Optimization is displayed:
- Name
- Index
- Disk Size
- Disk Sector Size
- Usage (the device in Capacity Optimization for which physical disk is being used)
- Port/Bus/Target/LUN used
- Status
Repairing Capacity Optimization (Inline Deduplication and Compression)
When one or more physical disks in the Capacity Optimization (RAID 0, RAID 5, or Mirrored Special Device) goes missing or gets failed, the Capacity Optimization goes into failed, degraded, or suspended state.
Once all the missing or failed disks recover, the Repair Capacity Optimization operation makes the Capacity Optimization state online by troubleshooting the errors that occurred when the disks failed or were missing.
By default, the Repair Capacity Optimization option is greyed out. This option becomes available when the Capacity Optimization state is not online or unknown.
To repair Capacity Optimization:
-
In the DataCore Servers panel, right-click Capacity Optimization and select Repair Capacity Optimization.
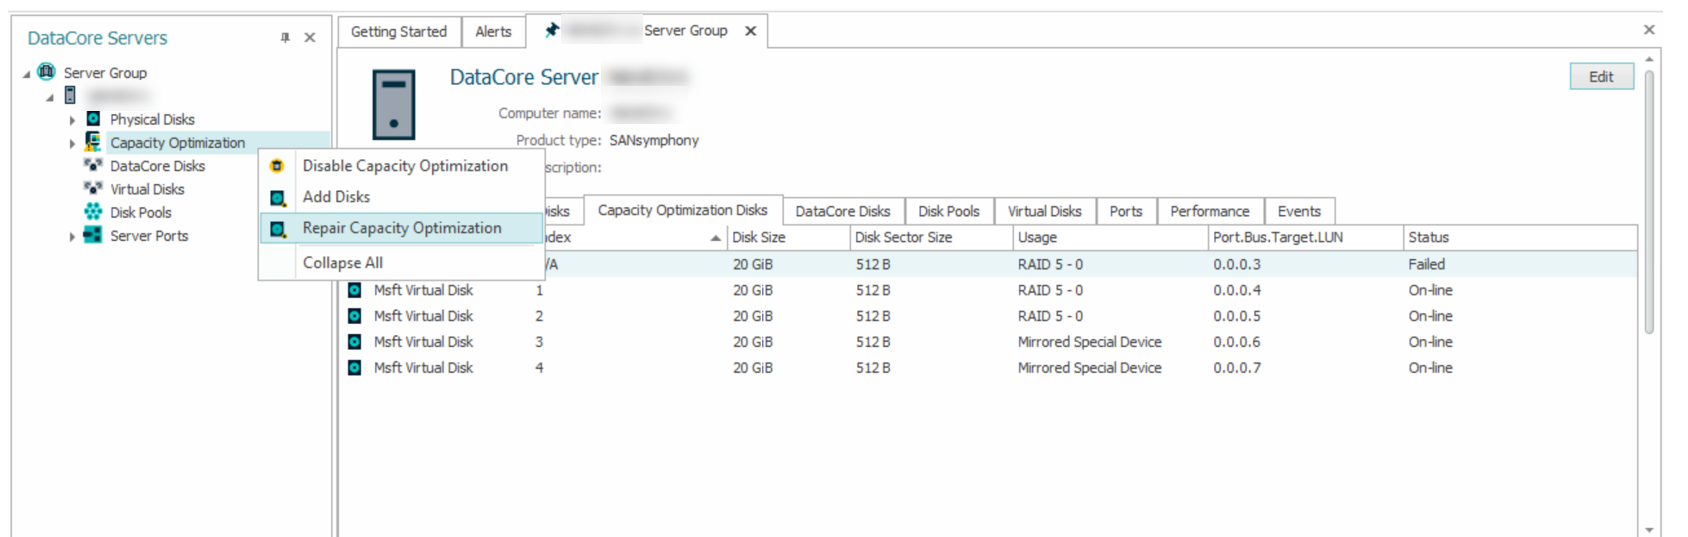
A confirmation message is displayed stating whether the failed disks were recovered.
- Click Yes to continue.
Learn More