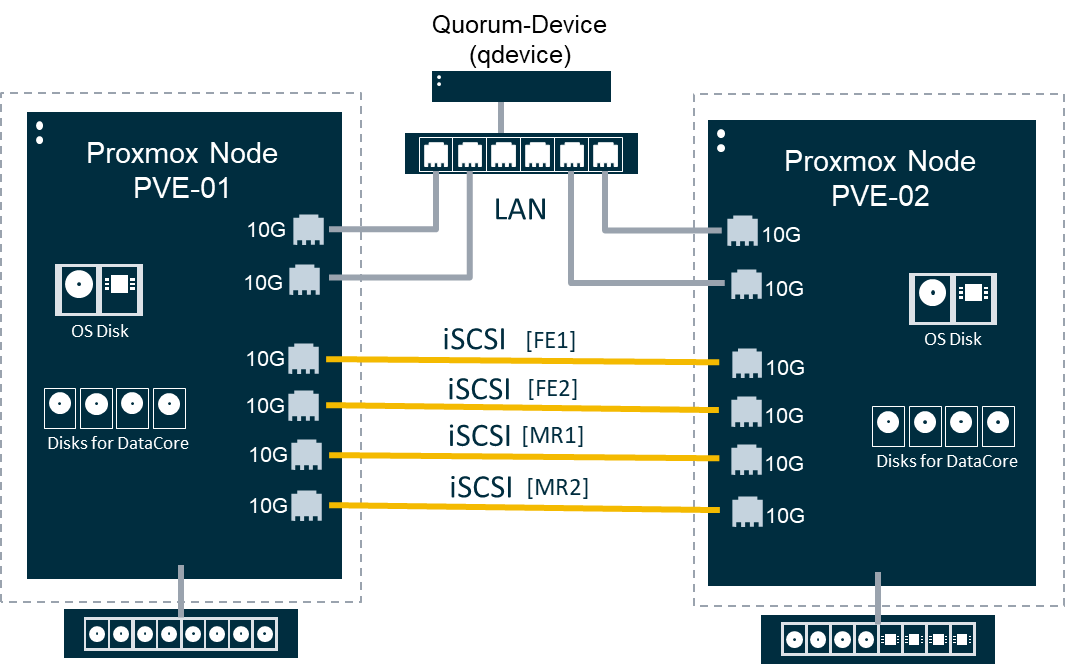
Proxmox Hyper-Converged Deployment
Explore this Page
- Overview
- Hyperconverged Infrastructure: Proxmox Installation
- Creating a Cluster
- Installing SANsymphony Virtual Machine
- Creating a New Virtual Machine
- Installing Guest Agent and Services
- Proxmox iSCSI
- iSCSI Settings
- iSCSI Multipath
- Serving a SANsymphony Virtual Disk to the Proxmox Node
- Creating a Proxmox File-system (LVM)
- Disk Raw Device Mapping to Virtual Machine
- Restarting the Connection after Rebooting the Proxmox Server
- Deployment Examples
Overview
This section provides guidance for deploying SANsymphony in Proxmox hyper-converged environments, including cluster creation, SANsymphony virtual machine installation and sizing, iSCSI configuration, multipath setup, storage presentation methods, RAW device mapping, and deployment best practices for Proxmox hosts. For general hyper-converged deployment guidance, see Hyper-Converged Virtual SAN Deployment.
Hyperconverged Infrastructure: Proxmox Installation
The basic installation of the nodes and the system requirements must be carried out according to the Proxmox specifications. Refer to Proxmox VE documentation for installation instructions and system requirements.
Through the Proxmox topic, the Proxmox host will be referenced as “PVE”, as this is the name Proxmox references in its documents.
Version
The guide applies to the following software versions:
- SANsymphony 10.0 PSP21
- Windows Standard Server 2025
- Proxmox version 9.1
Creating a Cluster
The following steps to create a cluster do not include the information on the quorum device (qdevice) and High Availability (HA) configuration. Refer to the Wiki Proxmox Cluster Manager to see details on the qdevice and HA configuration.
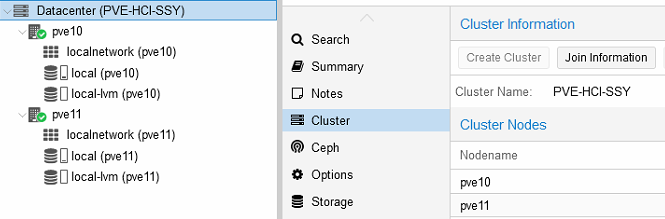
- Under Datacenter > Cluster, click Create Cluster.
- Enter the cluster name.
- Select a network connection from the drop-down list to serve as the main cluster network (Link 0). The network connection defaults to the IP address resolved via the node’s hostname.
Adding a Node
- Log in to the GUI on an existing cluster node.
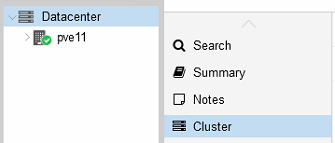
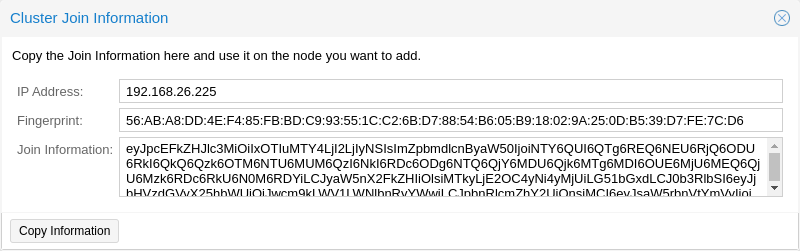
- Under Datacenter > Cluster, click the Join Information button displayed at the top.
- Click the Copy Information button. Alternatively, copy the string from the Information field.
- Next, log in to the GUI on the applicable node to be added.
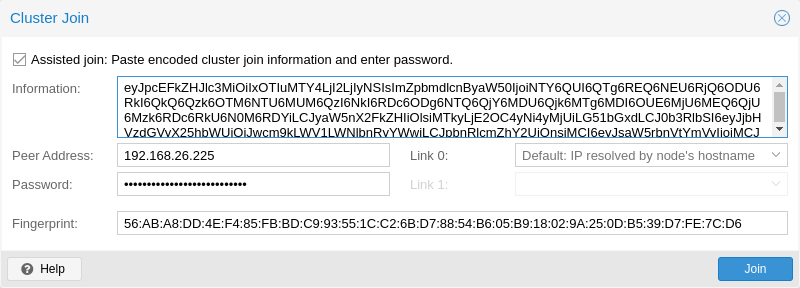
- Under Datacenter > Cluster, click Join Cluster.
- Fill the Information field with the Join Information text copied earlier. Most settings required for joining the cluster will be filled out automatically.
- For security reasons, enter the cluster password manually.
- Click Join. The node is added.
Installing SANsymphony Virtual Machine
See the Proxmox best practices for the basic Microsoft Windows configuration here.
Sizing of the Virtual Machine
The sizing of the SANsymphony Virtual Machine (VM) is dependent on the specific requirements of the environment.
For productive environments, it is recommend to start with the following:
- vCPU = 6
- RAM = 24 GiB
- OS/SSY Disk = 100GiB
- vNIC = 2x Frondend & 2 x Mirror
If a larger number of VMs or the use of functions such as snapshots or similar is planned in the deployment scenario, the resources must be adapted accordingly.
The system requirements for the VM hardware are lower for test and validation installations. The prerequisites are as follows:
- vCPU = 4
- RAM = 16 GiB
- OS/SSY Disk = 60 GiB
- vNIC = 1x Frondend & 1 x Mirror
The recommended sizing is not designed for performance testing and is only intended for understanding the general functionality and operation of the software.
Creating a New Virtual Machine
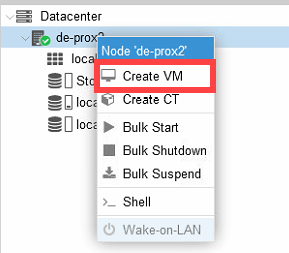
- Select "Microsoft Windows 11/2022" as the Guest Operating System (OS).
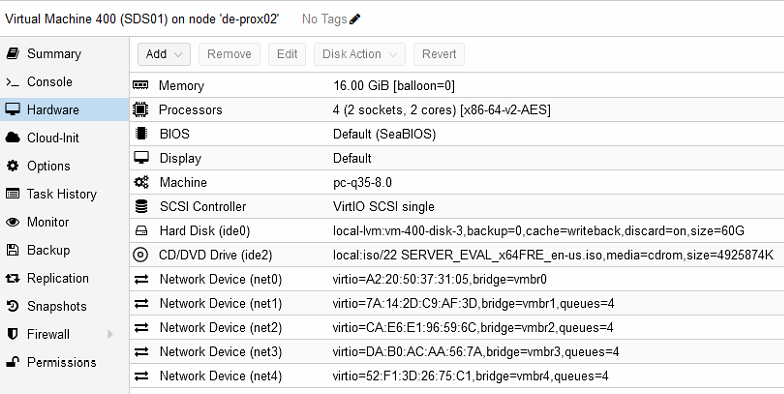
- Enable the "Qemu Agent" in the System tab.
- Continue and mount the Windows Server 2022 ISO in the CDROM drive.
- For the virtual hard disk, select "SCSI" as the bus with "VirtIO SCSI" as the controller.
- Set "Write back" as the cache option for best performance
- Select the "Discard" checkbox to optimally use the disk space (TRIM). Refer to QEMU/KVM Virtual Machines for more information.
-
Once a VM is created, make the following changes:
- Disable balloon on RAM.
- Add the four vNIC without the firewall settings.
- Configure the vNIC queues with the numbers of cores in a VM. This option allows the guest OS to process the networking packets using multiple virtual CPUs, thereby providing an increase in the total number of packets transferred. Refer to Windows VirtIO Drivers for more information.
The "No cache" default is safer, however, slower.
Installing Guest Agent and Services
Microsoft Windows does not have native support for VirtIO devices included. There is external support through open-source drivers, which are available compiled and signed for Windows.
Download the latest build of the ISO. Click here to download.
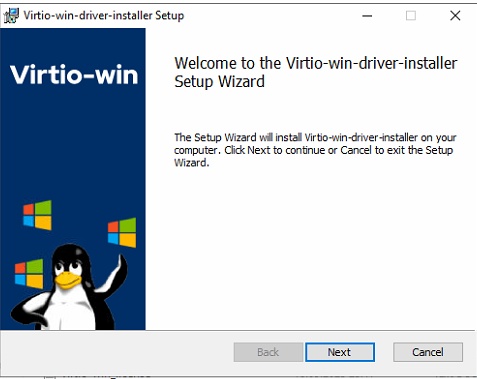
Without this agent, the network interface cards (NIC) and discs are not detected in Windows. This is why the ISO file must be embedded in the system as a virtual CD device. Refer to Windows VirtIO Drivers for more information.
Adding a Disk for the Pool
The preferred way to present storage to a DataCore virtual machine (VM) would be raw device mapping.
Identifying the Disk
- Identify the disks/devices that are available to the Promox (PVE) host and which of them are to be connected to DataCore VM.
- Display the existing devices using the following CLI command:
- Use the SCSI string with the corresponding serial number of the disk for the mapping.
find /dev/disk/by-id/ -type l|xargs -I{} ls -l {}|grep -v -E '[0-9]$' |sort -k11|cut -d' ' -f9,10,11,1213:11 /dev/disk/by-id/scsi-3600605b00b30d1501fa061fe0c634f7 -> ../../sda
13:11 /dev/disk/by-id/wwn-0x600605b00b30d1501fa061fe0c634f7 -> ../../sda
13:11 /dev/disk/by-id/scsi-3600605b00b040f02c67295c0c3313c -> ../../sdb
13:11 /dev/disk/by-id/wwn-0x600605b00b040f02c67295c0c3313c -> ../../sdb
13:11 /dev/disk/by-id/scsi-3600605b00b040f02c6729f3c995b67e -> ../../sdc
13:11 /dev/disk/by-id/wwn-0x600605b00b040f02c6729f3c995b67e -> ../../sdcAdding a Physical Device as a New Virtual SCSI Disk
Establish the new connection using the following command:
Sample Output
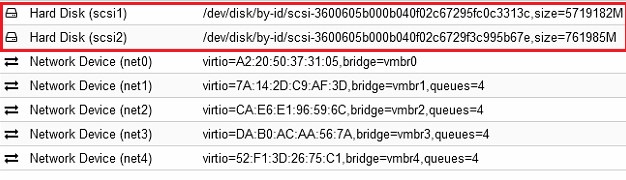
Verifying the Configuration File
Use the following command to check the configuration file:
Preparing the SANsymphony iSCSI
The IQN names of the iSCSI ports must be given a speaking name to easily configure the iSCSI setup and later administration.
It is recommended to replace the number after the dash with the function.
Original: iqn.2000-08.com.datacore:sds1-5
modified: iqn.2000-08.com.datacore:sds1-fe1
Proxmox iSCSI
Installing iSCSI Daemon
iSCSI is a widely employed technology that is used to connect to storage servers. Almost all storage vendors support iSCSI. There are also open-source iSCSI target solutions available, which is based on Debian.
To use Debian, install the Open-iSCSI (open-iscsi) package. This is a standard Debian package, however, not installed by default to save the resources. Refer to Open-iSCSI documentation for installation instructions.
iSCSI Connection
Changing the iSCSI-Initiator Name on each PVE
The Initiator Name must be unique for each iSCSI initiator. Do NOT duplicate the iSCSI-Initiator Names.
- Edit the iSCSI initiator name in the /etc/iscsi/initiatorname.iscsi file to assign a unique name in a way that the IQN refers to the server and the function. This change makes administration and troubleshooting easier.
- Original: InitiatorName=iqn.1993-08.org.debian:01:bb88f6a25285
- Modified: InitiatorName=iqn.1993-08.org.debian:01:<Servername + No.>
- Restart iSCSI to take effect using the following command:
Discovering the iSCSI Target to PVE
- Before attaching the SANsymphony iSCSI target, discover all the iqn-portname using the following command:
-
Attach all the SANsymphony iSCSI targets on each PVE using the following command:
Refer to Wiki - iSCSI Multipath for more information.
iscsiadm --mode node --targetname iqn.2000-08.com.datacore:pve-sds11-fe1 -p 172.16.41.21 --login
iscsiadm --mode node --targetname iqn.2000-08.com.datacore:pve-sds11-fe2 -p 172.16.42.21 --login
iscsiadm --mode node --targetname iqn.2000-08.com.datacore:pve-sds10-fe1 -p 172.16.41.20 --login
iscsiadm --mode node --targetname iqn.2000-08.com.datacore:pve-sds10-fe2 -p 172.16.42.20 --login
Displaying the Active Session
Rescans active iSCSI sessions to detect new LUNs or path changes.
Detailed information about the iSCSI connections and the hardware can be displayed with this command:
iSCSI Settings
- In Hyper-Converged Infrastructure (HCI) deployments, it is recommended to configure node.startup as manual instead of automatic. During Proxmox VE node startup, the iSCSI initiator attempts to establish connections to configured iSCSI targets. In HCI environments, the iSCSI targets are typically hosted on virtual machines running on the same node. Because these virtual machines require additional time to start, the iSCSI targets may not yet be available during node boot. This can result in connection timeouts and delays in the node startup process. Configuring node.startup = manual prevents automatic login attempts during boot and helps avoid unnecessary startup delays. If the Proxmox plugin is installed, the plugin automatically establishes the required iSCSI connections after the services and virtual machines are fully initialized.
- The iSCSI service does not start automatically by default when the Proxmox VE (PVE) node boots. Refer to iSCSI Multipath for more information.
The /etc/iscsi/iscsid.conf file must change the line so that the initiator starts automatically.
The default 'node.session.timeo.replacement_timeout' is 120 seconds. It is recommended to use a smaller value of 15 seconds instead.
If a port reinitialize is done, the port may be unable to login on its own. In this case, the attempts must be increased here:
Restart the service using the following command:
Logging in to the iSCSI Targets on Boot
For each connected iSCSI target, set the node.startup parameter in the target to automatic. The target is specified in the following file.
SCSI Disk Timeout
Set the timeout to 80 seconds for all the SCSI devices created from the SANsymphony virtual disks.
For Example: cat /sys/block/sda/device/timeout
Two methods may be used to change the SCSI disk timeout for a given device.
- Use the ‘echo’ command – this is temporary and will not survive the next reboot of the Linux host server.
- Create a custom ‘udev rule’ – this is permanent, however, will require a reboot for the setting to take effect.
Using the ‘echo’ Command (will not survive a reboot)
Set the SCSI Disk timeout value to 80 seconds using the following command:
Creating a Custom ‘udev’ Rule
Create a file called /etc/udev/rules.d/99-datacore.rules with the following settings:
SUBSYSTEM=="block", ACTION=="add", ATTRS{vendor}=="DataCore", ATTRS{model}=="Virtual Disk ", RUN+="/bin/sh -c 'echo 80 > /sys/block/%k/device/timeout'"- Ensure that the udev rule is exactly as written above. If not, the Linux operating system will default back to 30 seconds.
- There are four blank white-space characters after the ATTRS {model} string which must be observed. If not, paths to SANsymphony virtual disks may not be discovered.
Refer to Linux Host Configuration Guide FAQ for more information.
iSCSI Multipath
Installing Multipath Tools
The default installation does not include the 'multipath-tools' package. Use the following commands to install the package:
Refer to iSCSI Multipath for more information.
Creating a Multipath.conf File
After installing the package, create the following multipath configuration file: /etc/multipath.conf.
Refer to the Linux Configuration Guide for the relevant settings and the adjustments for the PVE in the Wiki iSCSI Multipath.
    defaults {
        user_friendly_names     yes
        polling_interval           60
        find_multipaths          "smart"
        }

    blacklist {
        devnode "^(ram|raw|loop|fd|md|dm-|sr|scd|st)[0-9]*"
               devnode "^hd[a-z]"
        }

    devices {
            device {
                    vendor                  "DataCore"
                    product                 "Virtual Disk"
                    path_checker         tur
                    prio                         alua
                    failback                   10
                    no_path_retry         fail
                    dev_loss_tmo         60
                    fast_io_fail_tmo      5
                    rr_min_io_rq            100
                    path_grouping_policy    group_by_prio
               }
    }
Restarting the Service
Restart the multipath service using the following command to reload the configuration:
Refer to ISCSI Multipath for more information.
Serving a SANsymphony Virtual Disk to the Proxmox Node
Following the necessary configurations in the SANsymphony graphical user interface (GUI) such as the assignment of the iSCSI port to the relevant host and the virtual disk, the virtual disk must now be integrated into the host.
To make the virtual disk visible in the system, the iSCSI connection must be scanned again using the following command:
The list of block devices and whether the virtual disk is correctly detected with its paths may be identified and with the multipath name “mpathX” the dives may also identified.
sdd       8:48   0   100G   0   disk
 └─mpathb 252:8   0   100G   0   mpath
sde       8:64   0   100G   0   disk
 └─mpathb 252:8   0   100G   0   mpath
sdf       8:80   0   1.5T   0   disk
 └─mpatha 252:7   0   1.5T   0   mpath
sdg       8:96   0   1.5T   0   disk
 └─mpatha 252:7   0   1.5T   0   mpath
Use the 'multipath' command to determine which and whether all necessary paths are now available from the SANsymphony server for the virtual disk:
root@de-prox02:~# multipath -ll
mpatha (360030d9095f0370627edc4fd4d0fa4a9) dm-7 DataCore, Virtual Disk
size=1.5T features="0" hwhandler="1 alua" wp=rw
  |- 7:0:0:1 sdg 8:96 active ready running
  `- 6:0:0:1 sdf 8:80 active ready running
mpathb (360030d9012bb36060faaaf8355276e9b) dm-8 DataCore, Virtual Disk
size=100G features="0" hwhandler="1 alua" wp=rw
  |- 7:0:0:0 sde 8:64 active ready running
  `- 6:0:0:0 sdd 8:48 active ready running
Creating a Proxmox File-system (LVM)
Creating a Physical Volume for the Logical Volume
“pvcreate” initializes the specified physical volume for later use by the Logical Volume Manager (LVM).
Creating a Volume Group
Displaying a Volume Group
root@de-prox02:/# vgscan
Found volume group "vol_grp2" using metadata type lvm2
Found volume group "vol_grp1" using metadata type lvm2
Found volume group "pve" using metadata type lvm2
Adding LVM at the Datacenter Level
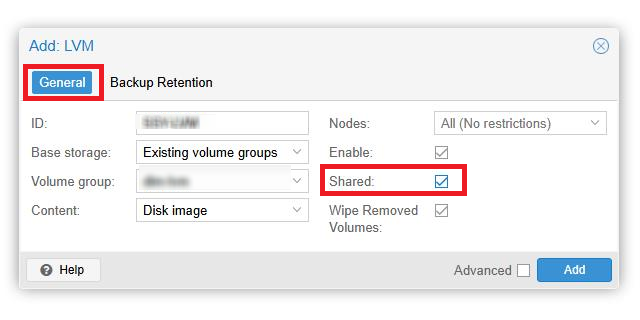
To create a new LVM storage, follow the steps below:
- Access the PVE GUI at the Datacenter level and click Storage in the left-hand menu.
- Click Add and select LVM from the list.
- Select the Shared checkbox (mandatory) to allow the storage to be used across all nodes.
- Click ADD to complete the storage creation.
Finding out the UUID and the Partition Type
The blkid command is used to query information from the connected storage devices and their partitions.
root@prox1:/# blkid /dev/mapper/mpath*
/dev/mapper/mpatha: UUID="X3bM3Dy-YyYf-3m8B-eUaA-n5li-Idbt-soaI0x" TYPE="LVM2_member"
/dev/mapper/mpathb: UUID="7zVp2P-58Ea-Atpp-hoHu-dzJQ-Gnd8-YRjWE2" TYPE="LVM2_member"
Proxmox LVM storage does not support SANsymphony advanced features such as snapshots and Continuous Data Protection (CDP) at the virtual machine disk level. To use SANsymphony snapshot or CDP functionality, present the SANsymphony virtual disk directly to the virtual machine using RAW device mapping instead of configuring the disk as Proxmox LVM storage. In this configuration, snapshot and CDP operations must be managed manually from the SANsymphony DataCore Management Console.
Disk Raw Device Mapping to Virtual Machine
Follow the steps below if the prerequisites of an operating system or an application should be that a RAW device mapping into the virtual machine is necessary:
-
After successfully serving the virtual disk (single or mirror) to the Proxmox (PVE) node, run a rescan to make the virtual disk visible in the system using the following command:
- Identify the virtual disk to use as a RAW device and identified multipath name “mpathX” using the following command:
- Navigate to the “/dev/mapper” directory and run the ls -la command to verify which dm-X the required device is linked to.
- Hot-Plug/Add physical device as new virtual SCSI disk using the following command:
lrwxrwxrwx 1 root root 7 May 28 17:05 mpatha -> ../dm-5
lrwxrwxrwx 1 root root 8 May 28 17:05 mpathb -> ../dm-8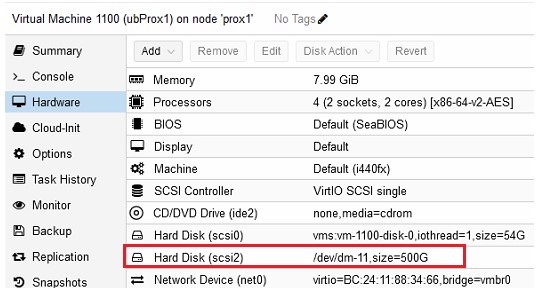
Restarting the Connection after Rebooting the Proxmox Server
Use the following commands to restart the Proxmox (PVE) Server:
If an error occurs, then attempt the following command first:
The connection will restart.
Deployment Examples
Minimum Design
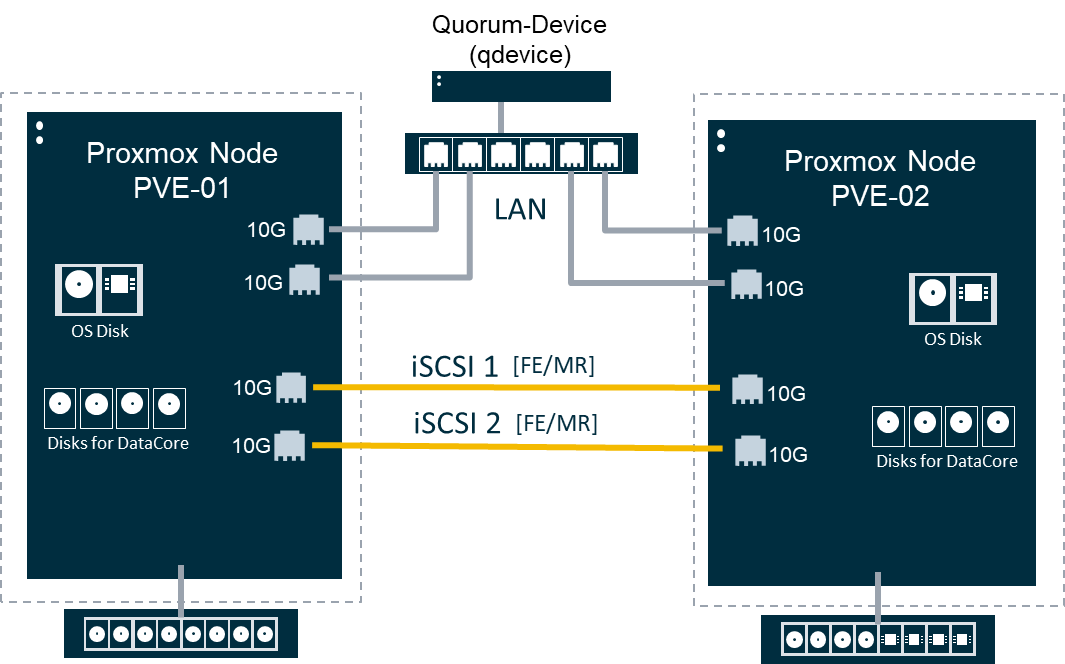
Best Practices Design