Automated Tasks
Explore this Topic
- Overview
- Triggers and Actions
- Task Settings
- Creating Tasks
- Adding or Modifying Triggers and Actions
- Running Tasks
- Aborting Active Tasks
- Deleting Tasks
- Viewing a List of All Tasks
- Viewing a Task Details Page
Overview
The Tasks tool is a versatile feature that can be used to monitor the SAN for a variety of events and perform actions when they occur.
Triggers and Actions
A task is one or more actions that are performed when one or more triggers occur. Triggers cause the action to be performed.
By default, if a task has multiple triggers, the task actions will be performed when any one trigger for that task occurs. This behavior can be changed in the Task Details page > Settings tab to perform actions when all trigger conditions are met.
When a task has multiple actions, the actions run sequentially. By default, when an action fails, subsequent actions will continue to run. This behavior can be changed in the Task Details page > Settings tab to abort the task when an action fails.
Possible triggers:
- An Event Log message is posted matching the criteria selected.
- A SAN resource monitor state change as reported in the System Health Tool.
- A replication checkpoint marker is received at the destination.
- A scheduled date and time is reached.
Possible actions:
- Post an Event Log message. Alerts can also be generated.
- Reclaim unused virtual disk space in a disk pool (see Reclaiming Virtual Disk Space).
- Perform snapshot and snapshot group operations, update and revert.
Existing snapshots/snapshot groups are required. (See Snapshot Operations and Virtual Disk Groups.)
- Run a command or Windows PowerShell script.
- Send a replication checkpoint marker to the replication virtual disk destination. See Replication Operations for important notes about checkpoint markers.
- Send an email notification with a customized message.
Requires email notification settings to be configured for the server group.
- Triggers based on scheduled times run at the local time zone of the console where the task is created. Scheduled time triggers in the wizard, and last start and stop times are displayed in the time zone of the computer running the console.
For example, Server1 resides in Eastern Time zone and the task is scheduled to run at 9:00 AM Eastern Time. If the administrator views the task from a console with the time zone set to Atlantic Time (one hour behind), the administrator sees the task scheduled to run at 8:00 AM Atlantic Time.
- Triggers based on an Hourly recurrence of a scheduled time are not automatically adjusted after a daylight savings change. The clock change will result in the trigger firing at different hours during the day. The scheduled time trigger will need to be deleted and recreated for it to fire at the same times as before the clock change.
- Triggers based on Daily, Weekly or Monthly recurrences of a scheduled time are automatically adjusted after a daylight savings change.
- The state of triggers can be viewed in the Task Details page >Trigger tab. Triggers are marked as inactive until the corresponding event is occurring, at which time the trigger will be marked as active. When the event is no longer occurring, the trigger will be marked as inactive again.
Task Settings
Settings for a task can be set when the task is created or changed later in the Task Details page>Settings tab.
Settings include:
- Enabling/disabling the task. When a task is enabled, the task will run as it was configured. When a task is disabled, the task will not run until it is enabled again.
- Maximum run timeis the amount of time allotted to perform all actions for each instance that the task is run. The maximum run time is shared by all actions in the task. When the time has been reached, all actions will be terminated. If triggered again, the same time will be allotted to perform the actions again. The default setting for maximum run time is seven days.
As an example, the maximum run time is set to one hour and there are 3 actions in the task. When the actions are triggered, the first action completes in 10 minutes, the second action completes in 5 minutes, and the third action has 45 minutes to complete or it will be terminated. If the actions are triggered again later, one hour will again be allotted to run all actions again.
- Only run when all trigger conditions are met requires that all triggers for a task be signaled before the actions are performed.
- Abort on error ensures that when tasks have multiple actions configured and one action fails that subsequent actions are aborted. When this option is not selected, subsequent actions continue to run if an action fails.
- Action delay is the amount of time to wait before performing actions when triggers are signaled.
To change the settings of an existing task:
- In the Ribbon > Home tab, click Tasks to open the Tasks List.
- In the list, double-click the task to modify. The Task Details page opens.
- Open the Settings tab and modify the settings.
Creating Tasks
A wizard is used to define a trigger, action and settings for a task.
To create a task:
- On the Ribbon > Home tab, click Tasks.
- Click the link Configure new Task to open the wizard.
- Replace the default task name with a meaningful name and description for the task.
- Click Next.
- Select the trigger type to use in the Trigger on field and then configure the parameters to use for the trigger:
- For Log message posted:
- In Define filter, create filters to search for in the Event Log by selecting the filter operations to use to trigger the action, then click Add Filter to add the filter to the list. More than one filter can be added to the list. To remove a filter, select it in the list and click Remove Filter. To clear the filter list, click Remove All.
- Filters can be defined using the following options:
Select the message in the Event Log to view the source type, source, message text, and level for that log message.
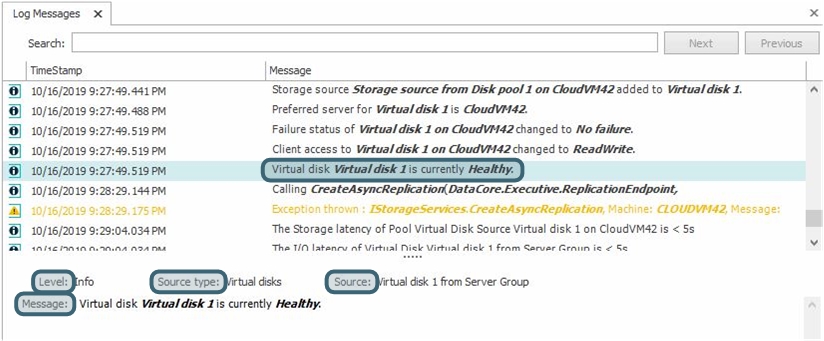
- Source type - Select this type to define the filter by a category of SAN resource or object. Select the source type from the drop-down list. Most source types are self-explanatory. The source type General is system messages of a general nature that do not fit other categories; Security is security-related system messages, and Support is system support messages.
- Source - Select this type to define a filter by a specific SAN resource or object or a sub-category of source type. Useful cases are provided below:
- To filter by a specific SAN resource or object, such as a disk pool, physical disks, virtual disk, ports, hosts, DataCore Servers, and so on, enter the specific name of the SAN resource in the text box. For instance, to filter messages for a specific virtual disk, enter the name such as "Virtual disk 1". See the Source field in the screen shot above. In this case, the entire source is "Virtual disk 1 from Group1". If Virtual disk 1 only exists in Group1, it is not necessary to include the entire source description. Enter as much of the name to adequately identify the source.
- The source Audit refers to messages for user-initiated actions and operations and the users that initiated them.
- The source DefaultPerformanceRecordingSession refers to performance recording session messages.
- The source CorePerfStorageServices refers to performance recording database messages.
- Message text - Select this type to search for actual message text. Enter the exact text string to search for in the text box.
- Log level - Select this type to search for messages of a particular level. Select the level from the drop-down list.
- If more than one filter is entered, the action will execute on any filter, so to execute the task when all filters have been received, select the Only fire when a message complies with all filters check box.
- For Monitor state changed:
Monitor states are provided by the System Health tool.
- In Monitor type, select the type of object (SAN resource) and parameter to monitor. When a monitor is selected, the description appears underneath.
- In Monitored object, select All or the specific object.
- In Trigger on state, select the comparison operator ( > is greater than, < is less than, >= is greater than or equal to, <= is less than or equal to) and the state classification to use to trigger the action.
- Examples:
- To trigger on all states that may need attention, select >= 1- Attention.
- To trigger on all warnings and critical status, select >= 2- Warning.
- Examples:
- For Replication checkpoint received:
- In the list, select the virtual disk to monitor for a checkpoint marker.
- For Scheduled times:
Tasks will not run if scheduled time has already passed before task configuration is complete.
- In Start date and time, keep the current day and time or select another. Click the arrow to reveal a calendar to select the day. Click on the current time and enter a new time.
- Select how often the trigger should fire: once, hourly, daily, weekly, monthly, or yearly. The trigger will fire on a recurring schedule beginning at the start date and time. Additional parameters may be required based on the selection to fine-tune the frequency.
- To set the frequency for less than one hour, set to Hourly, then set to 0 hours and the desired number of minutes. For example to set the frequency for every 15 minutes, set to Hourly, Every 0 hours, 15 minutes.
- When monthly is selected, the day of the month and the monthly frequency can be fine-tuned. For example to set the monthly recurring schedule to every 3rd day every other month, select Day, then 3 of every 2 months. The day can also be set according to the day of the week. For example to set the recurring schedule to the 2nd Monday of every month, select The, then Second Monday of every 1 month.
- In Duration after activation, select how long in hours and minutes that the scheduled trigger should remain active after it fires.
This option only applies to the trigger and is only relevant when multiple triggers exist with the Only run when trigger conditions are met option enabled. (Additional triggers can be added and the option can be set in the task details page.)
For example, if a trigger is scheduled to run fire once at 8 p.m. with a 12 hour duration and another trigger (in the same task) is set to fire once an hour, then the action would run 12 times a day starting at 8 p.m.
- For Log message posted:
- Click Next.
- In Perform Action, select the action to perform when the selected triggers parameters are met. More selections may be necessary depending on the action selected.
- For Post a log message:
- In Message level, select the level of message to post to the Event Log.
- To issue an active alert which requires acknowledgment, select the Raise an alert check box.
- In Message, enter the message to post in the Event Log.
- For Reclaim space:
- In the list, select the virtual disk to reclaim space.
- For Revert from snapshot:
- In the list, select the snapshot from which to revert.
- For Revert from snapshot group:
- In the list, select the snapshot group from which to revert.
- For Run a command or Run a PowerShell script:
- The command or script will run under the same user account as the DataCore Executive Service. The user account that the service is running under (DcsAdmin by default) must have the proper credentials to execute it.
- The command or script will run in the non-interactive default environment. Therefore, commands or cmdlets that require user input or result in console output will not work. Some examples are echo, write-host, read-host, get-credential, and Wscript.Shell object Popup.
- Select the DataCore Server where the command or script file should be executed.
- Enter the complete path to an existing file to run, for example "C:\MyScripts\Test.ps1".
- Parameters are used to add script specific data from the task. In Script parameters, multiple script parameters and the associated values, as well as parameter arrays can be entered, for example -param1 "value1" -param2 "value1" or -paramarray value1, value2, value3. Positional parameter values can also be entered in order, for example "value1, value2, value3".
- Select the Append the associated Task Trigger Data objects check box to append the trigger state data objects in the script file for the active triggers in a task. The data returned from the script will depend on the type of triggers that are configured for the task. The data will be returned in an array of objects called "TriggerState. Data from the trigger states can be compared using other cmdlets to obtain additional information. See Trigger State Data for more information.
- For Send a checkpoint marker:
- In the list, select the virtual disk from which the checkpoint marker should be sent.
- For Send an email:
- In Recipient, select the user to receive the email.
The recipient must have a valid user email address assigned.
- In Email address, the email address for the recipient will be displayed.
- In Message, enter the specific message to be sent in the email.
- If the SMTP Settings area is displayed, this information is needed to send an email and has not been previously set in the Server Group Details page. Enter the SMTP server address and logon account information for the sender. Click Send test email to verify the outgoing mail settings. Click Apply. (See Email Notification Settings for more information.)
- In Recipient, select the user to receive the email.
- For Update snapshot:
- In the list, select the snapshot to update
- For Update snapshot group:
- In the list, select the snapshot group to update.
- For Post a log message:
- Click Next.
- On the Task Summary page, review your selections and if correct, click Finish. To modify your selections, click Back and select again. The task will be automatically enabled to run.
After the task is created:
- The task is listed in the Tasks List and a details page is created for the task. The details page can be opened by double-clicking on the task in the Tasks List.
- Additional triggers and actions can be added, and settings can be changed in the Task Details page.
Adding or Modifying Triggers and Actions
Tasks can have more than one trigger and action associated with it. After a task is created, the triggers and actions can be created or deleted as required.
Modifications can not be made to existing triggers or actions. Delete the original trigger or action and recreate it using the required parameters. In this manner, you will not have to recreate the task in order to modify it.
To add a trigger to the task:
- Open the Task Details page > Triggers tab.
- Click the link Create Trigger and enter the trigger information.
- Click Finish.
To add an action to the task:
- Open the Task Details page > Actions tab.
- Click the link Create Action and enter the action information.
- Click Finish.
Running Tasks
A task must be enabled in order to run.
- On the Ribbon > Home tab > Diagnostics, click Tasks to open the Tasks List.
- In the list, right-click the task and select Run Task from the menu.
Aborting Active Tasks
Aborting a task aborts the currently triggered actions. The next time the task is triggered it will run as configured.
- On the Ribbon > Home tab > Diagnostics, click Tasks to open the Tasks List.
- In the list, right-click the task and select Abort Task from the menu.
Deleting Tasks
An active task cannot be deleted. When a task is deleted, the task is removed from the configuration.
- On the Ribbon > Home tab > Diagnostics, click Tasks to open the Tasks List.
- In the list, right-click the task and select Delete Task from the menu.
Viewing a List of All Tasks
All configured automated tasks can be viewed, enabled or disabled, run manually, deleted, or aborted directly from the list.
To view a list of all automated tasks:
- In the Ribbon > Home tab, click Tasks. The Tasks tab opens with a view of all configured tasks and a link to configure new tasks.
| Tasks List | |
|---|---|
|
Name |
Name of the task. |
|
State |
|
|
Current action |
The action being performed at this time. |
|
Last start time |
Timestamp when the actions were initiated the last time. |
|
Last stop time |
Timestamp when the actions were completed the last time. |
|
Description |
Description added when the task was created. |
|
Enabled |
If the check box is selected, the task is scheduled to run when the triggering conditions are met. If the check box is not selected, the task will not run. |
Viewing a Task Details Page
Every task has a details page that can be used to change settings, add or remove triggers and actions, and view events for the task.
The details page displays the following information at the top of the page:
- Status (enabled or disabled) is displayed under the icon.
- State
- The task name and description can be changed by clicking Edit at the top of the change. After the change is made, click Done.
To open a task details page:
- In the Ribbon > Home tab, click Tasks. The Tasks tab opens with a view of all configured tasks and a link to configure new tasks.
- Right-click on a task in the list and select View Details.
| Tasks Details | |
|---|---|
|
Settings tab |
The following settings can be viewed or changed:
See Task Settings for descriptions. |
|
Triggers tab |
Triggers can be viewed, added or deleted. The state of triggers (Active or Inactive) is displayed. Triggers are active when the corresponding event is occurring; otherwise, trggers are inactive. See Adding or Modifying Triggers or Actions. |
|
Actions tab |
Actions can be viewed, added or deleted. See Adding or Modifying Triggers or Actions. |
|
Events tab |
Lists events for the task. Click an event in the list to view details in the Message Text area at the bottom of the tab. See Event Log and Alerts. |
Learn More