Hyper-converged Virtual SAN Deployment (Formerly Known as FAQ 1155)
Explore this Page
- Overview
- Change Summary
- Storage Virtualization Deployment Models
- Microsoft Hyper-V Role
- Microsoft Hyper-V Deployment Examples
- VMware ESXi
- Proxmox Host
- Known Issues in Hyper Converged Virtual SAN Deployment
- Previous Changes
Overview
This FAQ covers best practices and design guidelines for deploying SANsymphony in Hyper or Hybrid-converged configurations.
The best practice for deploying SANsymphony in a hyper-converged architecture is to use the appropriate installation manager:
- VMware by Broadcom: Refer to the DataCore Installation Manager for vSphere.
- Hyper-V: Refer to the DataCore Installation Manager for Hyper-V.
- Other Options: Use the DataCore Deployment Wizard and the corresponding template.
- Proxmox: Refer to the Proxmox: Host Configuration Guide.
Change Summary
Changes since April 2020
Section(s) | Content Changes | ||
---|---|---|---|
Proxmox Host | Information about the HCI Proxmox Host Installation. | ||
Microsoft Hyper-V |
|
||
VMware ESXi |
|
Refer to the Previous Changes section for a list of earlier updates made to this document.
Storage Virtualization Deployment Models
This document is only concerned with either the ‘Hyper-converged’ or ‘Hybrid-converged’ deployment models. However, for completeness, all of the possible deployments are listed below.
Traditional Storage Virtualization
The Host servers and the Storage arrays, managed by SANsymphony, are all physically separate from the DataCore Server.
Converged
Only the Host servers are physically separate from the DataCore Server. All Storage arrays managed by SANsymphonyare internal to the DataCore Server.
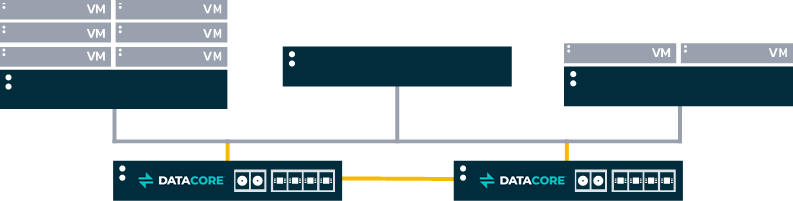
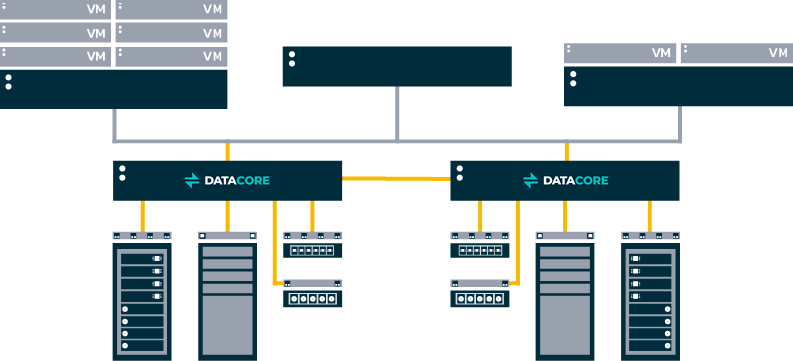
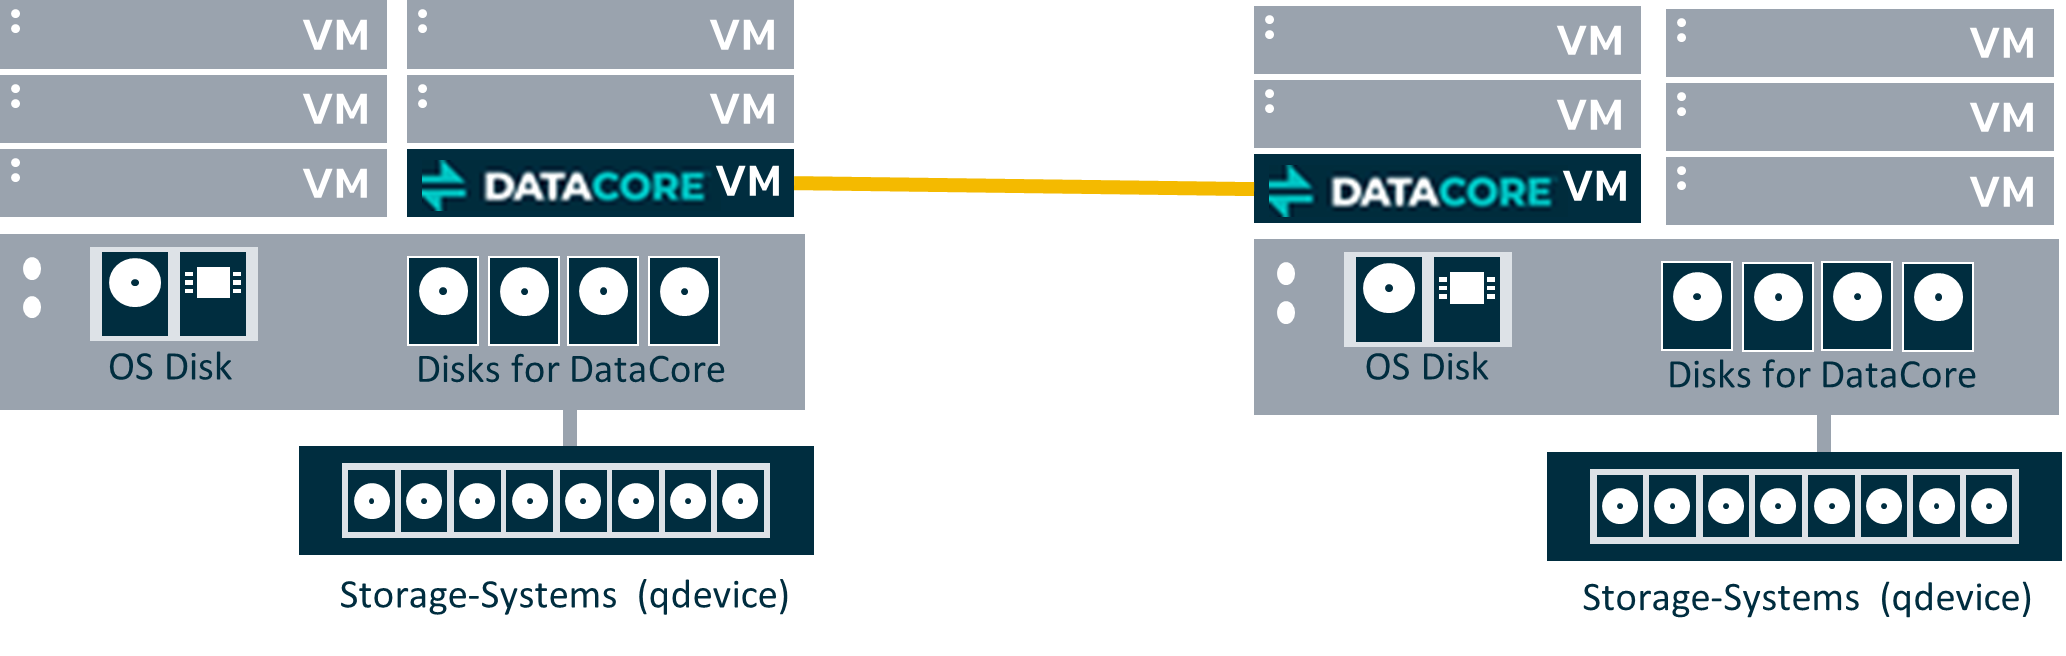
Hyper-Converged
The Host servers are all guest virtual machines that run on the same hypervisor server as SANsymphony. All Storage arrays managed by SANsymphony are internal to the DataCore Server.
Internal Data and or External Disk
On the root partition of a Windows server (e.g. Microsoft Hyper-V)
In a virtual machine (e.g. VMware ESXi, Citrix Hypervisor, Oracle VM Server, Microsoft Hyper-V)
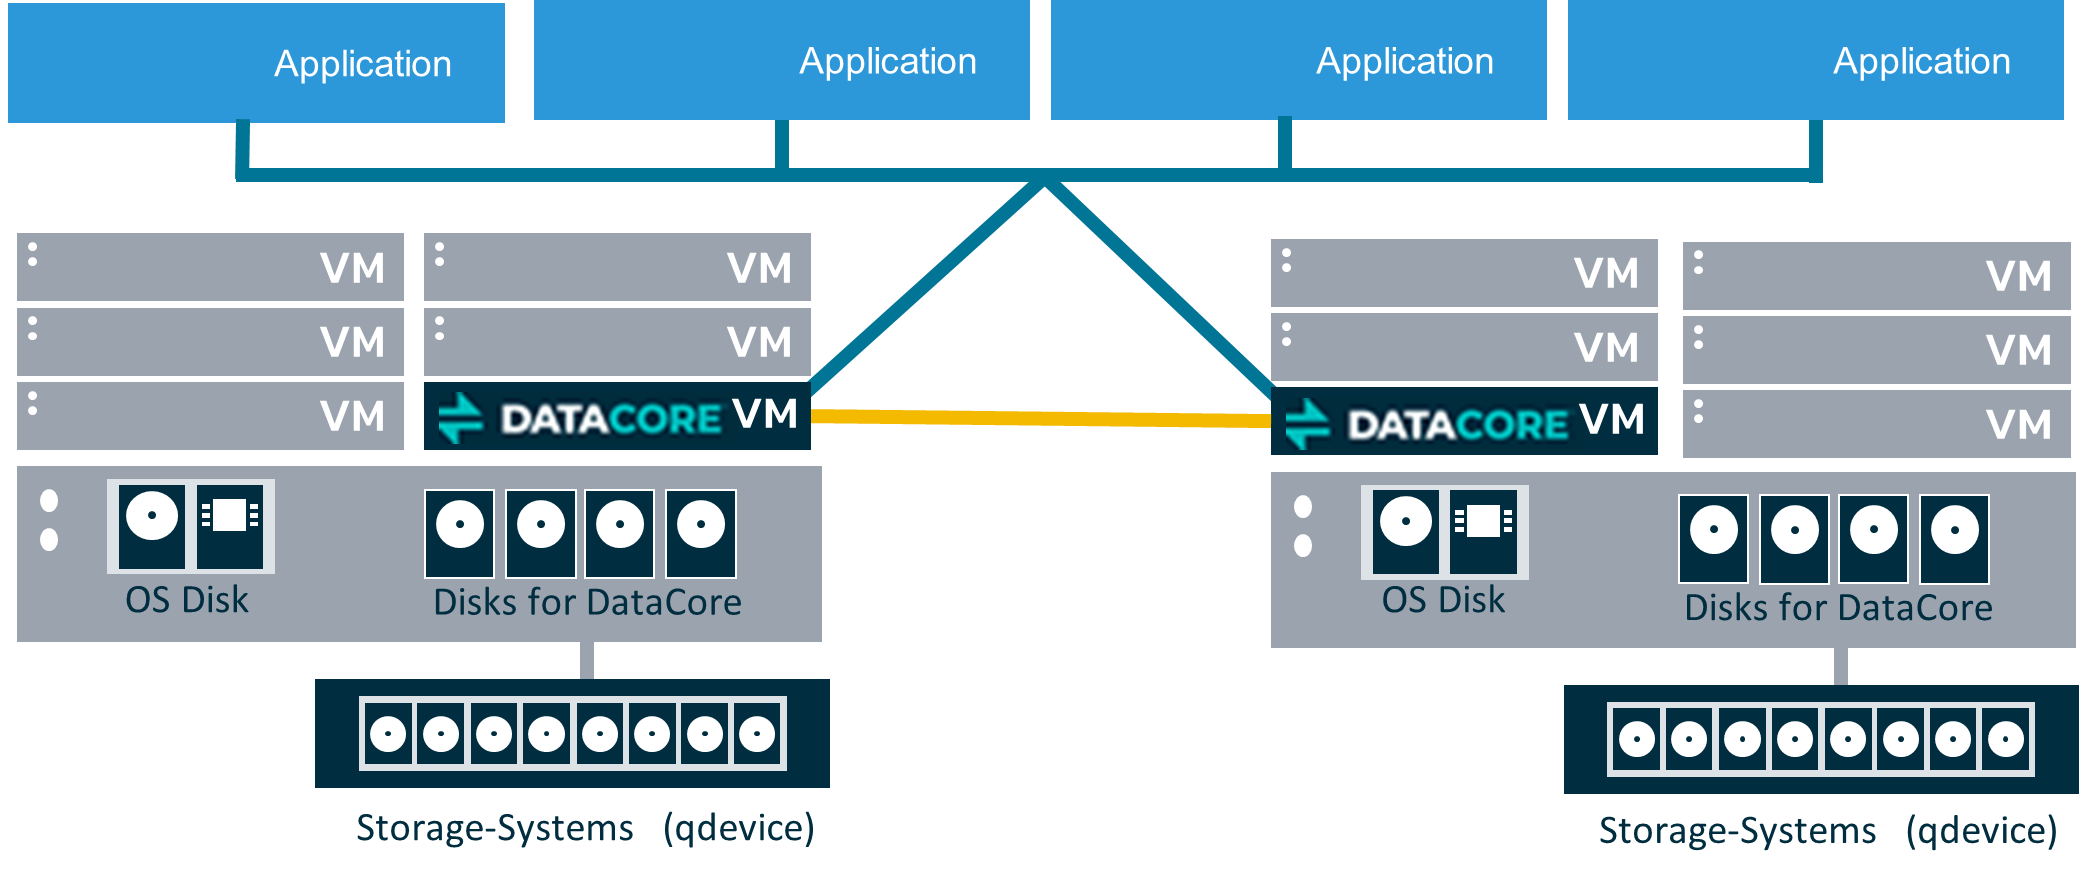
Hybrid-Converged
A combination of both Hyper-converged and Traditional Storage Virtualization. In the implementation design displayed below, the application servers run on the hypervisor, where the SANsymphony node is installed, and also attached as a physical server via iSCSI.
Microsoft Hyper-V Role
Two different configurations are possible when using Windows with the Hyper-V Role:
Running on the Root/Parent Partition
SANsymphony runs in the root/parent partition of the Windows operating system along with the Hyper-V feature.
Running Inside a Virtual Machine
SANsymphony runs in its own dedicated, Hyper-V Windows virtual machine.
The standalone “Microsoft Hyper-V Server” products, which consist of a cut-down version of Windows containing only the hypervisor, Windows Server driver model, and virtualization components, are not supported.
SANsymphony Virtual Machine Settings
Security
- Secure Boot support for new SANsymphony installations was added in 10.0 PSP13.
- For prior releases disable any ‘Secure Boot’ option for virtual machines that will be used as SANsymphony DataCore Servers otherwise the installation of DataCore’s system drivers will fail.
Memory
- When running a DataCore Server inside a Virtual Machine, do not enable Hyper-V's 'Dynamic Memory' setting for the SANsymphony Virtual Machine as this may cause less memory than expected to be assigned to SANsymphony’s cache driver.
- Fix the 'Startup RAM' to the required amount.
- Here is an example where a SANsymphony Virtual Machine has had its Startup RAM fixed to always use 30GB on startup:
This does not apply to other Hosts running in Hyper-V Virtual Machines.
Processor
Reserve all CPUs used for the SANsymphony virtual machine by setting the “Virtual machine reserve (percentage)” to 100.
Microsoft Hyper-V Deployment Examples
Using Fibre Channel Mirrors
With Microsoft Cluster Services
Here is an overview of best practices for a ‘minimum configuration’ highly available, hyper-converged deployment installed on the Root/Parent partition when using Fibre Channel mirrors with Microsoft Cluster Services.
An example of the IP networking settings for this configuration is shown below.
An example of the IP networking settings when using Fibre Channel mirrors with Microsoft Cluster Services:
See more explanatory technical notes in the Microsoft Hyper-V Deployment Technical Notes section.
Without Microsoft Cluster Services
Here is an overview of best practices for a ‘minimum configuration’ highly available, hyper-converged deployment installed on the Root/Parent partition when using fibre channel mirrors without Microsoft Cluster Services.
An example of IP networking settings for this configuration is shown below.
An example of IP networking settings when using Fibre Channel mirrors without Microsoft Cluster Services:
See more explanatory technical notes in the Microsoft Hyper-V Deployment Technical Notes section.
Using iSCSI Mirrors
With Microsoft Cluster Services
Here is an overview of best practices for a ‘minimum configuration’ highly available, hyper-converged deployment installed on the Root/Parent partition when using iSCSI mirrors with Microsoft Cluster Services.
An example of IP networking settings for this configuration is shown below.
An example of IP networking settings when using iSCSI mirrors with Microsoft Cluster Services:
Without Microsoft Cluster Services
Here is an overview of best practices for a ‘minimum configuration’ highly available, hyper-converged deployment installed on the Root/Parent partition when using iSCSI channel mirrors without Microsoft Cluster Services.
An example of IP networking settings for this configuration is shown below.
An example of IP networking settings when using iSCSI mirrors without Microsoft Cluster Services.
See more explanatory technical notes in the Microsoft Hyper-V Deployment Technical Notes section.
Microsoft Hyper-V Deployment Technical Notes
NIC Teaming
DataCore does not recommend using NIC teaming with iSCSI initiator or target ports.
Refer to Using NIC Teaming with SANsymphony for more information.
MS Initiator Ports
While technically, the MS initiator is available from ‘any’ network interface on the DataCore Server, the convention here is to treat MS Initiator connections used explicitly for any iSCSI Loopback connections as a separate, dedicated, IP address.
Creating Loopback Connections
Using SANsymphony’s Built-in Loopback Ports
Do not use SANsymphony’s built-in loopback ports for serving virtual disks to the hypervisor. See Known Issues for more information.
Using iSCSI Connections
Always connect to a DataCore Front-end (FE) port never from it when creating an iSCSI loopback (i.e. never initiate from the same IP address as a DataCore FE port). Also make sure that the Microsoft initiator connection is initiating from a different MAC address than the DataCore FE port (i.e. do not create the Loopback ‘within’ the same NIC that has multiple IP addresses configured it).
While looping back on the same IP/MAC address technically works, the overall performance for virtual disks using this I/O path will be severely restricted compared to looping virtual disks between different MAC addresses.
Using Virtual NIC Connections
The following illustration is an example showing the correct initiator/target loopback connections (highlighted in red) when using virtual NIC connections (vNICs).
DataCore FE ports are never used as the initiator - only the target - and that the interface used for the Microsoft Initiator never connects back to itself.
Here is the same example but with the incorrect initiator/target loopback connections (highlighted in red) when using vNICs.
Using Physical NIC Connections
With a physical NIC connections (pNICs) loopback connection both the Microsoft Initiator and the DataCore FE port each get assigned their own physical NIC which are both connected to an IP switch and logically connected to each other, creating the ‘loop’.
The following illustration is an example showing the correct initiator/target loopback connections (highlighted in red) when using pNICs.
DataCore FE ports are never used as the initiator - only the target - and that the interface used for the Microsoft Initiator never connects back to itself.
Performance using a vNIC Loopback compared to a pNIC Loopback
While DataCore have no preference over using virtual or physical NICs as loopbacks mappings, internal testing has shown that pNIC loopback configurations have been able to give as much as 8 times more throughput compared to vNIC loopback configurations under the same I/O workloads.
Maintaining Persistent Reservation connections (Microsoft Cluster Services)
If the DataCore Servers are configured within a Microsoft Cluster, an additional iSCSI Initiator connection is required for each MS Initiator designated vNIC/pNIC to ensure that all Cluster Reservations can be checked for/released by any server should the SANsymphony software be stopped (or unavailable) from one side of the high available pair.
Using the same MS Initiator IP address as those configured for iSCSI Loopback connections connect them into the corresponding ‘remote’ DataCore Server’s FE port as shown below. The following illustration shows the correct initiator/remote target connections (highlighted in red) when using vNICs.
The same correct initiator/remote target connections (highlighted in red) when using pNICs.
Unlike vNICs, an IP switch is required to provide both the ‘loop’ connection between the physical NICs and a route to the ‘remote’ DataCore FE port on the other DataCore Server.
SANsymphony’s Management connection
Avoid using the same IP address of any iSCSI port as SANsymphony’s Management IP address. Heavy iSCSI I/O can interfere with the passing of configuration information and status updates between DataCore Servers in the same Server Group. This can lead to an unresponsive SANsymphony Console, problems connecting to other DataCore Servers in the same Server Group (or remote Replication Group) and can also prevent SANsymphony PowerShell Cmdlets from working as expected as they also need to ‘connect’ to the Server Group to perform their functions.
VMware ESXi
Each SANsymphony instance runs in a dedicated Windows guest virtual machine on the ESXi Host.
ESXi Host Settings
Host Server BIOS
- Turbo Boost = Disabled
- Although VMware recommends enabling this feature when tuning for latency-sensitive workloads, DataCore recommends disabling it.
- This prevents disruption on the CPUs used by the SANsymphony virtual machine.
VMkernel iSCSI (VHMBA)
-
‘Delayed ACK’ = Disabled
- Path: vSphere Client > Advanced Settings > Delayed Ack
- Steps:
- Uncheck Inherit from parent
- Uncheck DelayedAck
- Reboot required: A reboot of the ESXi host will be needed after applying this change.
Reboot required: A reboot of the ESXi host will be needed after applying this change.
VMware ESXi Deployment Examples
Single DataCore Server
A single virtual machine configured with virtual disks served over one or more iSCSI connections. A very reliable and extremely fast DataCore Caching as well as including the entire suite of DataCore Server features.
More physical DataCore Servers can be added to create a highly available configuration. See below.
A Pair of Highly-Available DataCore Servers
Two virtual machines configured with virtual disks served to the local ESXi Servers – ESXi A and ESXi B - over one or more iSCSI connections. The virtual disks are also as a synchronously mirrored between the DataCore servers using either iSCSI or Fibre Channel connections.
Each ESXi host’s VMkernel is configured to login to two separate iSCSI targets:
- The first path is connected to the local DataCore Server.
- The second path is connected to the remote DataCore Server.
For clarity, so as not to make the diagram too complicated, the example shows just one SANsymphony Front-end (FE) port per DataCore Server. Use more FE port connections to increase overall throughput.
SANsymphony Virtual Machine Settings
CPU
- Set to ‘High Shares’
- Reserve all CPUs used for the SANsymphony virtual machine.
- Example: if one CPU runs at 2 GHz and four CPUs are to be reserved then set the reserved value to 8 GHz (i.e. 4 x 2 GHz).
Memory
- Set to ‘High Shares’
- Set ‘Memory Reservation’ to ‘All’.
Latency Sensitivity
- Set to ‘High’[ 1 ].
- Via ‘VM settings > Options tab > Latency Sensitivity.
Refer to the following documentation for more details:
Virtual Network Interfaces (vNIC)
- Use VMXNET3.
- ‘Interrupt coalescing’ must be set to ‘Disabled’.
- Via ‘VM settings > Options tab >Advanced General > Configuration Parameters → ethernetX.coalescingScheme’; (where ‘X’ is the number of the NIC to apply the parameter).
Time synchronization
Disable time synchronization with the ESXi host in VMware Tools.
Disabling Snapshots
Set 'maxSnapshots' to 0 by adding the parameter to the .vmx file or by adding a configuration parameter through the vSphere Web Client.
UEFI Secure Boot
Secure Boot support for new SANsymphony installations was added in 10.0 PSP13. For prior releases disable any ‘Secure Boot’ option for virtual machines that will be used as SANsymphony DataCore Server otherwise the installation of DataCore’s system drivers will fail.
Also, refer to Enable or Disable UEFI Secure Boot for a Virtual Machine for more information.
ISCSI Settings - General
DataCore Servers in virtual machines should run the appropriate PowerShell scripts found attached to the Technical Support Answer. Refer to SANsymphony - iSCSI Best Practices for more information.
Disk Storage
PCIe connected - SSD/Flash/NVMe
Internal storage to the ESXi host. DataCore recommend using VMware’s VMDirectPath I/O pass-through.
Refer to the following documentation for more details:
- Configuring VMDirectPath I/O pass-through devices
- VMware vSphere VMDirectPath I/O: Requirements for Platforms and Devices
- Fibre Channel HBA's supported by VMware using VM DirectPath I/O
Fibre Channel Attached Storage
Storage attached directly to the ESXi Host using Fibre Channel connections. DataCore recommend using VMware’s VMDirectPath I/O pass-through, assigning all physical Fibre Channel HBAs to the SANsymphony virtual machine. This allows SANsymphony to detect and bind the DataCore Fibre Channel driver as a Back-end connection to the storage. It is also possible to use disks presented from external FC storage as physical RDMs.
SAS/SATA/SCSI Attached Storage
Storage attached directly to the ESXi Host using either SAS/SATA/SCSI connections. If VMware’s VMDirectPath I/O pass-through is not appropriate for the storage array then contact the storage vendor to find out which is their own preferred VMware ‘SCSI Adaptor’ for highest performance (e.g. VMware’s own Paravirtual SCSI Adapter or the LSI Logic SCSI Adaptor).
ESXi Physical Raw Device Mapping (pRDM)
‘Raw" storage devices are presented to the SANsymphony virtual machine via the ESXi hypervisor. When using pRDM as storage for SANsymphony Disk Pools, disable ESXi's SCSI INQUIRY Caching. This ensures that SANsymphony can detect and report any unexpected changes in storage device paths managed by ESXi's RDM feature.
Also, refer to Virtual Machines with RDMs Must Ignore SCSI INQUIRY Cache for more information.
If VMware’s VMDirectPath I/O pass-through is not appropriate for the storage being used as RDM then contact the storage vendor to find out which is their own preferred VMware ‘SCSI Adaptor’ for highest performance (e.g. VMware’s own Paravirtual SCSI Adapter or the LSI Logic SCSI Adaptor).
VMDK Disk Devices
Storage created from VMFS datastores presented to the SANsymphony virtual machine via the ESXi hypervisor. DataCore recommends using VMware’s Paravirtual SCSI (PVSCSI) adapter using one VMDK per Datastore and provision them as ‘Eager Zeroed Thick’.This method is not recommended for use in production. Refer to Configuring disks to use VMware Paravirtual SCSI (PVSCSI) adapters for more information.
Proxmox Host
Hyperconverged Infrastructure: Proxmox Installation
The basic installation of the nodes and the system requirements must be carried out according to the Proxmox specifications. Refer to Proxmox VE documentation for installation instructions and system requirements.
Through the Proxmox topic, the Proxmox host will be referenced as “PVE”, as this is the name Proxmox references in its documents.
Version
The guide applies to the following software versions:
- SANsymphony 10.0 PSP18
- Windows Standard Server 2022
- Proxmox version 8.2.2
Creating a Cluster
The following steps to create a cluster do not include the information on the quorum device (qdevice) and High Availability (HA) configuration. Refer to the Wiki Proxmox Cluster Manager to see details on the qdevice and HA configuration.
- Under Datacenter > Cluster, click Create Cluster.
- Enter the cluster name.
- Select a network connection from the drop-down list to serve as the main cluster network (Link 0). The network connection defaults to the IP address resolved via the node’s hostname.

Adding a Node
- Log in to the GUI on an existing cluster node.
- Under Datacenter > Cluster, click the Join Information button displayed at the top.
- Click the Copy Information button. Alternatively, copy the string from the Information field.
- Next, log in to the GUI on the applicable node to be added.
- Under Datacenter > Cluster, click Join Cluster.
- Fill the Information field with the Join Information text copied earlier. Most settings required for joining the cluster will be filled out automatically.
- For security reasons, enter the cluster password manually.
- Click Join. The node is added.


Installing SANsymphony Virtual Machine
See the Proxmox best practices for the basic Microsoft Windows configuration here.
Sizing of the Virtual Machine
The sizing of the SANsymphony Virtual Machine (VM) is dependent on the specific requirements of the environment.
For productive environments, it is recommend to start with the following:
- vCPU = 6
- RAM = 24 GB
- OS/SSY Disk = 100GB
- vNIC = 2x Frondend & 2 x Mirror
If a larger number of VMs or the use of functions such as snapshots or similar is planned in the deployment scenario, the resources must be adapted accordingly.
The system requirements for the VM hardware are lower for test and validation installations. The prerequisites are as follows:
- vCPU = 4
- RAM = 16 GB
- OS/SSY Disk = 60 GB
- vNIC = 1x Frondend & 1 x Mirror
The recommended sizing is not designed for performance testing and is only intended for understanding the general functionality and operation of the software.
Creating a New Virtual Machine
- Select "Microsoft Windows 11/2022" as the Guest Operating System (OS).
- Enable the "Qemu Agent" in the System tab.
- Continue and mount the Windows Server 2022 ISO in the CDROM drive.
- For the virtual hard disk, select "SCSI" as the bus with "VirtIO SCSI" as the controller.
- Set "Write back" as the cache option for best performance
- Select the "Discard" checkbox to optimally use the disk space (TRIM). Refer to QEMU/KVM Virtual Machines for more information.
-
Once a VM is created, make the following changes:
- Disable balloon on RAM.
- Add the four vNIC without the firewall settings.
- Configure the vNIC queues with the numbers of cores in a VM. This option allows the guest OS to process the networking packets using multiple virtual CPUs, thereby providing an increase in the total number of packets transferred. Refer to Windows VirtIO Drivers for more information.
The "No cache" default is safer, however, slower.

Installing Guest Agent and Services
Microsoft Windows does not have native support for VirtIO devices included. There is external support through open-source drivers, which are available compiled and signed for Windows.
Download the latest build of the ISO. Click here to download.
Without this agent, the network interface cards (NIC) and discs are not detected in Windows. This is why the ISO file must be embedded in the system as a virtual CD device. Refer to Windows VirtIO Drivers for more information.
Adding a Disk for the Pool
The preferred way to present storage to a DataCore virtual machine (VM) would be raw device mapping.
Identifying the Disk
- Identify the disks/devices that are available to the Promox (PVE) host and which of them are to be connected to DataCore VM.
- Display the existing devices using the following CLI command:
- Use the SCSI string with the corresponding serial number of the disk for the mapping.
find /dev/disk/by-id/ -type l|xargs -I{} ls -l {}|grep -v -E '[0-9]$' |sort -k11|cut -d' ' -f9,10,11,12
13:11 /dev/disk/by-id/scsi-3600605b00b30d1501fa061fe0c634f7 -> ../../sda
13:11 /dev/disk/by-id/wwn-0x600605b00b30d1501fa061fe0c634f7 -> ../../sda
13:11 /dev/disk/by-id/scsi-3600605b00b040f02c67295c0c3313c -> ../../sdb
13:11 /dev/disk/by-id/wwn-0x600605b00b040f02c67295c0c3313c -> ../../sdb
13:11 /dev/disk/by-id/scsi-3600605b00b040f02c6729f3c995b67e -> ../../sdc
13:11 /dev/disk/by-id/wwn-0x600605b00b040f02c6729f3c995b67e -> ../../sdc
Adding a Physical Device as a New Virtual SCSI Disk
Establish the new connection using the following command:
Sample Output
Verifying the Configuration File
Use the following command to check the configuration file:
Preparing the SANsymphony iSCSI
The IQN names of the iSCSI ports must be given a speaking name to easily configure the iSCSI setup and later administration.
It is recommended to replace the number after the dash with the function.
Original: iqn.2000-08.com.datacore:sds1-5
modified: iqn.2000-08.com.datacore:sds1-fe1
Proxmox iSCSI
Installing iSCSI Daemon
iSCSI is a widely employed technology that is used to connect to storage servers. Almost all storage vendors support iSCSI. There are also open-source iSCSI target solutions available, which is based on Debian.
To use Debian, install the Open-iSCSI (open-iscsi) package. This is a standard Debian package, however, not installed by default to save the resources. Refer to Open-iSCSI documentation for installation instructions.
iSCSI Connection
Changing the iSCSI-Initiator Name on each PVE
The Initiator Name must be unique for each iSCSI initiator. Do NOT duplicate the iSCSI-Initiator Names.
- Edit the iSCSI initiator name in the /etc/iscsi/initiatorname.iscsi file to assign a unique name in a way that the IQN refers to the server and the function. This change makes administration and troubleshooting easier.
- Restart iSCSI to take effect using the following command:
Original: InitiatorName=iqn.1993-08.org.debian:01:bb88f6a25285
Modified: InitiatorName=iqn.1993-08.org.debian:01:<Servername + No.>
Discovering the iSCSI Target to PVE
- Before attaching the SANsymphony iSCSI target, discover all the iqn-portname using the following command:
-
Attach all the SANsymphony iSCSI targets on each PVE using the following command:
Refer to Wiki - iSCSI Multipath for more information. Restart the iSCSI session using the following command:
iscsiadm --mode node --targetname iqn.2000-08.com.datacore:pve-sds11-fe1 -p: 172.16.41.21 --login
iscsiadm --mode node --targetname iqn.2000-08.com.datacore:pve-sds11-fe2 -p 172.16.42.21 --login
iscsiadm --mode node --targetname iqn.2000-08.com.datacore:pve-sds10-fe1 -p 172.16.41.20 --login
iscsiadm --mode node --targetname iqn.2000-08.com.datacore:pve-sds10-fe2 -p 172.16.42.20 --login
Displaying the Active Session
Use the following command to display the active session:
iSCSI Settings
The iSCSI service does not start automatically by default when the PVE-node boots. Refer to iSCSI Multipath for more information.
The /etc/iscsi/iscsid.conf file must change the line so that the initiator starts automatically.
The default 'node.session.timeo.replacement_timeout' is 120 seconds. It is recommended to use a smaller value of 15 seconds instead.
If a port reinitialize is done, the port may be unable to login on its own. In this case, the attempts must be increased here:
Restart the service using the following command:
Logging in to the iSCSI Targets on Boot
For each connected iSCSI target, set the node.startup parameter in the target to automatic. The target is specified in the /etc/iscsi/nodes/<TARGET>/<PORTAL>/default file.
SCSI Disk Timeout
Set the timeout to 80 seconds for all the SCSI devices created from the SANsymphony virtual disks.
For Example: cat /sys/block/sda/device/timeout
Two methods may be used to change the SCSI disk timeout for a given device.
- Use the ‘echo’ command – this is temporary and will not survive the next reboot of the Linux host server.
- Create a custom ‘udev rule’ – this is permanent, however, will require a reboot for the setting to take effect.
Using the ‘echo’ Command (will not survive a reboot)
Set the SCSI Disk timeout value to 80 seconds using the following command:
Creating a Custom ‘udev’ Rule
Create a file called /etc/udev/rules.d/99-datacore.rules with the following settings:
SUBSYSTEM=="block", ACTION=="add", ATTRS{vendor}=="DataCore", ATTRS{model}=="Virtual Disk ", RUN+="/bin/sh -c 'echo 80 > /sys/block/%k/device/timeout'"
- Ensure that the udev rule is exactly as written above. If not, the Linux operating system will default back to 30 seconds.
- There are four blank white-space characters after the ATTRS {model} string which must be observed. If not, paths to SANsymphony virtual disks may not be discovered.
Refer to Linux Host Configuration Guide for more information.
iSCSI Multipath
Installing Multipath Tools
The default installation does not include the 'multipath-tools' package. Use the following commands to install the package:
Refer to iSCSI Multipath for more information.
Creating a Multipath.conf File
After installing the package, create the following multipath configuration file: /etc/multipath.conf.
Refer to the Linux Configuration Guide for the relevant settings and the adjustments for the PVE in the Wiki iSCSI Multipath.
defaults {
user_friendly_names yes
polling_interval 60
find_multipaths "smart"
}
blacklist {
devnode "^(ram|raw|loop|fd|md|dm-|sr|scd|st)[0-9]*"
devnode "^hd[a-z]"
}
devices {
device {
vendor "DataCore"
product "Virtual Disk"
path_checker tur
prio alua
failback 10
no_path_retry fail
dev_loss_tmo 60
fast_io_fail_tmo 5
rr_min_io_rq 100
path_grouping_policy group_by_prio
}
}
Restarting the Service
Restart the multipath service using the following command to reload the configuration:
Refer to ISCSI Multipath for more information.
Serving a SANsymphony Virtual Disk to the Proxmox Node
Following the necessary configurations in the SANsymphony graphical user interface (GUI) such as the assignment of the iSCSI port to the relevant host and the virtual disk, the virtual disk must now be integrated into the host.
To make the virtual disk visible in the system, the iSCSI connection must be scanned again using the following command:
The list of block devices and whether the virtual disk is correctly detected with its paths may be identified and with the multipath name “mpathX” the dives may also identified.
Command:
sdd 8:48 0 100G 0 disk
└─mpathb 252:8 0 100G 0 mpath
sde 8:64 0 100G 0 disk
└─mpathb 252:8 0 100G 0 mpath
sdf 8:80 0 1.5T 0 disk
└─mpatha 252:7 0 1.5T 0 mpath
sdg 8:96 0 1.5T 0 disk
└─mpatha 252:7 0 1.5T 0 mpath
Use the 'multipath' command to determine which and whether all necessary paths are now available from the SANsymphony server for the virtual disk:
root@de-prox02:~# multipath -ll
mpatha (360030d9095f0370627edc4fd4d0fa4a9) dm-7 DataCore, Virtual Disk
size=1.5T features="0" hwhandler="1 alua" wp=rw
|- 7:0:0:1 sdg 8:96 active ready running
`- 6:0:0:1 sdf 8:80 active ready running
mpathb (360030d9012bb36060faaaf8355276e9b) dm-8 DataCore, Virtual Disk
size=100G features="0" hwhandler="1 alua" wp=rw
|- 7:0:0:0 sde 8:64 active ready running
`- 6:0:0:0 sdd 8:48 active ready running
Creating a Proxmox File-system
Creating a Physical Volume for the Logical Volume
“pvcreate” initializes the specified physical volume for later use by the Logical Volume Manager (LVM).
Creating a Volume Group
Displaying a Volume Group
root@de-prox02:/# vgscan
Found volume group "vol_grp2" using metadata type lvm2
Found volume group "vol_grp1" using metadata type lvm2
Found volume group "pve" using metadata type lvm2
Adding LVM at the Datacenter Level
To create a new LVM storage, access the PVE GUI to the datacenter level, then select Storage and enter Add.
Finding out the UUID and the Partition Type
The blkid command is used to query information from the connected storage devices and their partitions.
root@prox1:/# blkid /dev/mapper/mpath*
/dev/mapper/mpatha: UUID="X3bM3Dy-YyYf-3m8B-eUaA-n5li-Idbt-soaI0x" TYPE="LVM2_member"
/dev/mapper/mpathb: UUID="7zVp2P-58Ea-Atpp-hoHu-dzJQ-Gnd8-YRjWE2" TYPE="LVM2_member"
RAW Device Mapping to Virtual Machine
Follow the steps below if the prerequisites of an operating system or an application should be that a RAW device mapping into the virtual machine is necessary:
-
After successfully serving the virtual disk (single or mirror) to the Proxmox (PVE) node, run a rescan to make the virtual disk visible in the system using the following command:
- Identify the virtual disk to use as a RAW device and identified multipath name “mpathX” using the following command:
- Navigate to the “/dev/mapper” directory and run the ls -la command to verify which dm-X the required device is linked to.
- Hot-Plug/Add physical device as new virtual SCSI disk using the following command:
lrwxrwxrwx 1 root root 7 May 28 17:05 mpatha -> ../dm-5
lrwxrwxrwx 1 root root 8 May 28 17:05 mpathb -> ../dm-8
Restarting the Connection after Rebooting the Proxmox Server
Use the following commands to restart the Proxmox (PVE) Server:
If an error occurs, then attempt the following command first:
The connection will restart.
Deployment Examples
Minimum Design
Best Practices Design
Known Issues in Hyper Converged Virtual SAN Deployment
This section intends to make DataCore Software users aware of any issues that affect performance, access or may give unexpected results under particular conditions when SANsymphony is used in Hyper-converged configurations.
These known issues may have been found during DataCore’s own testing but others may have been reported by our users when a solution was found that was not to do with DataCore’s own products.
DataCore cannot be held responsible for incorrect information regarding another vendor’s products and no assumptions should be made that DataCore has any communication with these other vendors regarding the issues listed here.
We always recommend that the vendor’s should be contacted directly for more information on anything listed in this section.
For ‘Known issues’ that apply to DataCore Software’s own products, refer to the relevant DataCore Software Component’s release notes.
Microsoft Windows
ISCSI Loopback Connections
SANsymphony’s ‘Preferred Server’ setting is ignored for virtual disks using iSCSI Loopback connections.
For SANsymphony 10.0 PSP5 Update 2 and earlier
This issue affects all hyper-converged DataCore Servers in the same Server Group.
Set MPIO path state to ‘Standby’ for each virtual disk (see below for instructions).
For SANsymphony 10.0 PSP6 and later
This issue affects only any hyper-converged DataCore Servers in the same Server Group where the DataCore Server has one or more virtual disks served to them from another DataCore Server in the same group. I.e. any Server group with three or more DataCore Servers where one of more of the virtual disks is served to all DataCore Servers (instead of just the two that are part of the mirror pair).
Apart from the two DataCore Servers that are managing the mirrored storage sources in a virtual disk and will be able to detect the preferred server setting – the ‘other’ DataCore Servers will not be able to (for that same virtual disk). Set MPIO path state to ‘Standby’ for each virtual disk served to the ‘other’ DataCore Server(s). See below.
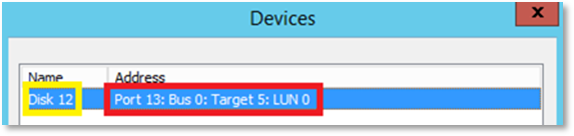
- Open the MS iSCSI initiator UI and under Targets, select the remote target IQN address.
- Click devices and identify the Device target port with disk index to update.
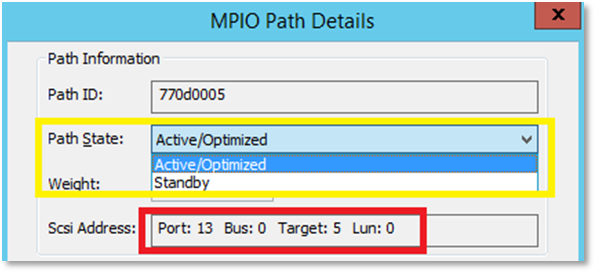
- Navigate to MS MPIO and view DataCore virtual disk.
- Select a path and click Edit.
- Verify the correct Target device.
- Set the path state to Standby and click OK to save the change.


SANsymphony’s Built-in Loopback Port
Affects clustered, hyper-converged DataCore Server
Do not use the DataCore Loopback port to serve mirrored Virtual Disks to Hyper-V Virtual Machines.
This known issue only applies when SANsymphony is installed in the root partitions of clustered, Hyper-V Windows servers where virtual disks are ‘looped-back’ to the Windows Operating system for use by Hyper-V Virtual Machines. Refer to DataCore SANsymphony Software Hyperconverged Deployments for more information.
A limitation exists in the DataCore SCSI Port driver - used by the DataCore Loopback Ports - whereby if the DataCore Server providing the ‘Active’ cluster path is stopped, the remaining DataCore Server providing the ‘Standby’ path for the Hyper-V VMs is unable to take the SCSI Reservation (previously held by the stopped DataCore Server). This will result in a SCSI Reservation Conflict and prevent any Hyper-V VM from being able to access the DataCore Disks presented by the remaining DataCore Server.
In this case please use iSCSI connections as ‘Loopbacks’ for SANsymphony DataCore Disks presented to Hyper-V Virtual Machines.
VMware ESXi
ISCSI Connections (General)
Affects ESX 6.x and 5.x
Applies to SANsymphony 10.0 PSP 6 Update 5 and earlier
ESX Hosts with IP addresses that share the same IQN connecting to the same DataCore Server Front-end (FE)port is not supported (this also includes ESXi 'Port Binding'). The FE port will only accept the ‘first’ login and a unique iSCSI Session ID (ISID) will be created. All subsequent connections coming from the same IQN even if it is a different interface will result in an ISCSI Session ID (ISID) ‘conflict’ and the subsequent login attempt will be rejected by the DataCore iSCSI Target. No further iSCSI logins will be allowed for this IQN whilst there is already one active ISID connected.
If an unexpected iSCSI event results in a logout of an already-connected iSCSI session then, during the reconnection phase, one of the other interface that shares the same IQN but was rejected previously may now be able to login and this will prevent the previously-connected interface from being able to re-connect.
Refer to the following examples of supported and not-supported configuration when using SANsymphony 10.0 PSP6 Update 5 or earlier:
Example 1: Supported configuration
The ESXi Host has four network interfaces, each with its own IP address, each with the same IQN:
Network Interface (IP Address) | iSCSI Qualified Name (IQN) |
192.168.1.1 |
(iqn.esx1) |
192.168.2.1 |
(iqn.esx1) |
192.168.1.2 |
(iqn.esx1) |
192.168.2.2 |
(iqn.esx1) |
Example: Two DataCore Servers, each have two FE ports, each with their own IP address and each with their own IQN:
Network Interface (IP Address) | iSCSI Qualified Name (IQN) |
192.168.1.101 |
(iqn.dcs1-1) |
192.168.2.101 |
(iqn.dcs1-2) |
192.168.1.102 |
(iqn.dcs2-1) |
192.168.2.102 |
(iqn.dcs2-2) |
Each interface of the ESXi Host connects to a separate Port on each DataCore Server:
ESXi Host IQN | ESXi Host IP | iSCSI Fabric | DataCore Server IP | DataCore Server IQN | ||
(iqn.esx1) |
192.168.1.1 |
← |
ISCSI Fabric 1 | → |
192.168.1.101 |
(iqn.dcs1-1) |
(iqn.esx1) |
192.168.2.1 |
← |
ISCSI Fabric 2 | → |
192.168.2.101 |
(iqn.dcs1-2) |
(iqn.esx1) |
192.168.1.2 |
← |
ISCSI Fabric 1 | → |
192.168.1.102 |
(iqn.dcs2-1) |
(iqn.esx1) |
192.168.2.2 |
← |
ISCSI Fabric 2 | → |
192.168.2.102 |
(iqn.dcs2-2) |
This type of configuration is very easy to manage, especially if there are any connection problems.
Example 2 – Un-supported configuration
Using the same IP addresses as example above here is a possible scenario that would be unsupported;
ESXi Host IQN | ESXi Host IP | iSCSI Fabric | DataCore Server IP | DataCore Server IQN | ||
iqn.esx1 | 192.168.1.1 |
← |
ISCSI Fabric 1 | → |
192.168.1.101 |
(iqn.dcs1-1) |
iqn.esx1 | 192.168.2.1 |
← |
ISCSI Fabric 2 | → |
192.168.2.101 |
(iqn.dcs1-2) |
iqn.esx1 | 192.168.1.2 |
← |
ISCSI Fabric 1 | → |
192.168.1.101 |
(iqn.dcs1-1) |
iqn.esx1 | 192.168.2.2 |
← |
ISCSI Fabric 2 | → |
192.168.2.102 |
(iqn.dcs2-2) |
In the ‘un-supported’ example, both Interfaces from ESXi1 are connected to the same Interface on the DataCore Server.
Server Hardware
Affects ESXi 6.5
HPE ProLiant Gen10 Servers Running VMware ESXi 6.5 (or Later) and Configured with a Gen10 Smart Array Controller may lose connectivity to Storage Devices.
For more information, search for a00041660en_us at HPE Support Center.
Affects ESXi 6.x and 5.x
vHBAs and other PCI devices may stop responding when using Interrupt Remapping.
VMware Tools
Affects ESXi 6.5
VMware Tools Version 10.3.0 Recall and Workaround Recommendations
VMware has been made aware of issues in some vSphere ESXi 6.5 configurations with the VMXNET3 network driver for Windows that was released with VMware Tools 10.3.0.
As a result, VMware has recalled the VMware Tools 10.3.0 release. This release has been removed from the VMware Downloads page.
Affects ESX 6.x and 5.x
Ports are exhausted on Guest VM after a few days when using VMware Tools 10.2.0 VMware Tools 10.2.0 version is not recommended by VMware. Refer to KB54459 for more information.
Failover
Affects ESX 6.7 only
Failover/Failback takes significantly longer than expected
Users have reported to DataCore that before applying ESXi 6.7, Patch Release ESXi-6.7.0- 20180804001 (or later) failover could take in excess of 5 minutes. DataCore are recommending (as always) to apply the most up-to-date patches to your ESXi operating system.
Citrix Hypervisor
Storage Repositories
Affects the hyper-converged DataCore Server virtual machine
Storage Repositories (SR) may not get re-attached automatically to a virtual machine after a reboot of the Citrix Hypervisor Host.
This prevents the DataCore Server’s virtual machine being able to access any storage used by SANsymphony’s own Disk Pools which will prevent other virtual machines -- running on the same Citrix Hypervisor Host as the DataCore Server -- from being able to access their virtual disks. DataCore recommend to serve all virtual disks to virtual machines that are running on the ‘other’ Citrix Hypervisor Hosts rather than directly to virtual machines running on the same Citrix Hypervisor as the DataCore Server virtual machine. Consult with Citrix for more information.
Previous Changes
Section(s) | Content Changes | Date |
---|---|---|
Microsoft Hyper-V Role | Clarified support of standalone product “Microsoft Hyper-V Server”. | April 2020 |
VMware ESXi |
|
|
Microsoft Hyper-V Deployment Technical Notes | Added a statement on NIC Teaming with iSCSI connections. | December 2019 |
General |
Added the following: This document has been reviewed for SANsymphony 10.0 PSP9. No additional settings or configurations are required. |
October 2019 |
Microsoft Hyper-V |
Added the following: The SANsymphony virtual machine settings - Memory When running a DataCore Server inside a virtual machine, do not enable Hyper-V's 'Dynamic Memory' setting for the SANsymphony virtual machine as this may cause less memory than expected to be assigned to SANsymphony’s cache driver. |
June 2019 |
VMware ESXi |
Added the following: Disk storage - ESXi Raw Device Mapping (RDM) When using RDM as storage for use in SANsymphony Disk Pools, disable ESXi’s ‘SCSI INQUIRY Caching’. This allows SANsymphony to detect and report any unexpected changes in storage device paths managed by ESXi’s RDM feature. Also, refer to Virtual Machines with RDMs Must Ignore SCSI INQUIRY Cache for more information. |
|
Storage Virtualization Deployment Models |
New section added: Microsoft Hyper-V Deployment Examples Users have reported to DataCore that before applying ESXi 6.7, Patch. The information on Hyper-converged Hyper-V deployment has been rewritten along with new detailed diagrams and explanatory technical notes. |
May 2019 |
The SANsymphony Virtual Machine Settings - iSCSI Settings - General |
Added the following: DataCore Servers in virtual machines running SANsymphony 10.0 PSP7 Update 2 or earlier should run the appropriate PowerShell scripts found attached to the Customer Services FAQ. Refer to SANsymphony - iSCSI Best Practices FAQ documentation. |
October 2018 |
Known Issues – Failover |
Added the following: Affects ESX 6.7 only Failover/Failback takes significantly longer than expected. Users have reported to DataCore that before applying ESXi 6.7, Patch Release ESXi-6.7.0-20180804001 (or later) failover could take in excess of 5 minutes. DataCore are recommending (as always) to apply the most up-to-date patches to your ESXi operating system. |
|
VMware ESXi Deployment |
Added the following: The information in this section was originally titled ‘Configure ESXi host and Guest VM for DataCore Server for low latency’. The following settings have been added:
|
September 2018 |
Known Issues |
Refer to the specific entries in this document for more details.
|
|
Configure ESXi host and Guest VM for DataCore Server for low latency |
Updated the following: This section has been renamed to ‘VMware ESXi deployment’. The following settings have been updated:
Refer to the specific entries in this document for more details and make sure that your existing settings are changed/ updated accordingly. |
|
Microsoft Windows – Configuration Examples |
Removed the following: Examples using the DataCore Loopback Port in a Hyper-V Cluster configuration have been removed as SANsymphony is currently unable to assign PRES registrations to all other non-active Loopback connects for a virtual disk. This could lead to certain failure scenarios where MSCS Reservation Conflicts prevent access for some/ all of the virtual disks on the remaining Hyper-V Cluster. Use ISCSI loopback connections instead. |
|
VMware ESXi Deployment |
Removed the following: The information in this section was originally titled ‘Configure ESXi host and Guest VM for DataCore Server for low latency’. The following settings have been removed: DataCore are no longer making recommendations regarding NUMA/ vCPU affinity settings as we have found that different server vendors have different NUMA settings that can be changed, and that many users have reported that making these changes made no difference and, in extreme cases, caused slightly worse performance than before. Users who may have already changed these settings based using the previous document and are running without issue do not need to revert anything. |
|
SANsymphony vs Virtual SAN Licensing | This section has been removed as it no longer applies to the current licensing model. | |
Appendix A | This has been removed. The information that was there has been incorporated into relevant sections throughout this document | |
VSAN License Feature |
Added the following: Updated the VSAN License feature to include 1 registered host Removed example with MS Cluster using Loopback ports (currently not supported) |
May 2018 |
DataCore Server in Guest VM on ESXi table |
Updated the following: Corrected errors, added references to VMware documentation and added Disable Delayed ACK. |
|
ESXi 5.5 |
Removed the following: ESXi 5.5 because of issues only fixed in ESXi 6.0 Update 2. Refer to KB2129176 for more information. |
|
First publication of document | Added the first publication of the document. | September 2016 |