Configuring iSCSI Connections
Explore this Page
- About iSCSI Connections
- Overview of the Process
- Discovering iSCSI Targets
- Logging in to iSCSI Targets
- Logging out of iSCSI Targets
- Configuring iSNS
- Disabling iSNS
- Changing iSNS Settings
- Configuring Authentication
- Adding Extra IP Addresses to a Network Adapter
About iSCSI Connections
In order to configure iSCSI connections, all iSCSI initiators must discover and log on to target storage devices. This topic provides information for configuring iSCSI connections, including iSNS and authentication in the DataCore Management Console. (If desired, the Microsoft® iSCSI Initiator tool included with the operating system can be used to perform iSCSI configuration instead. The information in the Important Notes in this topic also applies.)
Instructions provided in this topic are for configuration on DataCore Servers. If specific instructions are needed to configure iSCSI connections on HOSTS, use the instructions provided with the specific operating system and iSCSI initiator software installed on the host.
Before configuring iSCSI connections, read the following notes and overview of the process in this topic.
- Before you begin configuring iSCSI, ensure iSCSI software is installed on hosts and iSNS servers.
- Discovering and logging into server ports can be automatically performed by enabling the Auto-login iSCSI ports check box when adding a server to the server group. See Establishing Server Groups for more information.
- Up to 126 iSCSI initiators can be connected to a single iSCSI target at any one time. Up to 64 target ports are supported.
- Multiple iSCSI sessions from the same host IP address to a single DataCore Server iSCSI target are supported by connecting (binding) to different ports. Port binding requires that the initiator and target ports are in the same broadcast domain and IP subnet. Due to this limitation, DataCore does not recommend the use of port binding.
- Multiple virtual IP addresses are supported for use with a single physical NIC; multiple ports per NIC are supported. See Adding Extra IP Addresses to a Network Adapter in this topic.
DataCore Servers (including Replication partners) and computers running the DataCore Management Console component require functioning name resolution to resolve computer names to IP addresses. To ensure proper communication and data transfer, verify that correct name resolution exists. If using hosts files, the name in the file must be identical to the actual computer name, including case. When possible, we highly recommend using host names instead of IP addresses. IP addresses can be determined from host names regardless of changes to the IP addresses.
- Internet Protocol Version 4 (IPv4) are supported for iSCSI targets on DataCore Servers.
- Use Internet Protocol Version 4 (IPv4).
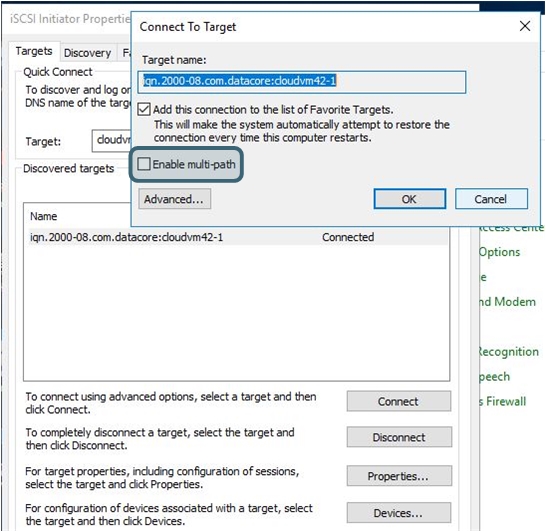
- When making iSCSI connections via the Microsoft iSCSI Initiator, do not select the Enable multi-path check box in the Connect To Target dialog box if the connection is used for mirror paths between DataCore Servers
-
It is recommended to set a non-default IQN for the Microsoft iSCSI Initiator. This may be configured in the Microsoft iSCSI Initiator Properties, under the Configuration tab. Setting this manually ensures that future changes such as adding SANsymphony servers to a domain do not change the IQN automatically, which happens with the default IQN as generated by Windows when the feature is enabled.
Overview of the Process
A basic overview of the process to establish iSCSI connections between initiators and targets is provided:
- iSCSI initiator ports must discover the target portals in your configuration:
- On hosts, configure the initiator to discover the DataCore Server targets and configure CHAP (if required) using the instructions for your specific operating system and iSCSI initiator software.
- On DataCore Servers, perform one of the following:
- If using iSNS, register the DataCore Server initiator and targets with the iSNS server, refer to Configuring iSNS in this topic.
- If mirroring over iSCSI, verify that each DataCore Server sees other DataCore Servers in the server group. If not, configure the targets on the iSCSI Initiator, refer to Discovering iSCSI Targets in this topic.
- iSCSI initiator ports must log on to iSCSI target ports in order to access target storage devices:
- On hosts, log on to targets using the instructions for your specific operating system and iSCSI initiator software. If possible, make the target persistent after system restarts.
- Verify that discovered targets are logged on. If not, log on to the targets manually, refer to Logging on to iSCSI Targets in this topic.
- If using CHAP or mutual authentication, refer to Configuring Authentication in this topic.
Discovering iSCSI Targets
The following instructions are used to discover targets on the iSCSI initiators on DataCore Servers using the DataCore Management Console. (Targets can also be discovered using the Microsoft iSCSI Initiator tool.)
If mirroring virtual disks over iSCSI, the DataCore Server must discover the target portals of the other DataCore Servers in the server group. During discovery, target secrets can also be configured.
If targets are discovered using the DataCore Management Console, the target will disappear after logging off. To log on again, the targets will have to be rediscovered. If targets are discovered using the Microsoft® iSCSI Initiator tool included with the operating system, the target will remain discovered after logging off.
To discover targets on DataCore Servers:
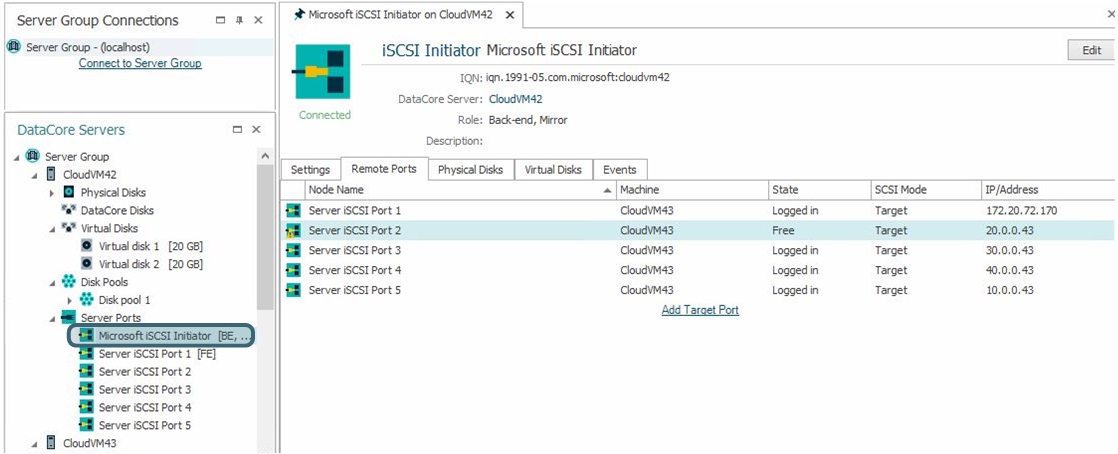
- In DataCore Servers panel, expand the tree for the DataCore Server and then expand Server Ports.
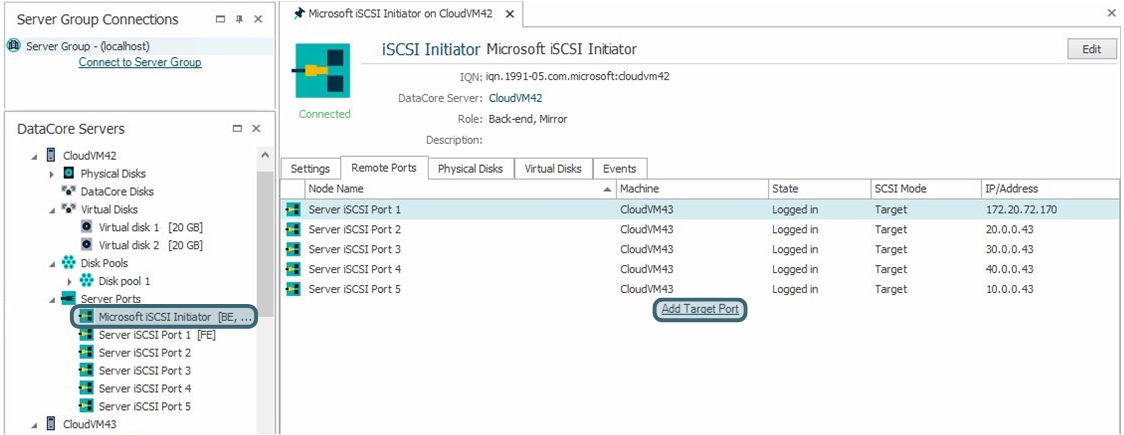
- Click Microsoft iSCSI Initiator to open the iSCSI Initiator Details page.

- If desired, you can change the name, IQN or description of the Microsoft iSCSI Initiator by clicking Edit at the top right of the page. Click Done when complete.
All letters in the IQN must be entered in lower case.
- In Remote Ports tab, verify that the iSCSI targets on the other DataCore Servers appear on the list. if the target portals for the other DataCore Servers in the group are not listed:
- Click the link Add Target Port to open the Add Target Port page.
- In the Target Portal area, enter the target IP address or DNS name. The default TCP port is 3260, this should be correct for standard environments.
- In the Connect using source IP box, select the source IP from the list or leave as Default, which will allow the iSCSI Initiator to choose the source IP.
- If performing authentication:
- In the CHAP Authentication area, select the CHAP Authentication check box; additional fields are activated.
- In User name, enter the desired user name. By default, the IQN for the initiator is used. (Change if necessary.)
- In Target secret, enter the secret. (Secrets are 12-16 characters.).
The user name and target secret configured here will be used when logging on to the target and should match the CHAP authentication configured on the target port.
- If performing mutual authentication, select the Perform mutual authentication check box.
- Click Finish.
- Repeat for all targets on all DataCore Servers.
Logging in to iSCSI Targets
The following instructions are for logging on to iSCSI targets on DataCore Servers.
After initiator and target connections are discovered, iSCSI initiators must be logged on to targets in order to establish connections and transfer data over iSCSI. Logins are persistent and connections will be automatically restored if servers restart unless the user logs off from the target.
To log on to targets:
- In DataCore Servers panel, under Server Ports for the DataCore Server and click Microsoft iSCSI Initiator to open the iSCSI Initiator Details page.
- In Remote Ports tab, the connection state is displayed in the State column. If the target needs to be logged on, right-click the node in the list and choose Login to open the Log On to Target page.
- In the Connect using source IP box, select the Source IP from the list or leave as Default, which will allow the iSCSI Initiator to choose the source IP.
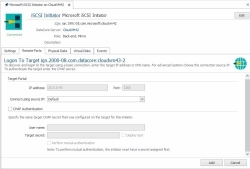
- If performing authentication:
- Select the CHAP Authentication check box.
- In User name, enter the same user name that was configured for the target secret when configuring CHAP authentication.
- In Target secret, enter the secret that was configured for the target when configuring CHAP authentication.
- For mutual authentication, select the Perform mutual authentication check box.
- Click Finish. The iSCSI icons for target ports under Server Ports will change from grey icons to green icons when connected.


Logging out of iSCSI Targets
The following instructions are for logging off from iSCSI targets on DataCore Servers.
If targets are discovered using the DataCore Management Console, the target will disappear after logging off. To log on again, the targets will have to be rediscovered. If targets are discovered using the Microsoft® iSCSI Initiator tool included with the operating system, the target will remain discovered after logging off.
To log off from targets:
- In DataCore Servers panel, under Server Ports for the DataCore Server and click Microsoft iSCSI Initiator to open the iSCSI Initiator Details page.
- In the Remote Ports tab, select the node in the list and choose Logout.
Configuring iSNS
The Internet Storage Name Server (iSNS) protocol is used for interaction between iSNS servers and iSNS hosts (DataCore Servers and hosts) to facilitate the discovery and configuration of iSCSI devices. Configuring the iSNS server, allows all initiators to automatically discover all target ports, eliminating the need for configuring every initiator for every target. When numerous hosts exist on a network, configuring an iSNS server saves time.
In order to make use of this protocol, an iSNS server must exist on the network and have iSNS software installed. Both the iSCSI initiator and target ports need to be registered with it.
Do not install iSNS software on a DataCore Server and attempt to use it as an iSNS server.
To register the initiator:
- In DataCore Servers panel, expand the tree for the DataCore Server and then expand Server Ports.
- Click Microsoft iSCSI Initiator to open the iSCSI Initiator Details page.
- Click the Settings tab.
- In the iSNS Servers area, enter the IP address of the iSNS server and click Add Server. The new iSNS server will appear in the list of iSNS servers.
- Click Apply.
- Repeat for additional DataCore Servers.
To register the targets:
- In DataCore Servers panel, expand the tree for the DataCore Server and then expand Server Ports.
- Click a target port to open the iSCSI Port Details page.
- Click the Settings tab.
- In iSNS settings area, select the iSNS enabled check box. This activates the Server IP address and Server TCP port below.
- Enter the iSNS server IP address and if necessary the TCP port. (The default TCP port is 3205, this should be correct for standard environments.)
- Click Apply.
- Repeat for additional DataCore Servers.
Disabling iSNS
To disable iSNS for initiators:
- In DataCore Servers panel, click Microsoft iSCSI Initiator to open the iSCSI Initiator Details page.
- Click the Settings tab.
- In the iSNS Servers area, select the server from the list and click Remove Server.
- Click Apply.
To disable iSNS for targets:
- In DataCore Servers panel, click a target port to disable to open the iSCSI Port Details page.
- Click the Settings tab.
- In iSNS settings area, clear the iSNS enabled check box.
- Click Apply.
Changing iSNS Settings
To change iSNS settings for initiators:
- The iSNS server must be disabled, removed and reregistered following the instructions in this topic.
To change iSNS settings for targets:
- In DataCore Servers panel, expand Server Ports for the DataCore Server and click a target port to open the iSCSI Port Details page.
- Click the Settings tab.
- Change the settings, as required.
- Click Apply.
Configuring Authentication
The instructions provided in this topic are used to configure CHAP authentication on DataCore Servers. (To configure authentication on HOSTs, use the instructions provided with the specific operating system and iSCSI initiator software installed on the host.)
Authentication verifies the validity of the initiator and target by using secrets. Target secrets entered must match the CHAP secrets configured for the corresponding initiator connections. Secrets are 12-16 characters.
DataCore SANsymphony software supports two types of authentication:
- One-way authentication where only the target authenticates the initiator. The secret is set just for the target and all initiators that want to access that target need to use the same secret to start a logon session with the target. The target secret must be configured on both the target and the initiator.
- Mutual authentication provides a higher level of security and is recommended in most environments. Using mutual authentication, the target and initiator authenticate each other. A separate secret is set for each target and for each initiator.
For mutual authentication, the initiator must have the secret assigned FIRST.
- When configuring target secrets, you will have to log off first, set the target secret, then log on to the target again.
To configure initiator secrets for mutual authentication:
- In DataCore Servers panel, expand Server Ports for the DataCore Server and click Microsoft iSCSI Initiator to open the iSCSI Initiator Details page.
- Click the Settings tab.
- In Secret, enter the initiator secret. (Secrets are 12-16 characters.) To display the secret in text format, select the Display text check box. (After entering and verifying the secret, clear the check box to hide the text.)
- Click Apply.
To configure target secrets on initiators for CHAP or mutual authentication:
- In DataCore Servers panel, expand Server Ports for the DataCore Server and click Microsoft iSCSI Initiator to open the iSCSI Initiator Details page.
- Click the Remote Ports tab.
- If the target exists in the list, ensure the target is logged off.
- Right-click the target port in the list and select Login, or click Add Target Port if the target is not listed.
- In the CHAP Authentication area, select the CHAP Authentication check box; additional fields are activated.
- In User name, enter the desired user name. By default, the IQN for the initiator is used. (Change if necessary.)
- In Target secret, enter the secret. (Secrets are 12-16 characters.)
The user name and target secret configured here will be used when logging on the target and should match the CHAP authentication configured on the target port.
- If performing mutual authentication, select the Perform mutual authentication check box.
- Click Finish.
To configure target secrets on targets for CHAP or mutual authentication:
- Ensure the target is logged off.
- In DataCore Servers panel, expand Server Ports for the DataCore Server and click an iSCSI target port to open the iSCSI Port Details page.
- Click the Authentication tab.
- In the Authentication Mode box, select CHAP or Default. (Default allows the initiator settings to determine use.)
- In the list box, select the node and click Change Settings or click Create New Node if the node is not listed.
- In the Port Authentication Information page, enter the Initiator node name, if blank. The IQN of the initiator can be used.
- In the Incoming CHAP Authentication Information area, enter the user name and the target secret. To display the secret in text format, select the Display text check box.
This user name and target secret should match the user name and target secret entered for the target on the initiator. Use this target user name and secret when logging on to the target.
- If required, select the Perform Mutual Authentication check box; additional fields are activated.
- In the Outgoing Mutual CHAP Authentication Information area, enter the initiator user name and initiator secret.
This initiator secret should match the initiator secret entered in the iSCSI Initiator Details page.
- In the Outgoing Mutual CHAP Authentication Information area, enter the initiator user name and initiator secret.
- Click Apply.
- Now that the secret is set, log on to the target.
Adding Extra IP Addresses to a Network Adapter
Adding extra IP addresses can often help improve performance for faster adapters (10 GB/second and higher). Each IP address will result in a distinct iSCSI target port. Multiple iSCSI target ports allows multiple paths to be created between the initiator and target. Distributing these paths between a number of virtual disks and/or adding extra paths to each virtual disk are both strategies which could help to make best use of the available bandwidth.
Extra IP addresses may be added to a NIC in the usual manner, such as using Windows Network Connections (right-click on the chosen adapter).
The iSCSI server port objects created from the additional virtual IP addresses should have individual IQN and IP addresses, but share the same MAC address, as described in the following naming scheme.
Naming Scheme
For backwards compatibility, existing IPv4 iSCSI target port objects should keep their original Physical Name attribute i.e.:
MAC:nn-nn-nn-nn-nn-nn
To disambiguate iSCSI ports sharing the same MAC address, the Physical Name attribute of additional ports should take the form:
MAC:nn-nn-nn-nn-nn-nn#<PortalIndex>
Where <PortalIndex> is a hex number from 1 to 7F (for IPv4 addresses).
For example, supposing an adapter was configured to have four IPv4 addresses, the corresponding ports objects might look as follows:
| IP Address | Caption | Physical Name | Port Name |
|---|---|---|---|
|
10.0.0.128 |
Server iSCSI Port SAN1a |
MAC:A0-36-9F-24-15-B4 |
iqn.2000-08.com.company:box2-2 |
|
10.0.0.129 |
Server iSCSI Port SAN1b |
MAC:A0-36-9F-24-15-B4#1 |
iqn.2000-08.com.company:box2-3 |
|
10.0.0.130 |
Server iSCSI Port SAN1c |
MAC:A0-36-9F-24-15-B4#2 |
iqn.2000-08.com.company:box2-4 |
|
10.0.0.131 |
Server iSCSI Port SAN1d |
MAC:A0-36-9F-24-15-B4#3 |
iqn.2000-08.com.datacore:box2-5 |
Learn More