In this topic:
Configuring DataCore Storage Management Provider
Allocating Storage to Host Groups
Provisioning Logical Units Through Windows File and Storage Services
Creating a SAN Copy-Capable Template
Rapid Provisioning of Virtual Machines
Microsoft System Center Virtual Machine Manager (SCVMM) is a management solution for the virtualized datacenter that manages large amounts of compute, network, and storage resources, as well as creates and manages public and private clouds. Microsoft System Center 2012 SP1 Virtual Machine Manager introduced support of a new Windows Storage Management API (SMAPI) used to manage external storage by using either Storage Management Provider (SMP) or SMAPI together with a standards-based Storage Management Service to communicate with storage that is compliant with the Storage Management Initiative Specification (SMI-S). (SMAPI supersedes the Virtual Disk Service (VDS) application programming interface (API) in Windows Server 2012.)
DataCore™ Storage Management Provider (DataCore SMP) is a WMI-based provider which was designed to support integration and automation between Microsoft System Center Virtual Machine Manager (SCVMM) and the DataCore SANsymphony™ Software-defined Storage platform. DataCore SMP enables administrators to easily add SANsymphony server group storage resources to the provider, create logical units (virtual disks), and allocate storage for virtual machines.
In SCVMM, SANsymphony virtual disks are served to Hyper-V hosts where applications are running. Virtual disks are used by applications with different levels of service (such as gold, silver, bronze). DataCore SMP communicates to SANsymphony software through the public API. In this manner, users can remain focused on what matters most—deploying an application instead of being concerned about storage.
DataCore SMP also allows administrators to provision logical units through Windows File and Storage Services.
Important Notes
o Read the DataCore SMP release notes for important prerequisites and installation information.
o This topic contains brief instructions for provisioning SANsymphony storage in Microsoft System Center Virtual Machine Manager (SCVMM) and Windows File and Storage Services. Instructions are provided only to facilitate and expedite storage provisioning and are not intended to replace Microsoft Windows documentation. These instructions are applicable to System Center 2012 SP1. Refer to Microsoft Windows documentation for additional information or later versions of the software.
o After virtual machines are created, snapshots can be created in SCVMM. It is also possible to create snapshots, enable Continuous Data Protection and create rollbacks in SANsymphony software, but SCVMM will not be aware of them.
Step |
Process |
1 |
In SCVMM, add storage devices and import the DataCore Storage Management Provider. See Configuring DataCore Storage Management Provider for more information. |
2 |
In SCVMM, allocate storage to host groups. See Allocating Storage to Host Groups for more information. |
3 |
In SCVMM, create logical units for host storage and format the logical unit and configure a mount point. See Provisioning Logical Units for more information.
See Provisioning Logical Units Through Windows File and Storage Services for more information. |
4 |
SAN copy-capable implies the use of the SAN Subsystem to provision the target virtual machine through a process known as rapid virtual machine provisioning. See Creating a SAN Copy-capable Template for more information. (This step is optional.) |
5 |
Virtual machines templates that are SAN copy-capable will use the SAN transfer method as opposed to network transfer improving performance and efficiency. See Rapid Provisioning of Virtual Machines for more information. (This step is optional.) |
In order to access SANsymphony storage resources from SCVMM, import DataCore Storage Management Provider and add the disk pools in SCVMM. This process is equivalent to importing a SANsymphony disk pool to SCVMM.
Important Notes:
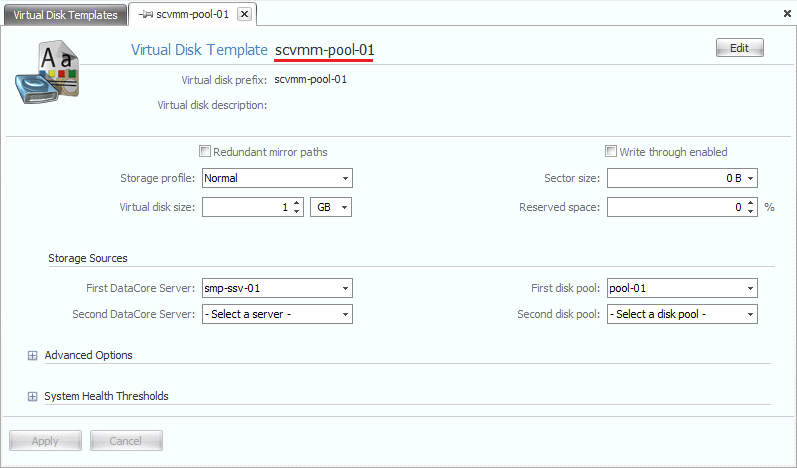
o The storage devices listed under the SANsymphony server group in SCVMM correspond to virtual disk templates in SANsymphony software. Virtual disk templates identify the disk pools to use in SANsymphony software. Templates should be configured in the SANsymphony server group before adding storage devices in SCVMM. See Virtual Disk Templates for more information.
o In order to recognize new templates created in SANsymphony software after this process is initially run, run the Add Storage Devices wizard in SCVMM again.
To import DataCore SMP and add storage devices:
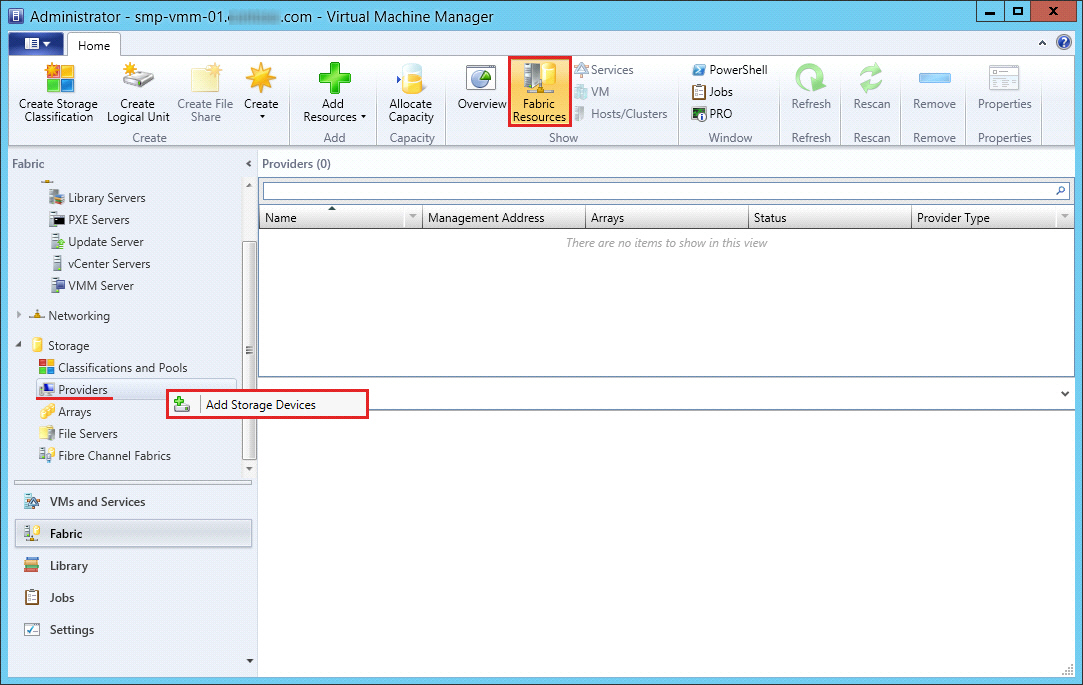
1 In SCVMM, click Fabric Resources in the Home tab to navigate to the Fabric workspace.
2 Under Storage, right-click on Providers
and select Add
Storage Devices from the context
menu. ![]()
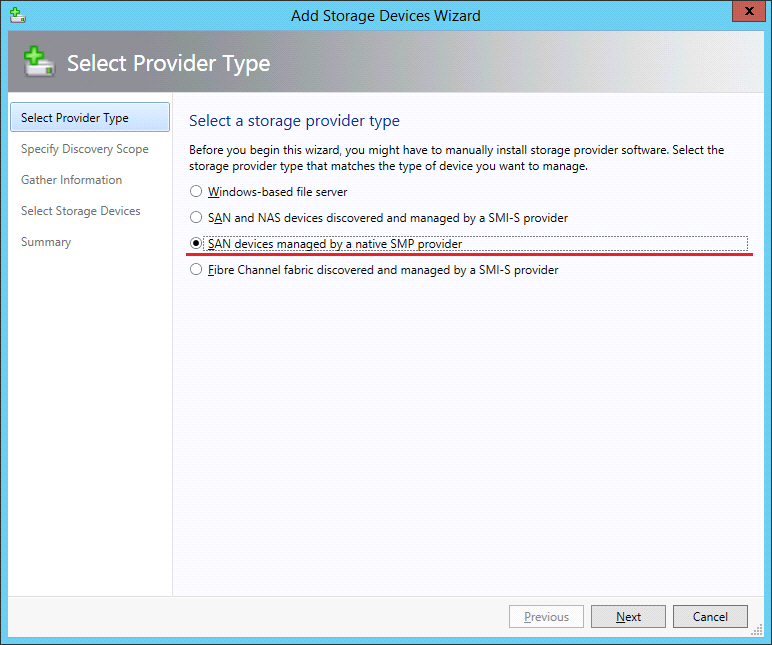
3 In the Select
Provider Type dialog box, select SAN
devices managed by a native SMP provider, and click Next.
![]()
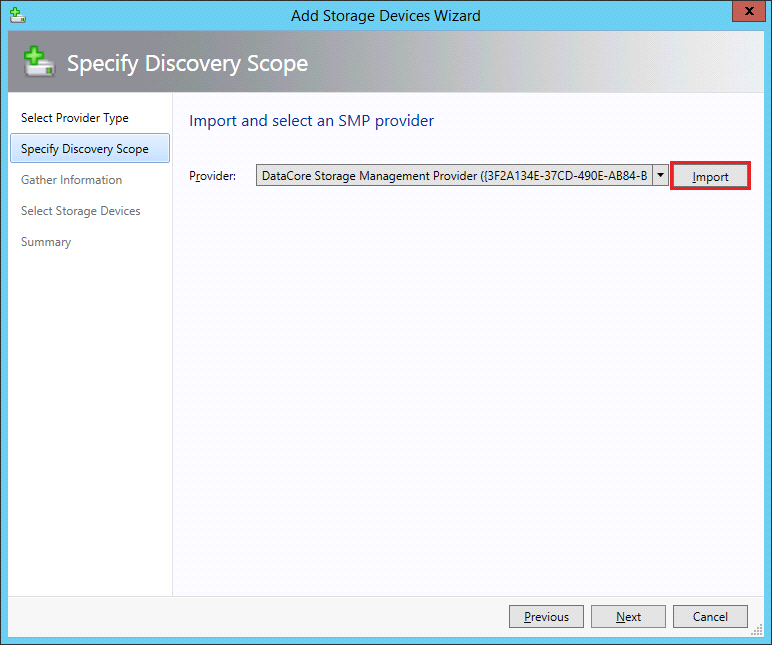
4 In the Specify
Discovery Scope dialog box, click Import
and then select DataCore Storage Management
Provider from the drop-down list. Click Next
to continue. ![]()
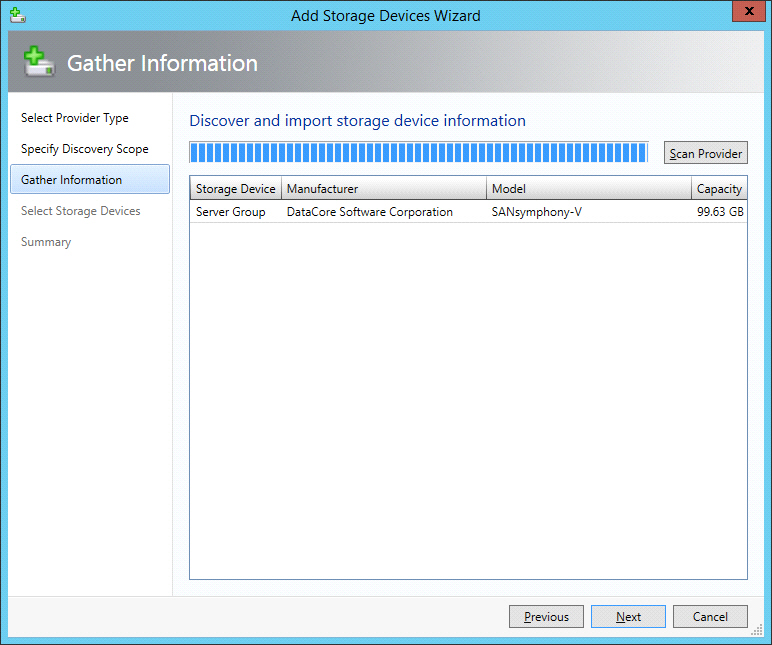
5 In the Gather
Information dialog box, click Scan
Provider. The wizard will scan for the connected SANsymphony server group
containing storage devices. Ensure that the storage device for DataCore Software Corporation
is found. When the server group is listed in the table, click Next
to continue. ![]()
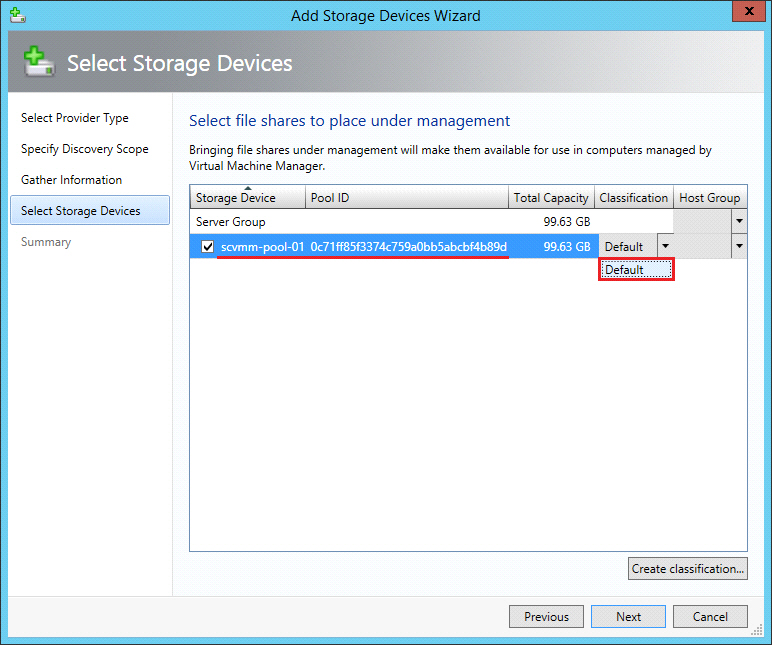
6 In the Select
Storage Devices dialog box, select the storage devices (storage
pools identified by SANsymphony
virtual disk templates) that should be managed by Virtual Machine Manager
and select the classification. Click Next
to continue. ![]()
Note: The storage classification is a user-defined way to categorize different
properties of discovered storage pools on criteria such as Quality of
Service (QoS), use case or the identification of a storage pool. If desired,
a separate classification may be created for each discovered storage device.
See https://technet.microsoft.com/en-us/library/gg610685.aspx
for more information.
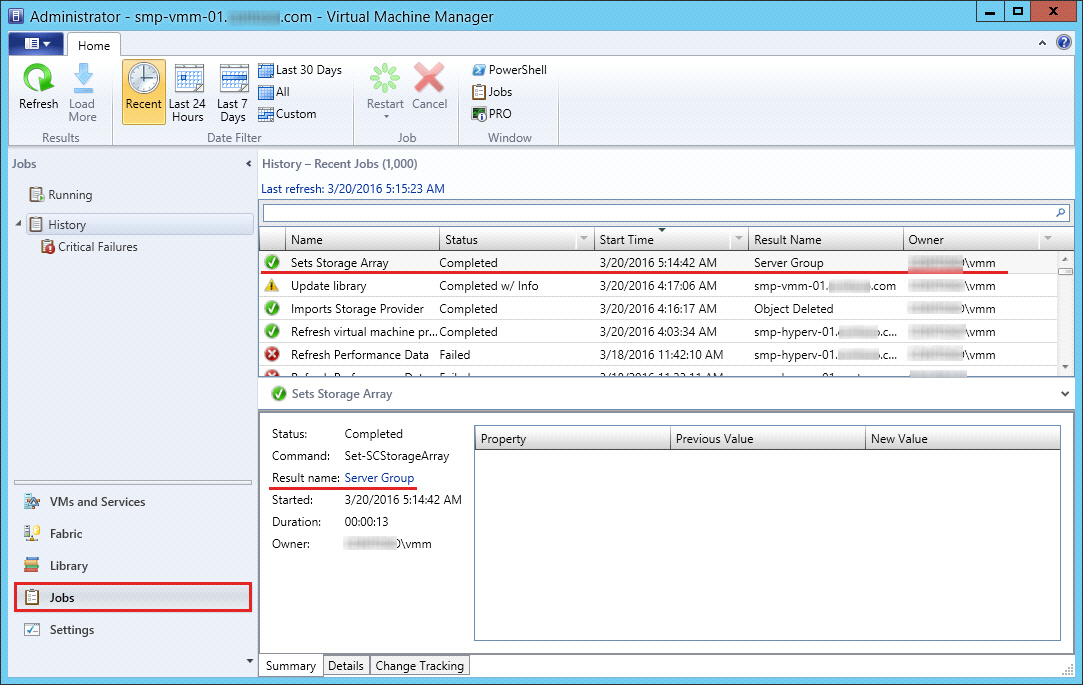
7 In the Summary page, confirm the settings and click Finish to complete the process.
8 Monitor the completion
of the process in History>Recent Jobs in the Jobs
workspace. ![]()
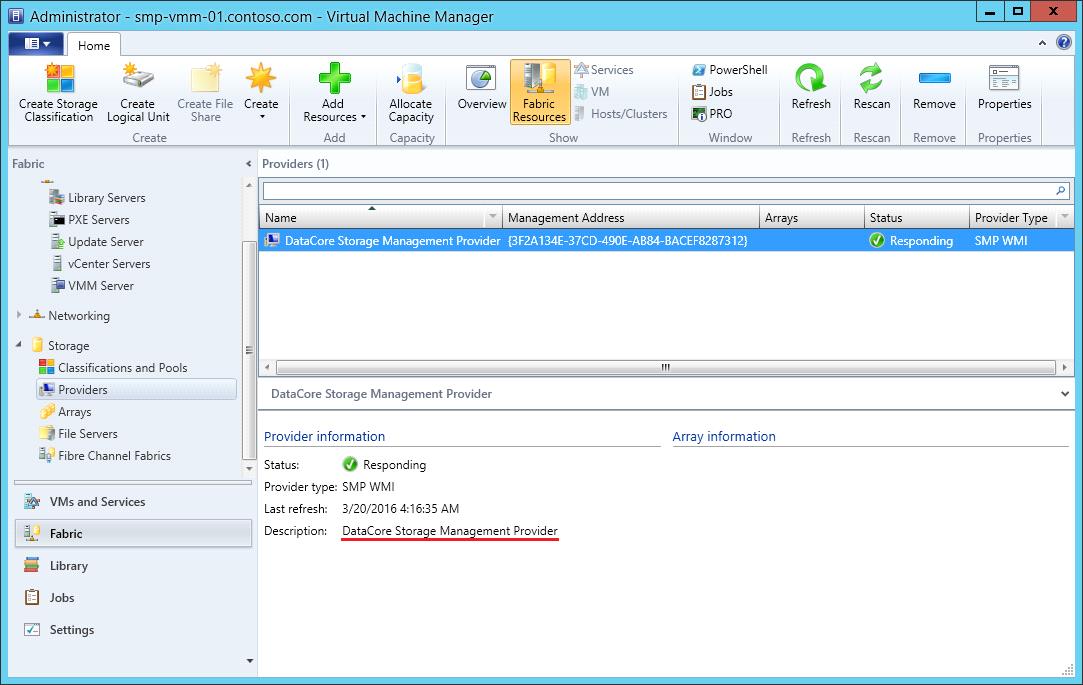
9 DataCore Storage Management Provider
will be displayed in Fabric Resources under the Storage folder. Details
about the SANsymphony
server group and imported disk pools can be viewed in Fabric
Resources>Arrays. ![]()
Storage may be allocated by pools or logical units to host groups (Hyper-V hosts managed by SCVMM) in order to allow the creation and assignment of logical units to use as virtual machine workloads.
Allocating a storage pool to a host group allows administrators to do either of the following:
o Create logical units from servers that are running Hyper-V in the host group that can access the storage array where the storage pool resides.
o Use the storage pool for rapid provisioning of virtual machines. See https://technet.microsoft.com/en-us/library/gg610635.aspx for more information.
Allocating logical units to a host group allows administrators to assign the logical units to servers running Hyper-V that can access the storage, as well as host clusters that reside in the host group. See https://technet.microsoft.com/en-us/library/gg610686(v=sc.12).aspx for more information.
Important Notes:
o The logical unit in SCVMM corresponds to a virtual disk in SANsymphony software.
o For rapid provisioning of VMs, storage pools are required to be allocated to host groups. During the rapid provisioning process, SCVMM will create a new logical unit from the storage pool and therefore logical units should not be allocated beforehand.
To allocate storage pools to host groups:
1 Navigate to the Fabric workspace.
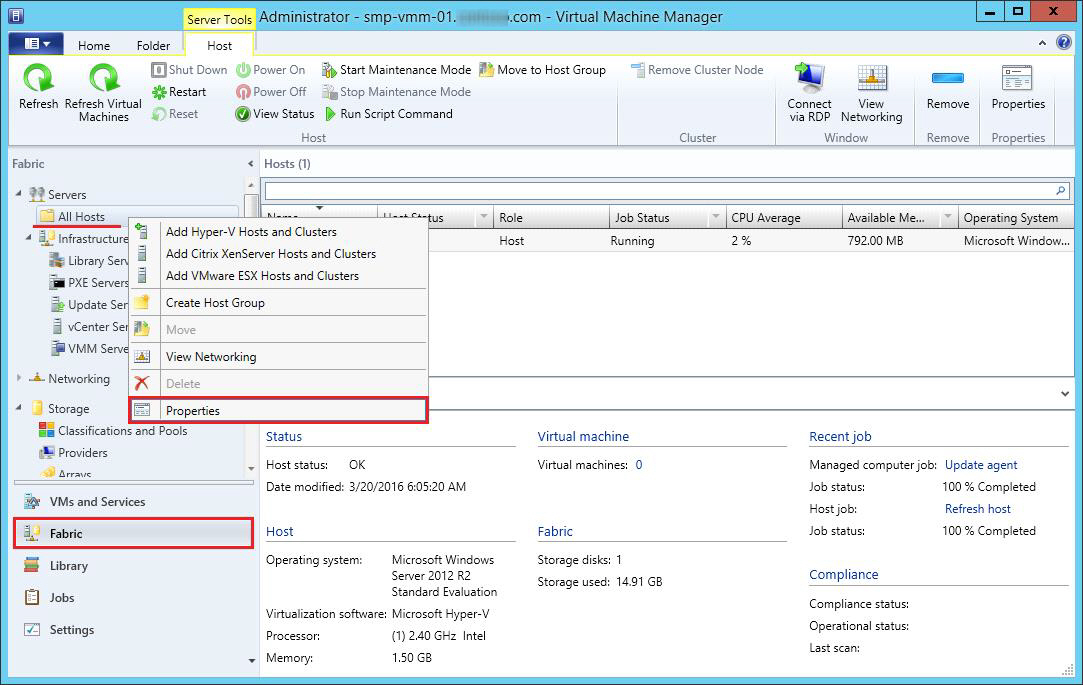
2 Right-click
All
Hosts and
then select
Properties
from the
context menu. ![]()
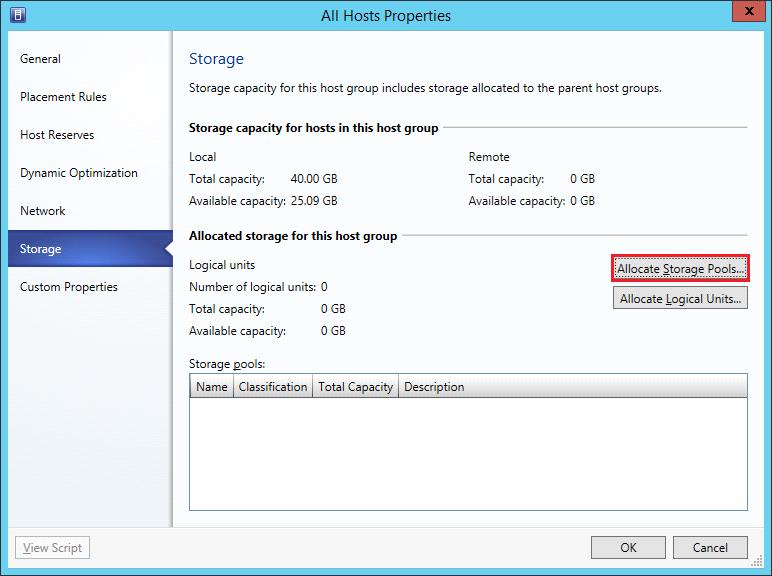
3 In the All Hosts Properties
dialog box, select Storage, click Allocate
Storage Pools and click OK.
![]()
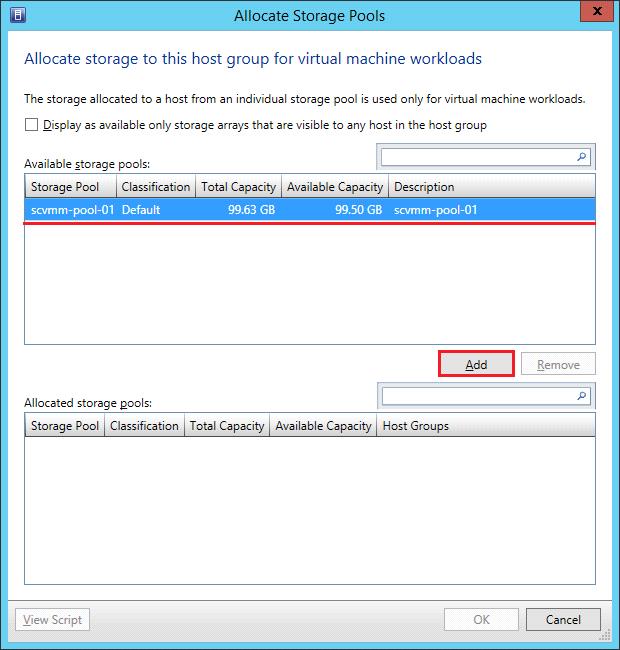
4 In the Allocate Storage
Pools dialog box, select the pool
with the appropriate classification to assign to the host group and click
Add.
![]()
To allocate a logical unit to a host group:
Do not allocate logical units for rapid provisioning of virtual machines.
1 Navigate to the Fabric workspace.
2 Right-click All Hosts and then select Properties from the context menu.
3 In the All Hosts Properties dialog box, select Storage, click Allocate Logical Unit and click OK.
4 In the Allocate Logical Unit dialog box, select the logical unit with the appropriate classification to assign to the host group and click Add.
DataCore SMP allows administrators to create logical units and assign them to managed servers running Hyper-V software in a host group to which storage pools were allocated. This process simplifies the management of logical units because all actions can be performed in SCVMM, instead of switching between multiple user interfaces such as the Microsoft iSCSI Initiator tool, Windows Disk Manager, and the DataCore Management Console.
Important Notes:
o The logical unit in SCVMM corresponds to a virtual disk in SANsymphony software.
To create and assign a logical unit to a Hyper-V host:
1 Navigate to the Fabric workspace.
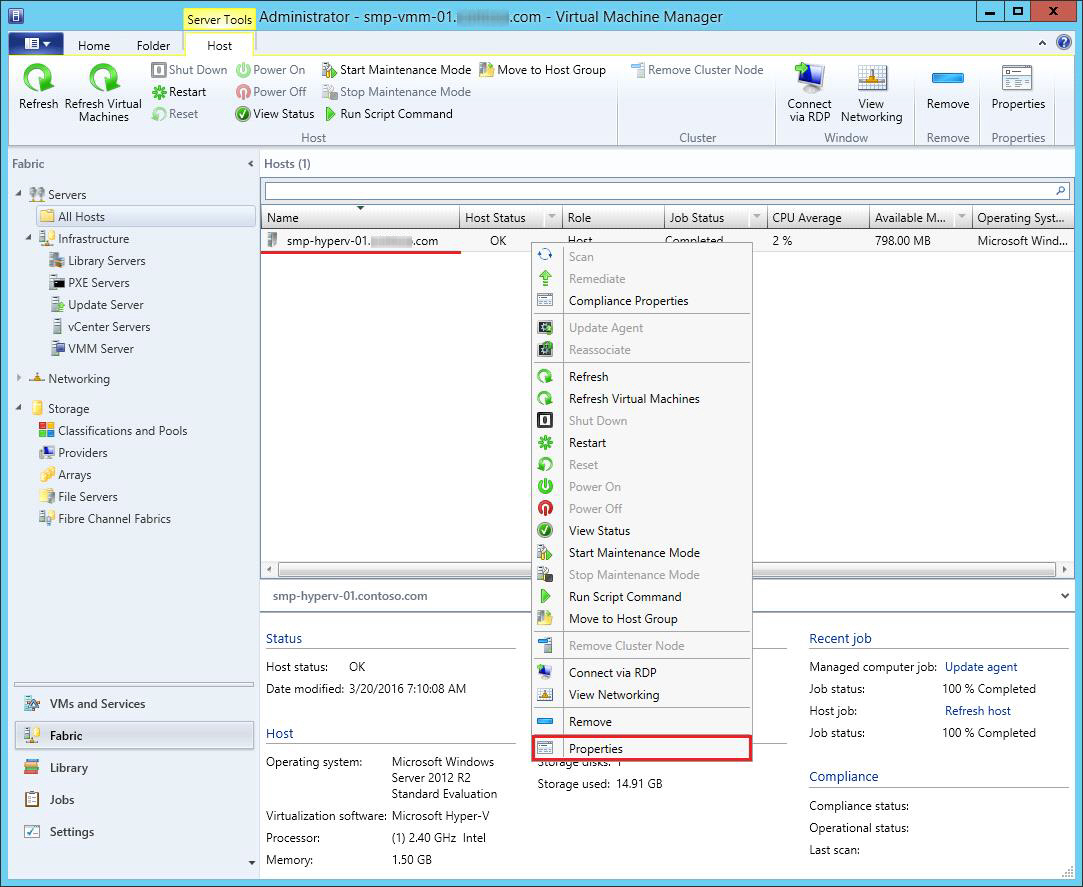
2 Click All
Hosts to display hosts, then right-click
on the desired host and select Properties
from the context menu. ![]()
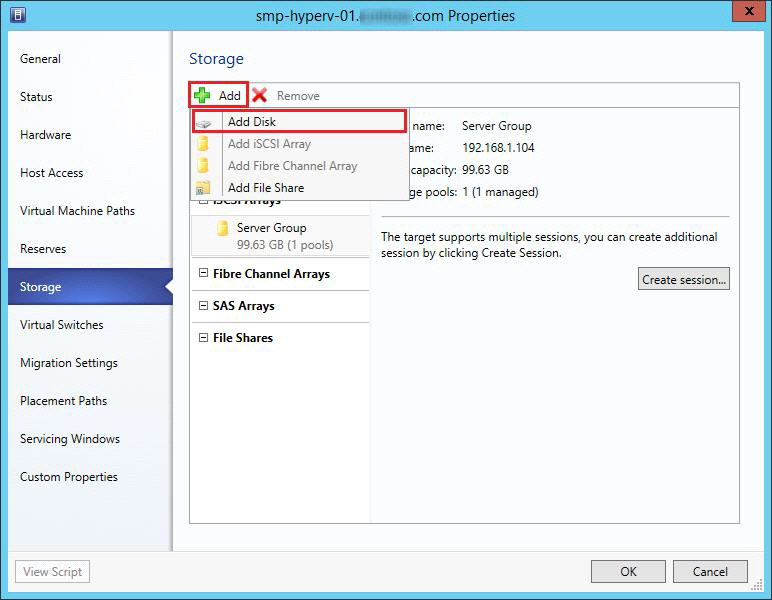
3 In
the All
Hosts Properties dialog box, select
Storage. Under Storage, select Add
and choose Add
Disk from the drop-down menu. ![]()
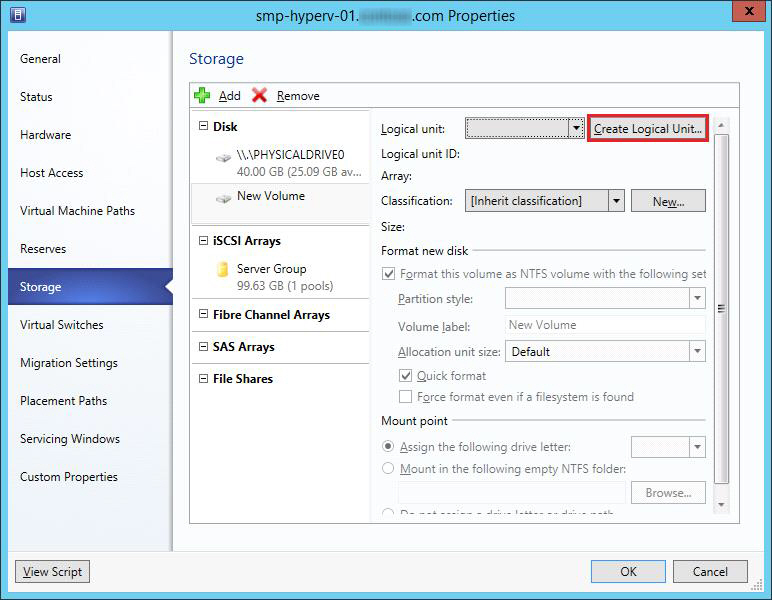
4 In the Disk
area, click Create Logical Unit.
![]()
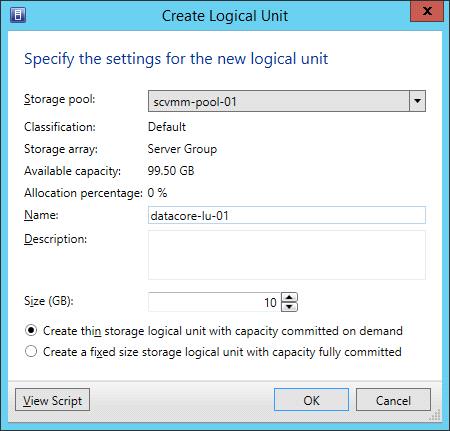
5 In the Create
Logical Unit dialog box, specify the settings for the logical unit.
![]()
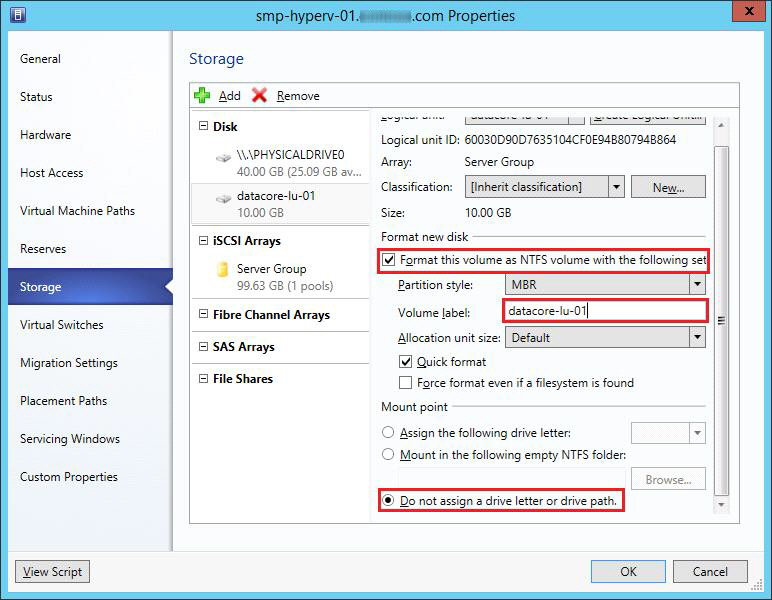
6 Format the logical
unit and configure a mount point without a drive letter or drive path.
![]()
7 Monitor the status for the logical unit completion and assignment in History>Recent Jobs in the Jobs workspace.
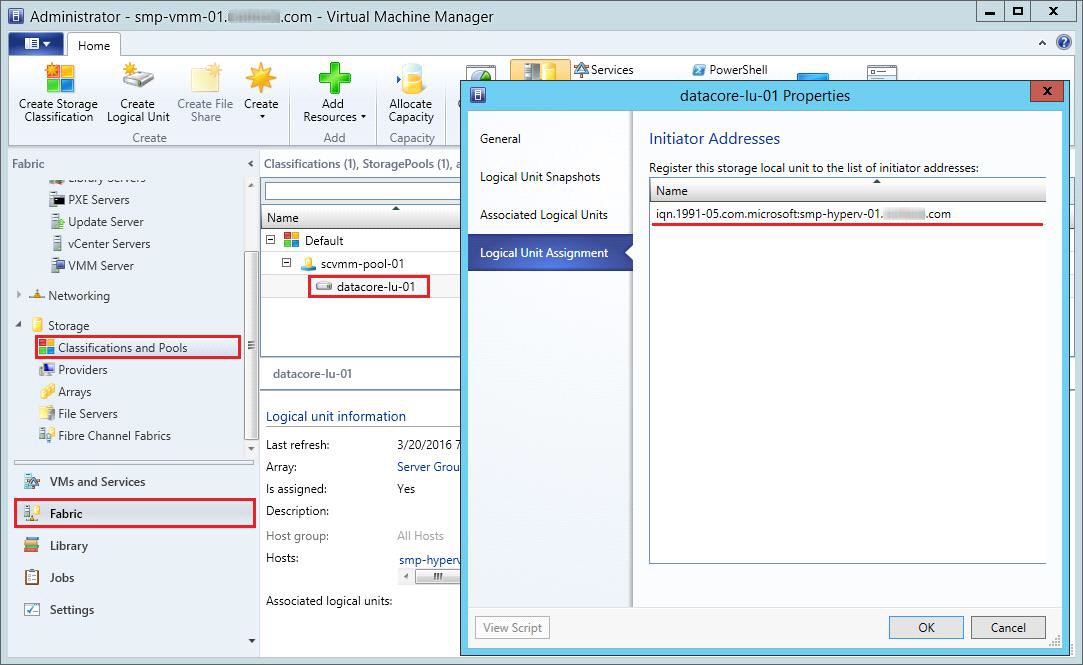
8 The Properties
dialog box for the logical unit, under Logical
Unit Assignment indicates the initiator addresses assigned to the
logical unit. ![]()
In some situations it is useful to create and assign a logical unit to a server which is not managed by a Hyper-V host (for example, assignment to a dedicated SCVMM Library Server). However, storage automation with SCVMM is only supported for servers that are running Hyper-V software and therefore is not supported in the SCVMM Console. In such cases, DataCore SMP allows you to use Windows File and Storage Services to create logical units (virtual disks).
To create a logical unit in File and Storage Services:
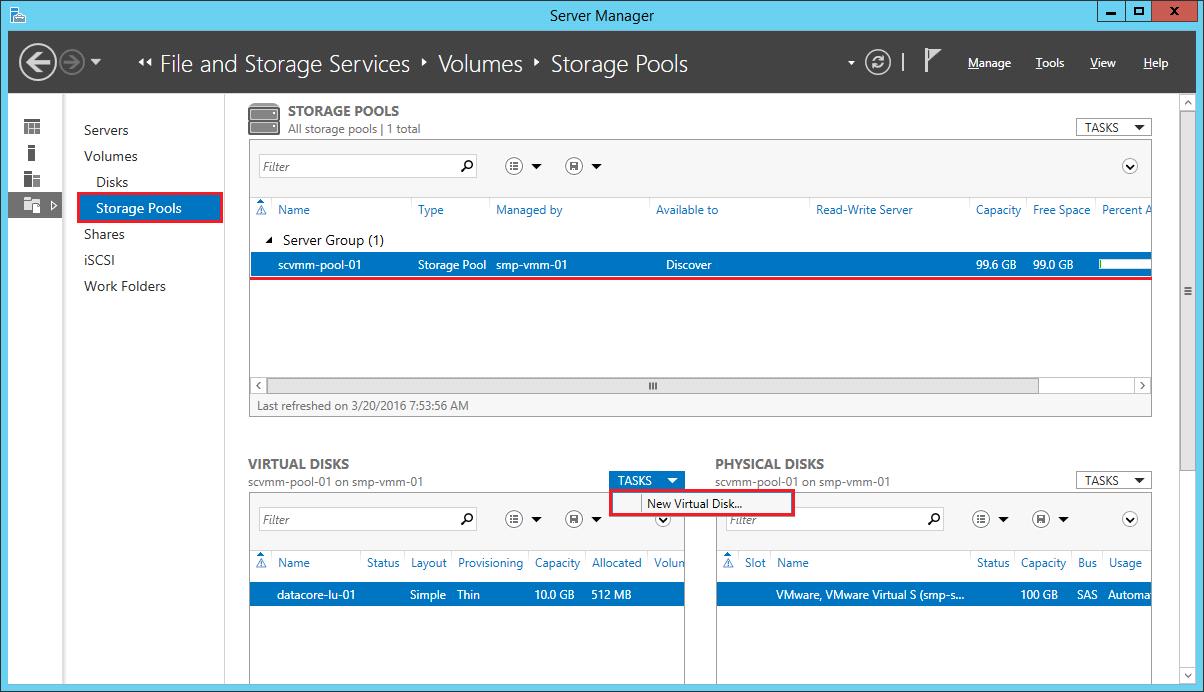
1 Open File and Storage Services in Server Manager and select Storage Pools, then choose the appropriate SANsymphony storage resource under the server group. (The virtual disk created is based on the selected SANsymphony virtual disk template.)
2 In the Virtual Disks
box, select New
Virtual Disk under Tasks. ![]()
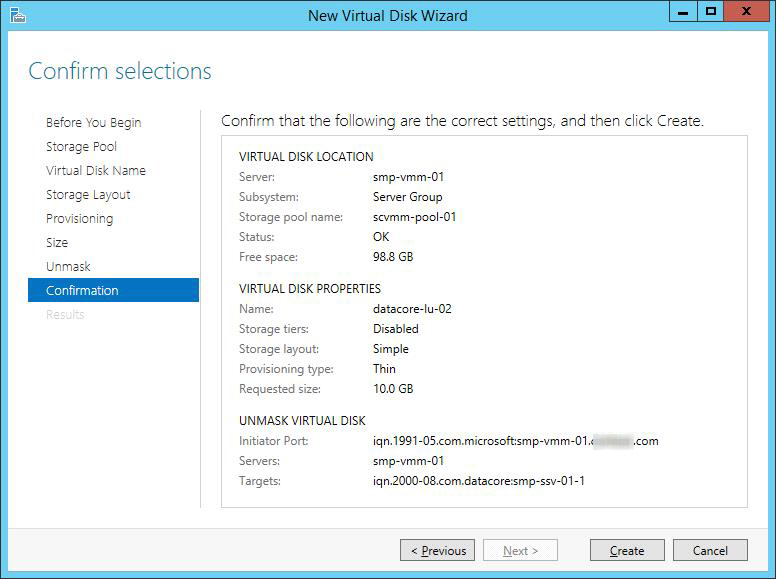
3 In the New
Virtual Disk Wizard, follow the steps to create a virtual disk.
![]()
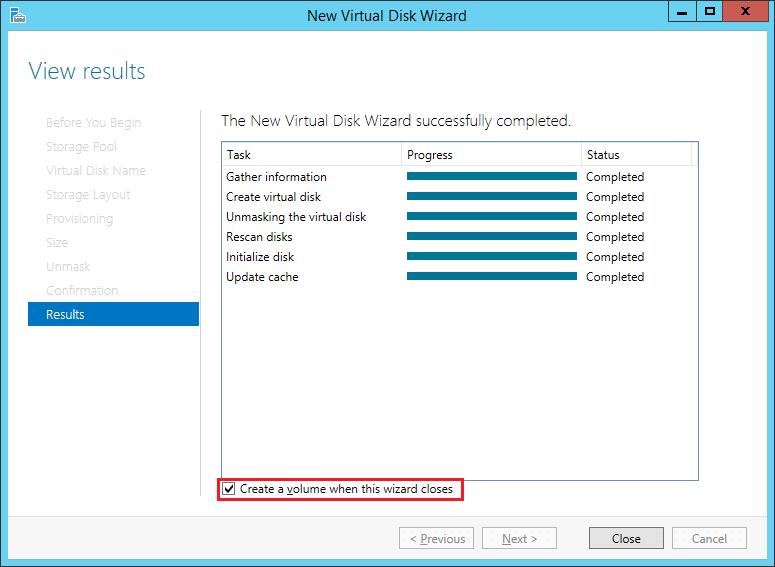
4 Ensure that the check
box Create a volume when this wizard
closes is selected and click Close.
![]()
This process creates a SANsymphony
virtual
disk based on the selected virtual disk template. The volume from the
File and Storage Services perspective is the storage that is visible to
the operating system and application.
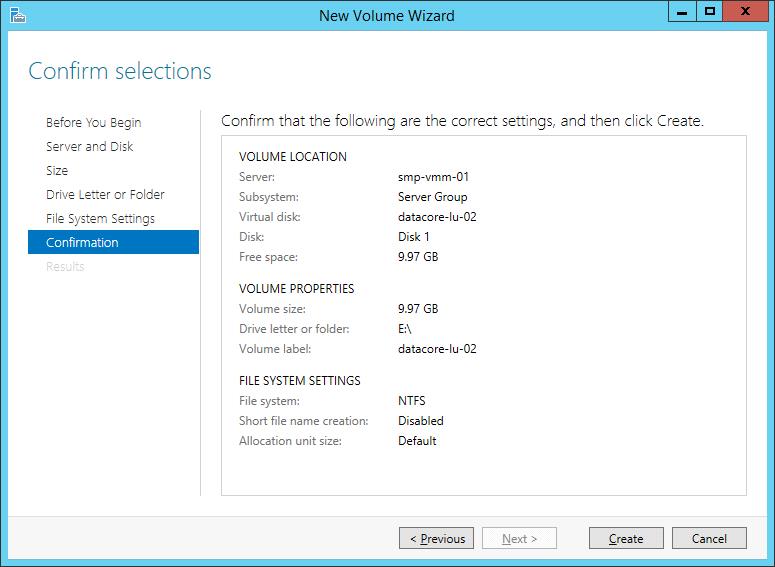
5 In the New
Volume Wizard, follow the steps to create a volume. ![]()
In order to access a virtual hard disk from the SCVMM Library Server and create a virtual machine template, the volume should be shared for the SCVMM Library Server. For other cases, sharing the volume may be optional.
To share the volume:
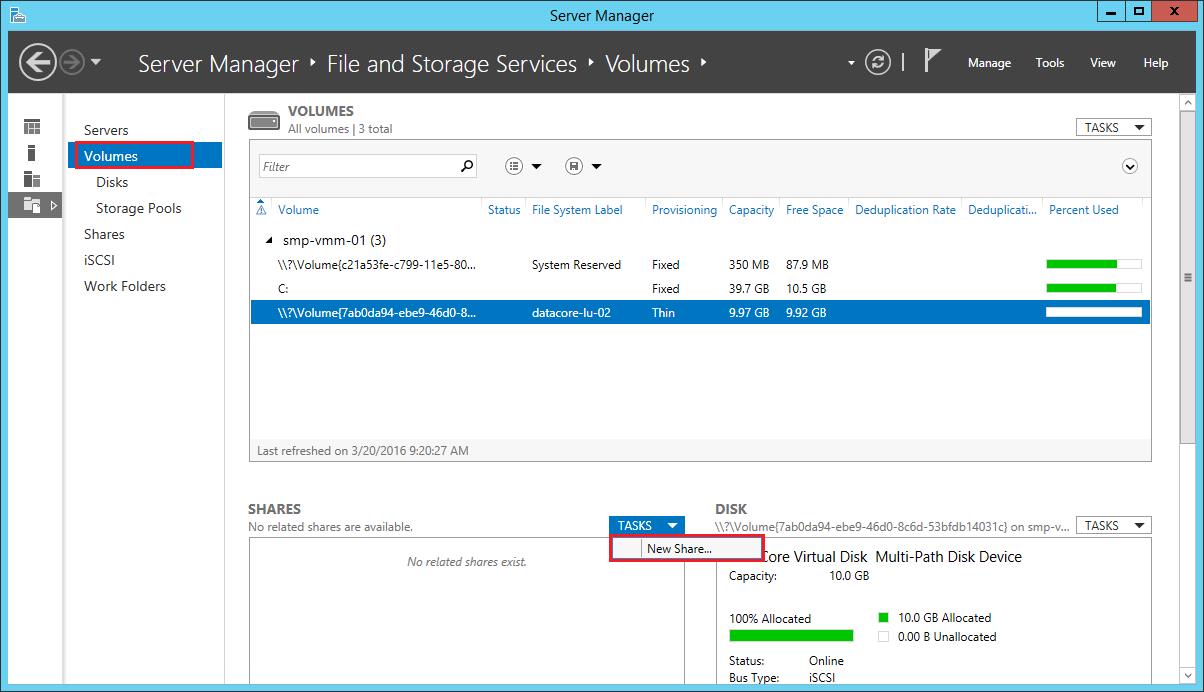
1 Open File and Storage Services in Server Manager and select Volumes.
2 In the
Shares
box, select
New
Share under
Tasks. ![]()
3 In
the New Share Wizard, verify the
volume location and click Next.
![]()
By default, the location of the file share will be a new folder under the
\Shares directory on the volume.
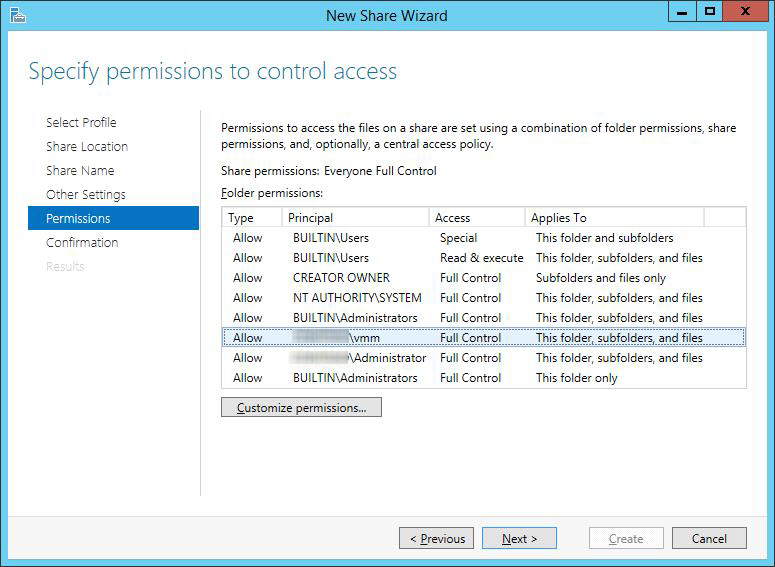
4 Customize
permissions on the share to allow access for the SCVMM Library Server.
![]()
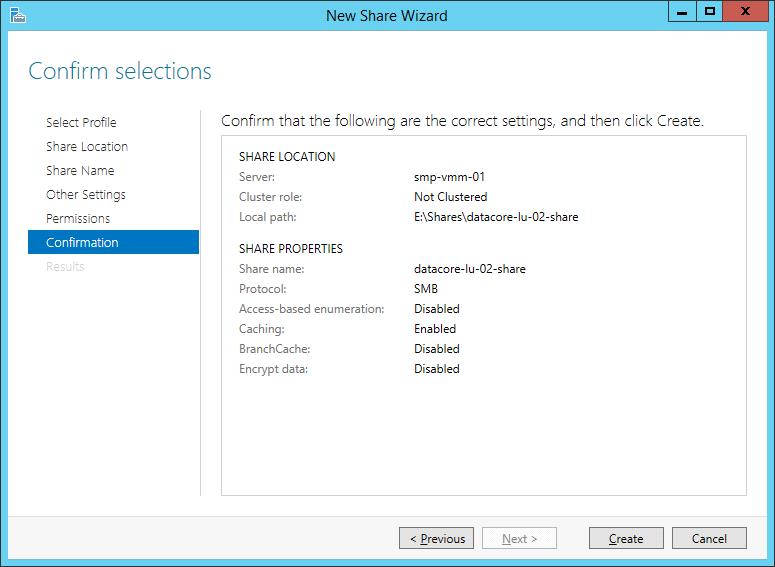
5 Follow
the steps in the wizard to create a file share. ![]()
(This file share will be added later to the SCVMM Library Server for SAN
Copy-Capable virtual machine templates.)
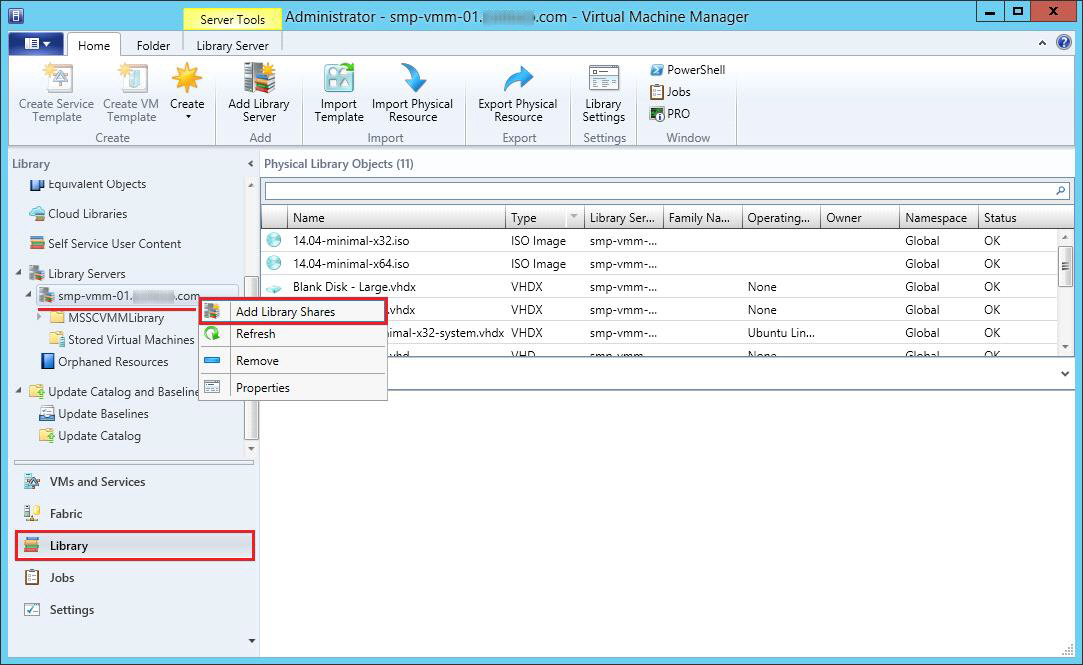
6 In
SCVMM, open the Library Servers
in the Library workspace, then
right-click the library server to which to add the share and select Add Library Shares from the context
menu. ![]()
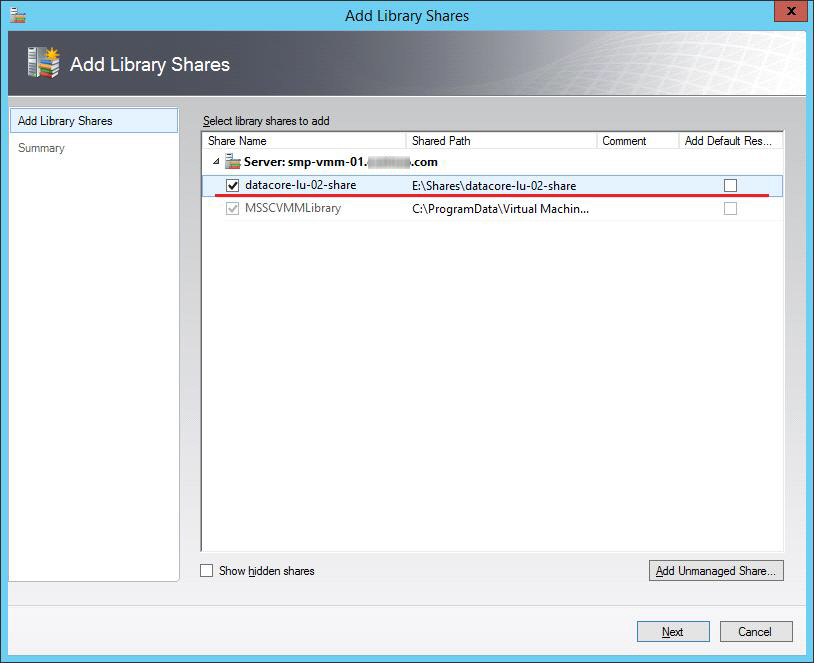
7 In
the Add Library Shares dialog
box, select the check box next to the share representing the SANsymphony virtual disk
and click Next. ![]()
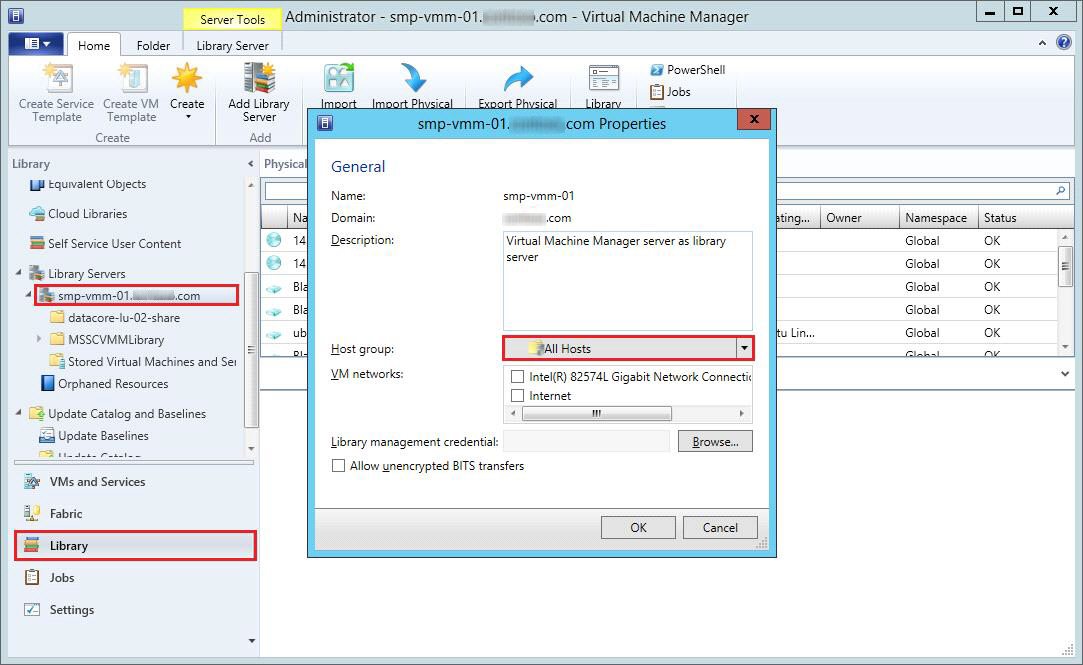
8 In
the Properties for the Library
Server, ensure that the Library Server has All
Hosts selected for the Host group.
![]()
Virtual machine templates provides an efficient way to deploy standardized virtual machines according to the organization policies and compliance criteria. The ability to create a copy of an operating system with predefined hardware and guest operating system profile settings, and then provision that copy throughout the infrastructure enables the efficiencies, availability, and performance offered by intelligent storage subsystems.
SCVMM has the ability to create both network copy and SAN copy-capable virtual machine templates. SAN copy-capable implies the use of the SAN Subsystem to provision the target virtual machine through a process known as rapid virtual machine provisioning. For more information on rapid virtual machine provisioning, see https://technet.microsoft.com/en-us/library/gg610594.aspx.
To create a SAN copy-capable template from a SAN copy-capable virtual hard disk:
1 After a logical
unit is added to the SCVMM Library Server as a library share, copy the
virtual hard disk to use to the library share. ![]()
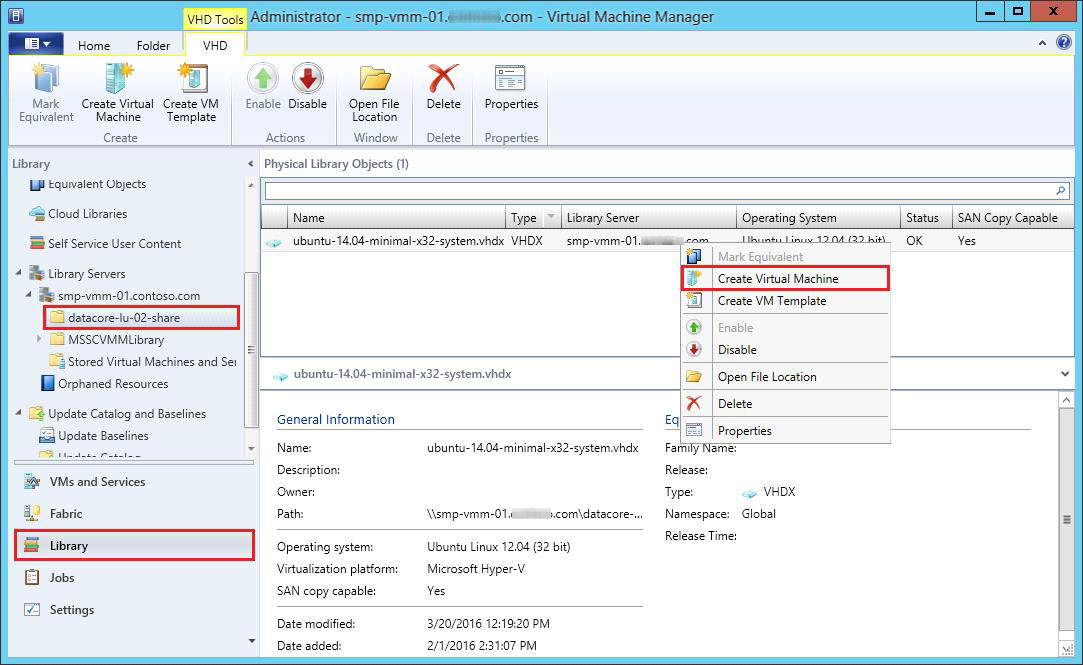
2 In
SCVMM, open the Library Servers
in the Library
workspace, select the library
share, then right-click the virtual hard disk and select Create Virtual
Machine from the context
menu. ![]()
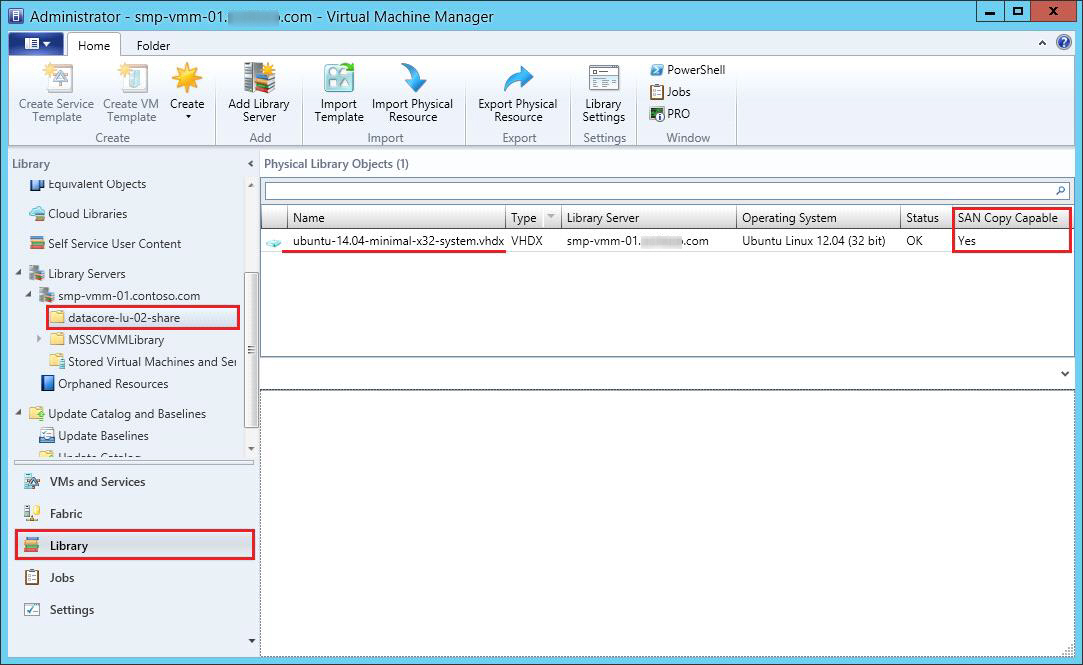
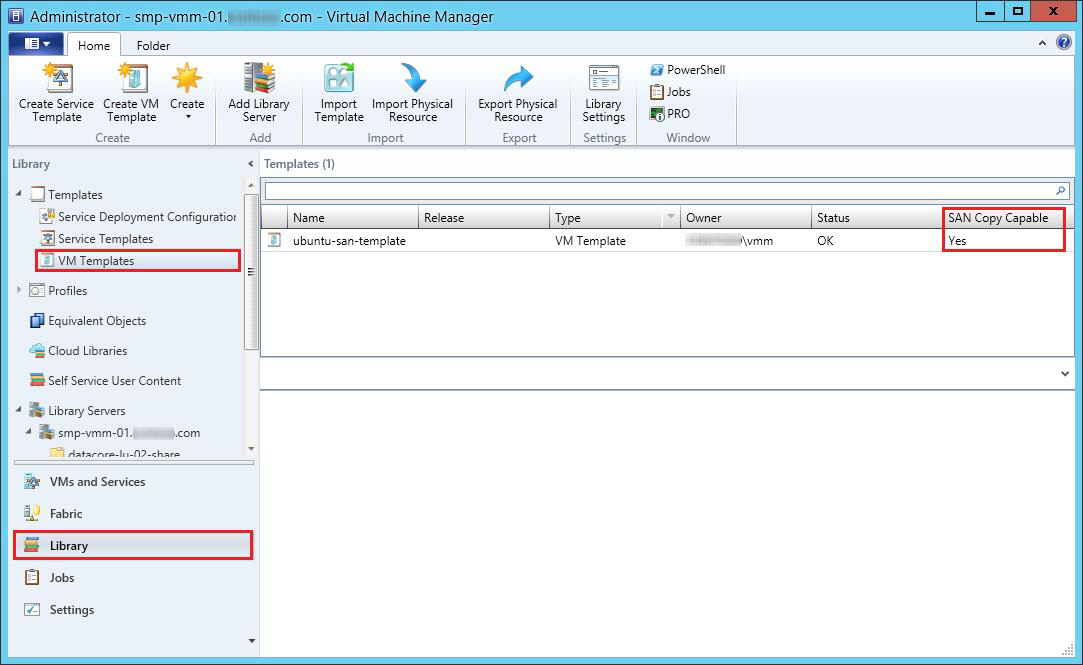
3 Follow
the steps in the wizard to create a SAN copy-capable template. After the
template is created, view the template in the Library workspace Templates > VM Templates. ![]()
When a virtual hard disk (.vhd or .vhdx) for a virtual machine template is residing on a SANsymphony virtual disk, SCVMM identifies the template as SAN copy-capable. Virtual machines templates that are SAN copy-capable will use the SAN transfer method as opposed to network transfer improving performance and efficiency. On a SANsymphony storage array, the SAN transfer method will communicate through the DataCore SMP to create a clone of the SANsymphony virtual disk.
To create a virtual machine through rapid provisioning:
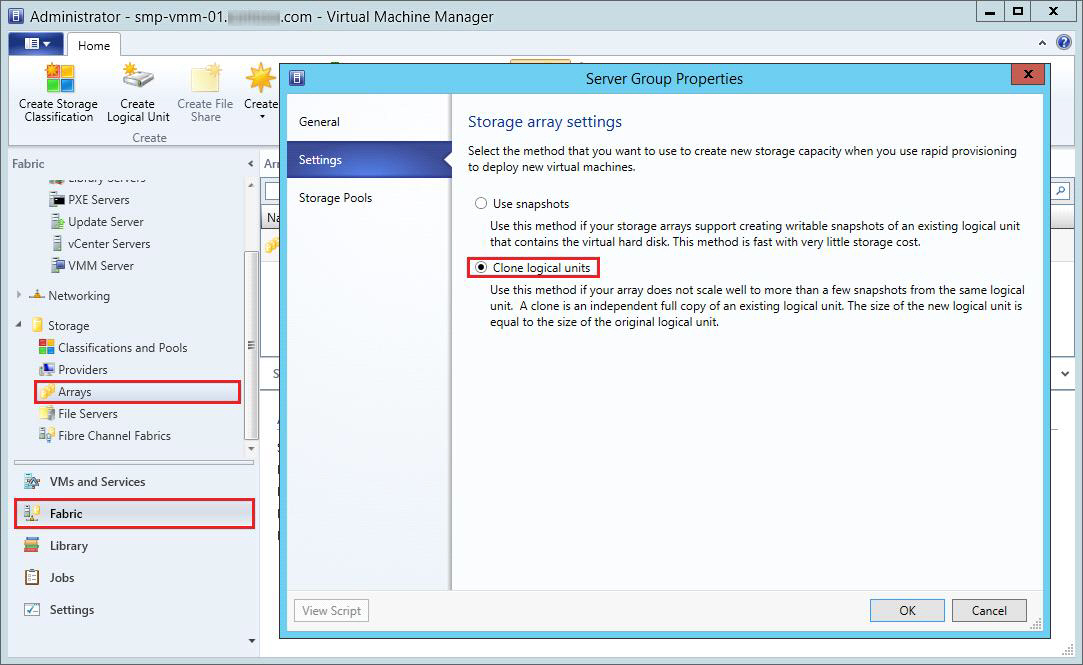
1 Navigate to the Fabric workspace, expand the Storage node, select Arrays.
2 In the Arrays area, right-click on the SANsymphony storage array that is intended to store the virtual machines and select Properties.
3 In
the Properties dialog box, under Settings, ensure that the provisioning
method for the storage array is set to Clone
logical units. ![]()
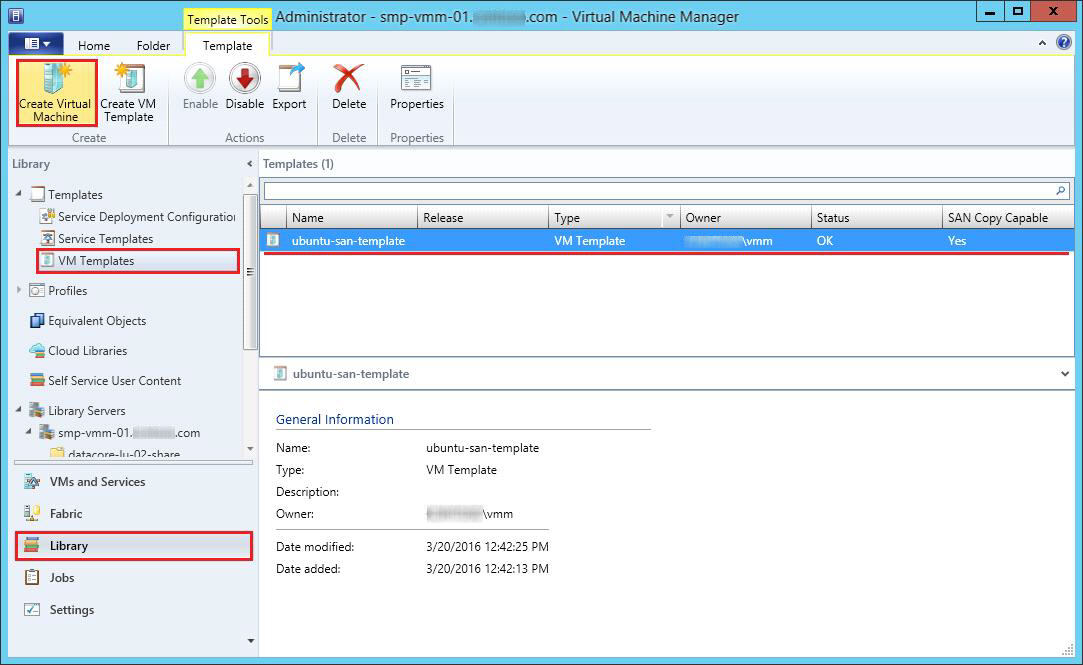
4 Navigate to the VM Templates. Select the SAN copy-capable
template and click Create Virtual Machine
in the Template Ribbon. ![]()
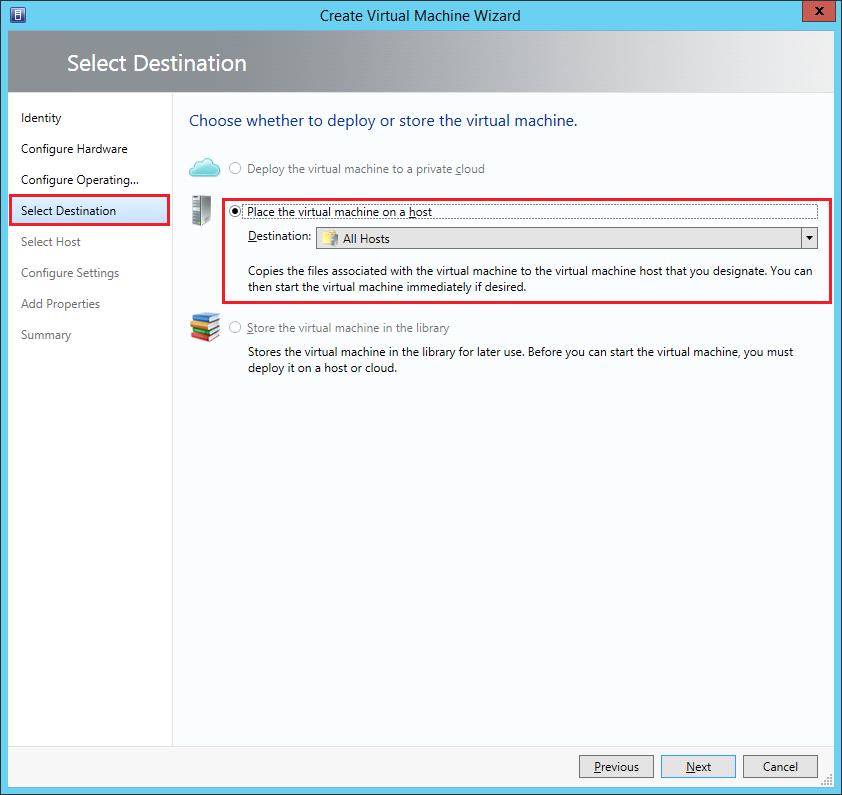
5 Follow the steps in
the wizard to complete the virtual machine creation. In Select
Destination, select Place the
virtual machine on a host and choose All
Hosts. ![]()
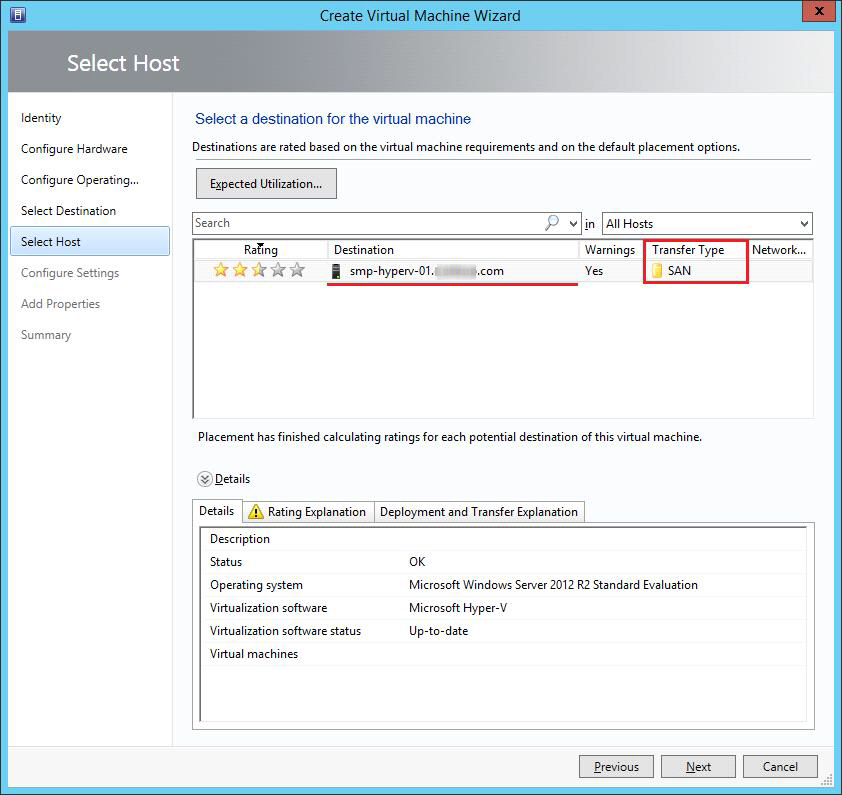
6 In Select
Host, ensure the Transfer Type is SAN.
![]()
7 When a virtual machine
is rapidly deployed using SAN copy, a clone of the SANsymphony
virtual disk is created that belongs to the SAN copy-capable virtual machine
template for the virtual machine being deployed. ![]()
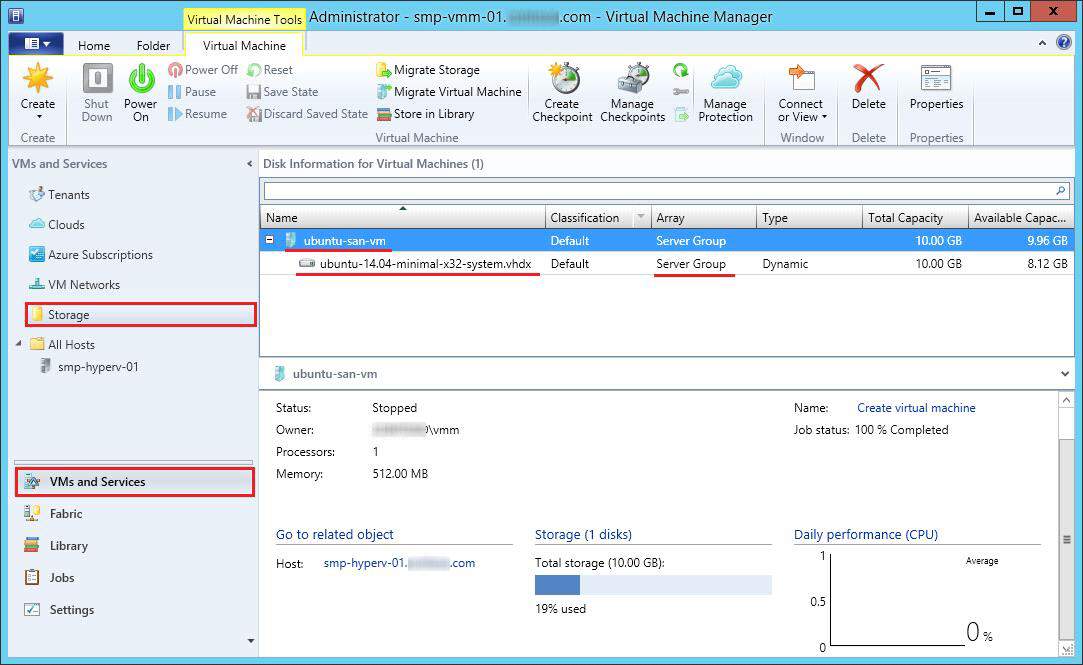
8 The rapidly provisioned
virtual disk is displayed in the Storage
node under VMs and Services. ![]()