Creating 3-Copy Virtual Disks
3-copy virtual disks can be created in the following ways:
- Host context: Use the Create Virtual Disk operation to create and serve a virtual disk with a redundancy level of three. This creates three data copies of the virtual disk. See Quickly Creating and Serving Virtual Disks for instructions.
- Create Virtual Disk wizard: Use the wizard to create a mirrored virtual disk, with 2 data copies, and add another mirror. See Creating a Virtual Disk from the Wizard and Adding Mirrors for instructions.
- Create Another operation: Use this operation to create more virtual disks using a 3-copy virtual disk as the basis. See Creating Virtual Disks Using Another as a Model for instructions.
Storage Sources
A 3-copy virtual disk has three storage sources:
-
Parent - Host Access = Read/Write
-
Mirror - Host Access = Read/Write
-
Child - Host Access = Not Allowed
The virtual disk will appear in the DataCore Servers panel under each server that is included as a storage source. Storage source details are displayed in the Virtual Disk Details page under the Info tab and in the Virtual Disks list under the Virtual Disk Summary. When the parent or mirror storage source is offline, and demoted to being the child source by automatic self-healing, it will remain as a child even when brought back online.
- A multi-copy virtual disk has front-end paths between the host and all storage sources. However, host access is available to no more than two DataCore Servers at a time. Storage sources that are accessible to the host or are capable of being accessible to the host (if not served) are considered "active" storage sources. The storage source that has host access disabled is considered an "inactive" storage source. Host access may change among the storage sources in the virtual disk to maintain high availability as various failure conditions or operations are handled.
- Automatic self-healing is enabled by default. See Automatic Self-Healing for more information.
- All storage sources in a multi-copy virtual disk are displayed in the Virtual Disk Details page>Info tab and in the Summary when the virtual disk is selected in the Virtual Disk List.
- A Shared Multi-port Array license is not required for dynamic data resiliency, nor are shared pools. Dynamic data resiliency is not supported for dual virtual disks.
Configure 3-Way Member Roles for 3-Way Virtual Disks
The Configure 3-Way Member Roles feature allows you to adjust the roles of logical disks in a 3-Way Virtual Disk, including operations like Demote and Switch Parent. Configuring roles is crucial for ensuring optimal performance, data redundancy, and high availability. By setting fixed roles—First Server (Parent), Second Server (Mirror), and Backup Server (Child)—you can avoid unexpected changes, manage failovers more efficiently, enhance system reliability, and minimize downtime. This helps balance I/O loads and optimize resource utilization within the storage infrastructure.
- For easy access predictability, each virtual disk copy is assigned a designated role (e.g., Parent, Mirror, Backup), with host paths configured accordingly. ALUA (Asymmetric Logical Unit Access) ensures consistent path roles as long as all three copies are online. In case of an outage, a predefined failover strategy is in place to ensure reliable recovery, minimizing downtime and eliminating any uncertainty during the process.
-
Ensure the 3-way virtual disk is in a healthy state before proceeding with the role change operation. The virtual disk should be online, synchronized (with mirror and backup in sync), and all paths should be up before you change member roles. (Additionally, verify that all servers in the 3-way set can properly access each others virtual disks. If any server lacks the required connectivity or if paths are inaccessible, the promoted paths may not function correctly, potentially affecting the success of the role change operation).
- Member role change configuration is disabled if any of the following conditions have not been resolved or are still ongoing:
- Full or log recovery running.
- Full or log recovery pending.
- The Virtual Disk is Offline.
- Path Down.
- The Virtual Disk is moving.
- Only the Backup disk has failed (Degraded Capability).
- Redundancy failure.
- A role change operation is already in progress (e.g., if the role change is initiated via DataCore cmdlet, REST API, or another instance of the Management Console). A new role change cannot be performed until the existing operation is complete.
- The desired member roles are identical to the current roles of the 3-Way Virtual Disk.
- If any server (Parent, Mirror, or Backup) is in Maintenance Mode, changing the backup server’s role to parent or mirror is possible but not recommended. This can affect the active path and lead to a no-path fenced condition.
- The Configure 3-Way Member Roles operation is supported only for 3-Way Virtual Disks.
- Configuring 3-Way Member Roles may cause a temporary loss of high availability (e.g., paths down) during the role change process. This could trigger Self-Healing, which involves log recovery without affecting data integrity. Only the logical disks within the 3-Way Virtual Disk and the involved servers (First, Second, and Backup) will be impacted.
Steps to Configure 3-Way Member Roles for a 3-Way Virtual Disk
-
In the DataCore Management Console, click "Virtual Disks" from the ribbon.
(Alternatively, you can navigate to the list of 3-Way Virtual Disks by using the DataCore Servers panel, Disk Pools, Server Ports, or Host Panel).

- Select the 3-Way Virtual Disk whose logical disk roles you wish to modify.
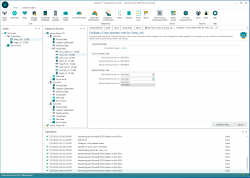
- Right-click on the selected 3-Way Virtual Disk and select Configure 3-Way Member Roles from the context menu.
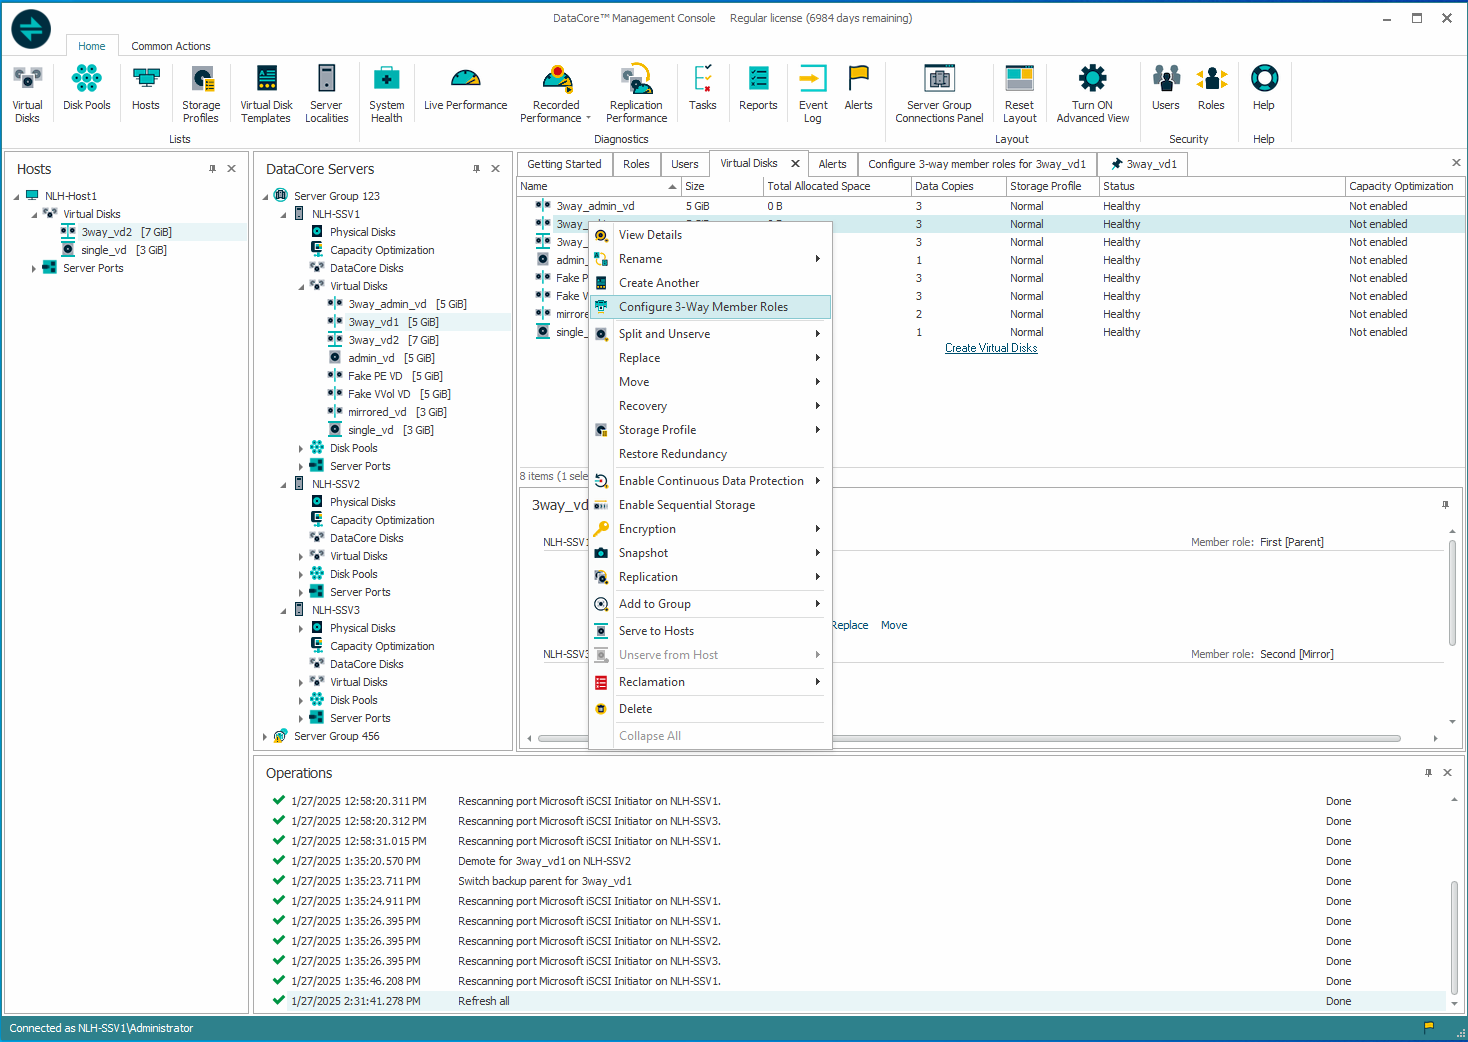
- The Configure Member Roles for 3-Way Virtual Disk tab will appear, displaying the current member roles (First, Second, Backup) for the selected virtual disk.
- Select the Desired member roles for each disk (First, Second, or Backup). For example, you can interchange the roles as follows:
- Set First Logical Disk as the Backup disk.
- Set Second Logical Disk as the First disk.
- Set Backup Logical Disk as the Second disk.
- Review the role changes and click the Configure Roles button.
- A confirmation prompt will appear. Read the message carefully, then click Yes to proceed with the operation.
- Allow the system time to synchronize the data and update the roles. The role change configuration will be disabled until this operation is fully completed.
- After the operation is completed, the member roles will reflect the desired configuration.
- You can check the status of each virtual disk in the Virtual Disk Details section or the Info tab once the role change operation is complete and the desired roles have been updated. Ensure that the virtual disks are in a healthy state (i.e., not in a failed state or undergoing any ongoing operations such as recovery, synchronization, or migration) before initiating another role change operation.